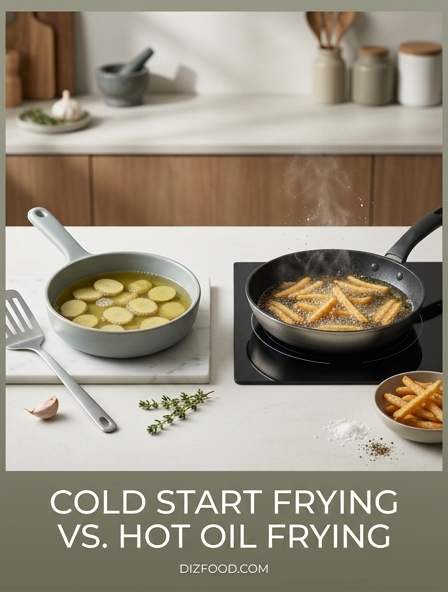
Achieving the ultimate crunch in your kitchen often boils down to a fundamental choice: do you plunge your ingredients into a shimmering pool of preheated oil or let them rise gradually with the heat? Cold start frying is a culinary game-changer for dense items like thick-cut potatoes, allowing for deep interior cooking and moisture evaporation without scorching the exterior, while traditional hot oil frying remains the gold standard for instant searing and creating that iconic, airy crust on battered proteins. Whether you are chasing a shatteringly crisp French fry or a tender, juicy schnitzel, understanding how these thermal dynamics affect oil absorption and surface tension is the secret to mastering texture and elevating your fried dishes from greasy to gourmet.
| Feature | Cold Start Frying | Hot Oil Frying (Standard) |
|---|---|---|
| Ideal For | Dense foods (Potatoes, Chicken Thighs) | Battered items, Thin cuts, Doughnuts |
| Starting Temp | Room Temperature (approx. 70°F) | Preheated (350°F - 375°F) |
| Oil Absorption | Low (due to steady moisture release) | Variable (High if temp drops too fast) |
| Surface Texture | Hard, uniform, "glass-like" crunch | Light, porous, airy, and blistered |
| Internal Finish | Fully tender and creamier consistency | Quick sear; risks raw center in thick cuts |
| Chef's Effort | Hands-off; less splatter risk | High; requires constant temp monitoring |
Defining Cold Start Frying and Hot Oil Methods
Frying is a fundamental culinary technique, yet it is often misunderstood as a monolithic process. The traditional hot oil method involves preheating a significant quantity of oil to a specific temperature, typically between 350°F and 375°F, before submerging the food. This creates an immediate thermal shock, searing the exterior of the ingredient and trapping moisture inside. It is the gold standard for battered foods and quick-cooking proteins where a distinct contrast between a crisp shell and a tender interior is desired.
In contrast, the cold start frying method-often associated with "pommes frites" or certain poultry preparations-defies conventional wisdom. In this technique, the ingredients are placed in a pan and covered with room-temperature oil. The heat is then turned on, allowing the oil and the food to rise in temperature together. This gradual ascent changes the way heat penetrates the food, leading to a different structural outcome. While hot oil relies on speed and high-intensity energy transfer, cold start frying is a marathon that prioritizes even cooking and internal rendering.
- Hot Oil: Requires a thermometer; focuses on instant crust formation and minimal oil penetration through steam pressure.
- Cold Start: Requires patience; focuses on steady moisture evaporation and internal structural changes before the browning begins.
The Science of Heat Transfer in Frying
Heat transfer in frying occurs primarily through convection and conduction. When food enters hot oil, the surface moisture vaporizes instantly, creating a "steam barrier" that prevents the oil from soaking into the food while simultaneously transferring heat into the core. This is why bubbles form vigorously in hot oil frying; those bubbles are actually steam escaping the ingredient. The Maillard reaction occurs rapidly on the surface as sugars and proteins react under high heat, creating the brown, savory crust we associate with fried delicacies.
Cold start frying operates on a different thermodynamic principle. Because the oil heats slowly, the food passes through various temperature zones over a longer period. This allows the internal starches or fats to undergo transformations before the exterior hardens. For example, in a potato, the starch granules swell and gelatinize gradually as the oil moves from 100°F to 212°F. Once the water begins to boil off at the boiling point, the oil continues to rise in temperature to brown the exterior. This method ensures that the food is cooked thoroughly to the center without the risk of the outside burning before the inside is done, providing a more uniform thermal gradient throughout the ingredient.
Achieving the Perfect Crunch with Cold Starts
The quest for the ultimate crunch often leads chefs to the cold start method, particularly for starchy vegetables. When a potato is started in cold oil, the extended time in the warming oil allows the surface to dehydrate more significantly than it would in a quick hot-fry. This dehydration creates a thicker, more robust crust that is structurally different from the thin, brittle shell produced by traditional methods. As the moisture leaves the cells slowly, the remaining starch structures consolidate into a glass-like layer that remains crispy for a longer duration after leaving the pan.
To achieve this specific texture, the process must be managed with care to ensure the oil eventually reaches a high enough temperature to finish the browning process. If the temperature stalls too low, the food will be pale and oily. However, if managed correctly, the results are remarkably consistent. The following steps highlight the typical progression of a cold start crunch:
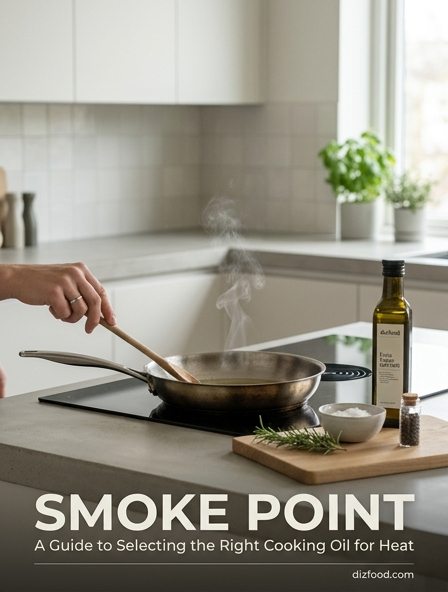
- Submerge the ingredients completely in high-smoke-point oil at room temperature.
- Apply medium-high heat to initiate the rendering and moisture evaporation phases.
- Wait for the vigorous bubbling to subside, signaling that most surface moisture has escaped.
- Increase the heat slightly at the end to achieve a deep golden hue and a rigid exterior.
Oil Absorption Differences Between Frying Techniques
A common myth in the kitchen is that starting food in cold oil will result in a greasy, oil-logged product. However, scientific testing has shown that if the oil is eventually brought to a high temperature, the oil absorption is often comparable to, or even lower than, traditional hot frying. In hot frying, oil absorption happens primarily during the cooling phase; as the food cools and steam stops escaping, a vacuum effect can pull surface oil into the crust. Because cold-start fried foods often have a thicker, more sealed exterior, they can sometimes resist this vacuum effect more effectively.
The key variable in oil absorption is the final temperature of the oil when the food is removed. If the food is pulled out while the oil is still lukewarm, it will indeed be greasy. If the oil reaches 350°F by the end of the process, the internal pressure of the remaining steam keeps the oil out. The table below summarizes the absorption characteristics based on the technique used.
| Feature | Hot Oil Frying | Cold Start Frying |
|---|---|---|
| Initial Absorption | Low (due to steam barrier) | Moderate (minimal barrier) |
| Final Absorption | Moderate (during cooling) | Low to Moderate (denser crust) |
| Crust Porosity | High (thin and brittle) | Low (thick and sealed) |
The Best Foods for Cold Start Frying
While the hot oil method is versatile, the cold start technique excels with specific ingredients that benefit from rendering or internal starch conversion. High-starch potatoes are the primary candidate; the cold start method produces fries that are creamy on the inside and exceptionally crunchy on the outside without the need for the traditional double-fry process. Poultry, specifically chicken wings and duck breasts, also benefits because the slow rise in temperature allows the subcutaneous fat to render out completely, resulting in skin that is thin and crackling rather than rubbery.
Aromatic ingredients and certain dense vegetables are also well-suited for this approach. Starting these items in cold oil allows for a more controlled infusion of flavor into the oil itself, which is useful for garnishes or flavored bases. Below are the most successful candidates for the cold start method:
- Russet Potatoes: Perfect for single-stage French fries.
- Chicken Wings: Renders fat for a "glass-like" skin texture.
- Garlic and Shallots: Prevents burning while ensuring even browning and crisping.
- Bacon: Starting in a cold pan prevents curling and ensures the fat is fully crispy.
- Dense Root Vegetables: Such as parsnips or carrots, which need time to soften before they brown.
Comparing Texture and Flavor Profiles
The sensory experience of fried food is dictated by the interaction between the crust and the core. Hot oil frying creates a "shattering" texture. The crust is usually thin and highly aerated, especially when a leavened batter (like beer batter) is used. The flavor is often dominated by the Maillard reaction on the very surface, leaving the interior flavor relatively fresh and unchanged. This is ideal for delicate fish or vegetables where you want the natural flavor of the ingredient to remain the star of the show, protected by a salty, savory shell.
Cold start frying produces a "crunch" rather than a "shatter." The texture is more substantial and toothsome, often described as a hard-shell crunch. Because the food spends more time in the oil as it heats, there is a slight "confit" effect happening internally. This leads to a deeper, more nutty flavor profile as the sugars throughout the ingredient, not just on the surface, have more time to interact with the heat. For something like a potato or a chicken wing, this results in a more complex, roasted flavor that permeates the entire piece of food rather than just sitting on the surface.
Safety and Splatter Control in the Kitchen
Safety is a significant concern when dealing with high-temperature fats. The hot oil method is inherently more volatile. When moisture-rich food is dropped into 375°F oil, the immediate vaporization of water can cause the oil to bubble over or "spit" violently. This increases the risk of skin burns and grease fires if the oil contacts an open flame. Cooks must be extremely careful to dry their food thoroughly and use specialized tools like spiders or slotted spoons to lower ingredients into the pot gently.
Cold start frying is considerably safer for the home cook. Because the oil and the food heat up together, the release of moisture is gradual. There is no sudden "boil-over" effect, and the splattering is much more manageable and predictable. This makes it an excellent technique for those who are intimidated by deep-frying. Additionally, because you aren't managing a pot of already-boiling oil, the ambient temperature of the kitchen remains lower for longer. However, caution is still required once the oil reaches its peak temperature, as it is just as hot as traditional frying oil at the end of the cycle.
- Always use a pot with high sides to contain potential bubbles.
- Keep a lid or a splatter screen nearby, though cold starts rarely require them early on.
- Never leave any frying operation unattended, regardless of the starting temperature.
Efficiency and Preheating Time Comparisons
When considering kitchen efficiency, the two methods offer different advantages. Hot oil frying requires a significant lead time for preheating. Depending on the volume of oil and the heat source, it can take 10 to 20 minutes to reach the target temperature. This time is essentially "dead time" where no cooking is happening. However, once the oil is hot, the actual cooking time for the food is very short, making it the preferred method for high-volume service in restaurants where turnover is key.
Cold start frying eliminates the preheating phase entirely, as the food goes in immediately. While the total "stove time" for the food is longer, the total "process time" from cabinet to plate is often shorter for a single batch. This makes it highly efficient for home cooks who want to prepare a side of fries without waiting for a large vat of oil to come to temperature. Furthermore, cold start frying generally uses less oil because it is often done in a shallower pan or skillet rather than a deep stockpot. This results in less wasted oil and an easier cleanup process after the meal.
| Phase | Hot Oil Frying | Cold Start Frying |
|---|---|---|
| Preheat Time | 15-20 Minutes | 0 Minutes |
| Cooking Time | 3-7 Minutes | 15-25 Minutes |
| Oil Volume | High | Low to Moderate |
Common Mistakes in Cold and Hot Frying
Success in frying depends on avoiding several common pitfalls that can ruin the texture and flavor of the food. In hot oil frying, the most frequent error is crowding the pan. Adding too much cold food at once causes the oil temperature to plummet, leading to soggy, oil-soaked results because the steam barrier cannot be maintained. Another mistake is failing to use a thermometer; relying on "eyeballing" the oil can lead to either burnt exteriors or undercooked centers.
In cold start frying, the mistakes are different. The most common error is using battered or breaded foods. Because the oil heats slowly, the batter will disintegrate or slide off the food before it has a chance to set, resulting in a greasy mess. Additionally, cooks often fail to stir the food during the early stages of a cold start. As the oil heats, the food sitting on the bottom of the pan can stick or develop "hot spots" where it browns unevenly. To ensure success, follow these guidelines:
- For hot frying, always fry in small batches and allow the oil to return to temperature between sets.
- For cold starts, only use naked or floured foods; avoid wet batters entirely.
- Stir cold-start ingredients gently once the oil begins to simmer to ensure they remain separated.
- Always drain fried foods on a wire rack rather than paper towels to maintain crispness.
Choosing the Right Method for Your Recipe
Deciding between cold start and hot oil frying depends entirely on the desired outcome and the nature of the ingredient. If you are preparing a dish that relies on a delicate, crispy batter-such as Tempura or Fish and Chips-hot oil is your only option. The instant heat is required to puff the batter and cook the interior quickly enough that the coating doesn't become heavy. Hot frying is also the superior choice for frozen foods, which need the intense heat to overcome their internal ice crystals without becoming waterlogged.
Conversely, the cold start method should be your go-to for "naked" starches and fatty proteins. If you want French fries that stay crunchy for an hour or chicken wings that have rendered out every bit of flab, the cold start provides a level of control and structural integrity that hot oil cannot match. It is a more forgiving technique that rewards patience with a superior, localized crunch. By understanding the science and mechanics of both methods, a cook can manipulate heat to achieve the perfect texture for any ingredient in the kitchen. Consider the moisture content, the presence of skin or fat, and your available time before choosing which path to take.


Comments