Optimal Oil Temperature Maintenance
Maintaining the correct oil temperature is the primary defense against excessive oil absorption. When food is submerged in hot oil, typically between 350°F and 375°F (175°C to 190°C), the moisture inside the food instantly turns to steam. This steam creates internal pressure that pushes outward, effectively acting as a barrier that prevents oil from entering the food's cellular structure. If the temperature drops below this critical threshold, the pressure subsides, and the oil begins to seep into the ingredient, resulting in a greasy, heavy texture.
- 325°F - 350°F: Low range, suitable for larger items requiring longer cook times.
- 350°F - 375°F: Standard range for most appetizers and small proteins.
- 375°F - 400°F: High range for flash-frying or very thin items.
Using a clip-on thermometer is essential for accuracy. Chefs must wait for the oil to recover its temperature between batches. This "recovery time" ensures that each subsequent addition of food is met with the same outward steam pressure, keeping the finished product light and crisp rather than oil-laden.
Surface Moisture Removal Techniques
Surface moisture is the enemy of a crisp, low-oil finish. Any water present on the exterior of an ingredient must evaporate before the Maillard reaction can begin and a protective crust can form. Excessive moisture causes the oil temperature to plummet and leads to "boiling" rather than frying, which significantly increases the time the food spends in the oil. To minimize absorption, ingredients should be prepared through a series of drying steps.
- Thoroughly pat proteins and vegetables dry with lint-free paper towels.
- Allow items like cut potatoes to air-dry on a wire rack for 30 minutes.
- Use a light dusting of flour or cornstarch to absorb residual microscopic moisture.
- Ensure frozen items are free of ice crystals before frying.
By removing as much surface liquid as possible, the oil can immediately begin sealing the exterior. This rapid dehydration creates a "parching" effect on the surface, forming a structural wall that limits the amount of fat that can migrate into the interior of the food during the cooking process.
High Starch Coating Strategies
The choice of coating significantly dictates the final oil content of fried foods. While wheat flour is traditional, high-starch alternatives like cornstarch, potato starch, or rice flour offer superior resistance to oil penetration. These starches contain higher levels of amylose, which creates a more robust, brittle film when exposed to heat. This film acts as a mechanical barrier, preventing oil from soaking into the substrate while simultaneously providing a more satisfying crunch.
| Starch Type | Amylose Content | Oil Resistance |
|---|---|---|
| Wheat Flour | Medium | Moderate |
| Cornstarch | High | High |
| Rice Flour | High | Excellent |
| Potato Starch | Medium-High | High |
Utilizing a blend of these starches allows for a customized texture. For example, adding rice flour to a batter reduces the overall gluten development, which otherwise tends to hold onto oil. The goal is to create a shell that dehydrates quickly and stays rigid, as softer coatings are naturally more porous and absorbent.
Carbonation and Batter Aeration
Integrating aeration into frying batters is a sophisticated method for reducing oil weight. When a batter is infused with bubbles-via seltzer water, beer, or baking soda-the physical density of the coating decreases. These air pockets expand rapidly in the heat, creating a large surface area that dries out almost instantly. This rapid expansion ensures the batter sets before the oil has an opportunity to saturate the mixture.
- Carbon dioxide in beer or club soda provides immediate lift.
- Whisking egg whites to soft peaks creates a delicate, airy foam.
- Sifting dry ingredients prevents dense clumps that trap oil.
Aerated batters also benefit from the insulating properties of the air bubbles. They protect the delicate food inside from overcooking while the exterior becomes exceptionally thin and crisp. Because the batter is less dense, there is physically less material available to hold onto the oil, resulting in a significantly lower calorie count and a cleaner mouthfeel compared to heavy, dense batters.
Acidity and Alcohol Integration
The chemistry of the liquid components in a batter plays a vital role in oil management. Incorporating alcohol, such as vodka or high-proof spirits, is an effective strategy because alcohol evaporates at a much lower temperature (173°F) than water (212°F). This accelerated evaporation means the batter dries and hardens faster, shortening the window of time that oil can penetrate the surface. Furthermore, alcohol inhibits the development of gluten, preventing the batter from becoming "bready" and oil-absorbent.
Similarly, acidic components like vinegar or lemon juice can alter the pH of the batter. A slightly acidic environment helps to denature proteins more quickly, contributing to a faster "set" of the crust. This rapid transformation from a liquid state to a solid, crispy shell is the key to minimizing the total fat uptake. By leveraging the volatile nature of alcohol and the structural influence of acids, cooks can achieve a level of crispness that remains light and non-greasy long after the food has been removed from the fryer.
Managing Thermal Mass Stability
Thermal mass refers to the ability of the cooking vessel and the oil to maintain a consistent temperature when food is introduced. A common mistake is overloading the fryer, which causes a drastic drop in temperature, leading to heavy oil absorption. To combat this, one must manage the ratio of food to oil and choose the right equipment. Heavy-bottomed vessels, such as cast iron Dutch ovens, have high heat retention and provide better stability than thin stainless steel pans.
- Fry in small batches to ensure the oil remains within 10 degrees of the target.
- Use a large volume of oil relative to the food to act as a heat buffer.
- Allow the oil to return to the target temperature between every batch.
When the thermal mass is stable, the vigorous bubbling-representing steam leaving the food-remains constant. If the bubbling slows down significantly upon adding food, it indicates the temperature is too low, and the food is beginning to absorb oil like a sponge. Maintaining the "energy" of the oil is the most effective way to ensure a clean finish.
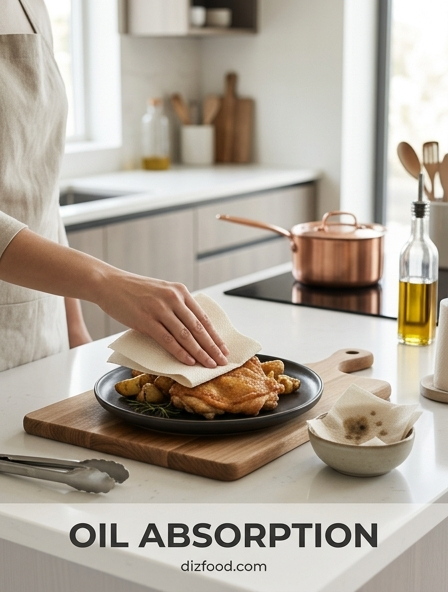
Effective Oil Drainage Procedures
Oil absorption does not stop the moment food leaves the fryer; in fact, much of the oil soakage occurs during the cooling phase. As the steam pressure inside the food drops, a vacuum effect can draw surface oil into the interior. Therefore, immediate and effective drainage is essential. Simply placing fried food on a flat plate is the worst option, as the food will sit in a pool of its own rendered fat and become soggy.
- Use a wire cooling rack set over a baking sheet to allow air circulation.
- Vigorously shake the frying basket or tongs to shed excess surface oil.
- Blot the top of the food with high-absorbency paper towels immediately.
- Maintain a warm environment for drainage to keep the oil fluid and mobile.
Gravity and airflow are the primary tools here. By elevating the food on a rack, you ensure that oil can drip away freely and that steam can escape from all sides. This prevents the bottom of the food from steaming itself into a soft, oil-receptive state, preserving the integrity of the crust.
The Science of Double Frying
Double frying is a technique used to achieve maximum crispness with minimum internal oiliness. The first fry is conducted at a lower temperature (around 300°F to 325°F) to cook the interior and establish a foundational structure. During this phase, the food loses a significant portion of its internal moisture. After a resting period, the food is fried a second time at a much higher temperature (375°F to 400°F).
| Fry Stage | Temperature | Primary Goal |
|---|---|---|
| First Fry | 300°F - 325°F | Internal cooking and moisture loss |
| Resting | Room Temp | Moisture migration to surface |
| Second Fry | 375°F - 400°F | Surface crisping and oil expulsion |
The second fry is particularly effective because the moisture that migrated to the surface during the rest period is flash-evaporated. This creates a secondary expansion of the crust, making it incredibly thin and hard. Because the second fry is brief, there is very little time for new oil to penetrate the already dehydrated and hardened exterior, resulting in a remarkably light product.
Selecting High Smoke Point Oils
The type of oil used impacts not only flavor but also the physical process of oil absorption. Oils with high smoke points, such as peanut, safflower, or refined avocado oil, are more chemically stable at frying temperatures. When an oil begins to break down or "smoke," its viscosity changes and it begins to form polar compounds. These compounds actually increase the oil's ability to "wet" or cling to the surface of the food, leading to higher absorption rates.
- Refined Peanut Oil: Excellent stability and neutral flavor.
- Canola Oil: Economical with a high smoke point (400°F).
- Rice Bran Oil: Contains oryzanol, which helps resist oxidation.
Old or degraded oil should always be avoided. As oil is reused, it accumulates impurities and broken-down fatty acids that lower the smoke point and increase the oil's tendency to soak into coatings. Using fresh, high-quality oil with a smoke point well above your target frying temperature ensures that the liquid remains thin and easily shed during the drainage process, keeping the food's fat content as low as possible.
Post Frying Aeration and Resting
The final stage of oil management occurs in the minutes following the removal of the food from the heat source. As fried items rest, the internal temperature continues to cook the center, and steam continues to escape. If this steam is trapped, it will condense back into water on the surface, softening the crust and allowing any residual surface oil to be absorbed into the previously crisp layers. Proper aeration during this resting phase is critical for maintaining structural integrity.
Resting should ideally occur in a single layer. Stacking fried foods creates a "sauna effect" where the heat from the bottom pieces steams the pieces above them. Furthermore, providing a slight incline or using a specialized draining rack helps utilize capillary action to pull oil away from the food. A brief rest of 2 to 3 minutes allows the starches in the crust to fully set and crystallize. This resting period, combined with active aeration, ensures that the final product is not only hot but has a dry, clean finish that is free from the heavy, oil-saturated characteristics of poorly executed frying.


Comments