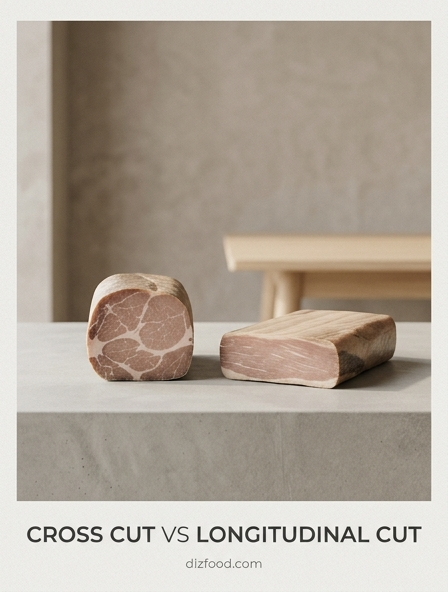
Unlock the hidden potential of your ingredients by mastering the nuance between cross-cutting and longitudinal slicing. Whether you're prepping crisp vegetables or tenderizing proteins, the direction of your blade dictates the final dining experience. A cross-cut, or slicing against the grain, severs tough fibers to create a tender mouthfeel and a rapid release of aromatic compounds. In contrast, a longitudinal cut follows the natural fibers, preserving the ingredient's structural integrity for a satisfying crunch and a more subtle flavor profile. Choosing the right technique isn't just about prep speed; it's about engineering the perfect balance of texture and taste to elevate every dish you create.
| Feature | Cross Cut (Against Grain) | Longitudinal Cut (With Grain) |
|---|---|---|
| Blade Direction | Perpendicular to the fibers/veins | Parallel to the fibers/veins |
| Cellular Impact | Ruptures cell walls extensively | Maintains cellular integrity |
| Resulting Texture | Tender, soft, and easy to chew | Firm, crisp, and holds structural snap |
| Flavor Profile | Intense, immediate aromatic release | Mild, controlled, and subtle flavor |
| Best Use Cases | Onions for soups, tough meats, ginger | Fajita peppers, slaw, salad garnishes |
| Cooking Stability | Breaks down and softens quickly | Retains shape under high heat |
Understanding Wood Grain and Fiber Orientation
To master the art of kitchen woodworking, from crafting bespoke cutting boards to installing butcher block countertops, one must first understand the biological composition of the material. Wood is essentially a bundle of long, cellulose fibers held together by a natural glue called lignin. These fibers run vertically up the trunk of the tree, creating what we identify as the "grain." In the context of a kitchen environment, where moisture and temperature fluctuations are constant, the orientation of these fibers dictates how a piece of wood will react to its surroundings.
Think of wood fibers as a pack of drinking straws bundled tightly together. The orientation of these straws determines the strength, porosity, and stability of the wood. When you look at the face of a cabinet door, you are usually seeing the long side of these "straws." When you look at the end of a board, you are seeing the open pores. Understanding this orientation is crucial because wood is anisotropic, meaning its physical properties change depending on the direction in which you measure or cut it. A longitudinal cut runs with the length of the fibers, while a cross cut severs them. Proper identification of grain direction ensures that kitchen tools and surfaces remain durable and aesthetically pleasing over years of heavy use.
Defining the Cross Cut for Beginners
A cross cut is defined as any cut made perpendicular to the direction of the wood grain. If you imagine the wood fibers as long threads, a cross cut is the act of slicing across those threads to shorten the board. In kitchen projects, this is most commonly performed when sizing a long plank of maple or walnut to the specific width needed for a kitchen island or when trimming a decorative molding to fit a corner. Because you are cutting through the toughest part of the fiber wall, this action requires a different mechanical approach than cutting parallel to the grain.
For beginners, the challenge of the cross cut lies in managing "tear-out." As the saw blade exits the wood, it can pull and splinter the unsupported fibers at the back of the board. This results in a jagged edge that is both unsightly and difficult to clean-a major drawback for food-preparation surfaces. To achieve a high-quality cross cut, tools with a higher tooth count are generally preferred. These teeth act like tiny knives, scoring the wood fibers before removing the waste. Whether you are using a miter saw or a specialized hand saw, the goal of a cross cut is to create a clean, square end that can be buttressed against another surface or left exposed as a decorative end-grain feature.
Mechanics of the Longitudinal Rip Cut
The longitudinal cut, frequently referred to in woodworking as a "rip cut," is the process of slicing a board along its length, moving parallel to the grain. While a cross cut shortens a piece of wood, a rip cut changes its width. In the kitchen, this is essential for "ripping" down wide slabs of oak to create uniform stiles and rails for cabinet doors. The mechanics here are fundamentally different; instead of severing tough fibers, the saw blade acts more like a chisel, wedging between the fibers and splitting them apart along their natural longitudinal lines.
Because there is less resistance when cutting with the grain, rip cuts can generally be performed faster than cross cuts. However, this ease of movement introduces its own set of risks. The saw blade has a tendency to follow the grain, which can cause the board to wander if not properly guided by a fence. Furthermore, internal stresses within the wood are often released during a rip cut. If a board was under tension, it might "pinch" the blade or "bow" outward as it is being cut. Understanding these mechanics allows a maker to anticipate the wood's movement, ensuring that the long edges of a kitchen tabletop remain straight and true for a seamless glue-up.
Comparing Saw Blade Tooth Configurations
The efficiency and cleanliness of a cut depend heavily on the geometry of the saw blade. Using a blade designed for ripping to perform a cross cut will result in severe splintering, while using a cross-cut blade for ripping may lead to overheating and even fire due to the lack of "gullet" space for sawdust removal. The following table highlights the primary differences between these configurations:
| Feature | Rip Blade | Cross-Cut Blade |
|---|---|---|
| Tooth Count | Low (24-30 TPI) | High (60-80 TPI) |
| Gullet Size | Large (for deep clearing) | Small (for fine finishing) |
| Tooth Grind | Flat Top (FTG) | Alternate Top Bevel (ATB) |
| Cutting Action | Chiseling/Splitting | Slicing/Shearing |
For those working on versatile kitchen projects, a "Combination Blade" is often used. These blades feature a mix of tooth styles, allowing the user to switch between longitudinal and cross-cutting without the downtime of a blade change, though they rarely provide the perfect finish of a dedicated task-specific blade.
When to Use a Cross Cut Saw
In the construction of kitchen furniture and cabinetry, the cross cut saw is the primary tool for achieving precise dimensions and clean joinery. You should reach for a cross cut saw-or a cross-cut blade on your power saw-whenever the integrity of the wood's end-face is paramount. For instance, when installing crown molding or baseboards in a kitchen, every joint is a cross cut. A clean, burr-free edge is required to ensure that the miters meet perfectly with no visible gaps for moisture or kitchen grease to penetrate.
Another strategic use for cross cutting is in the creation of end-grain cutting boards. These boards are prized by chefs because the knife blade slides between the severed fibers rather than cutting across them, which preserves both the board and the knife's edge. To make these, one must perform a series of cross cuts on laminated strips of wood. In this scenario, the cross cut defines the final working surface of the product. Whenever your goal is to reduce the length of a component or to prepare a surface that will be highly visible from the side, the cross cut is the mandatory choice for a professional finish.
Strategic Applications for Longitudinal Cutting
Longitudinal cutting is the backbone of kitchen cabinetry and large-scale surface preparation. When you are building a custom butcher block or a farmhouse-style kitchen table, you rarely find a single piece of wood wide enough to serve as the entire top. Instead, you must rip several narrower boards to a consistent width so they can be glued together. This process relies on the rip cut to produce a flat, straight edge that provides maximum surface area for the adhesive to bond. A successful longitudinal cut ensures that the resulting seam is virtually invisible and structurally sound.
Strategic ripping is also used to remove defects from a piece of timber. If a board has a large knot or a sapwood edge that doesn't match the rest of the kitchen's aesthetic, a rip cut can "clean" the board, leaving only the prime heartwood. Furthermore, when creating the "stiles" (the vertical frame pieces) of a cabinet door, ripping ensures that the grain remains vertical, which provides the necessary strength to support the weight of the door and its hinges. By aligning the cut with the natural growth of the tree, you leverage the wood's inherent structural properties to prevent sagging and warping over time.
Surface Quality and Edge Finish Differences
The visual and tactile result of a cut is heavily influenced by its orientation. A longitudinal cut generally leaves a smoother surface in terms of texture, as the blade is moving in the same direction as the fibers. However, it can leave "scallop" marks or "burn" marks if the blade is dull or if the wood is pushed through too slowly. These marks are usually easy to remove with a jointer or a hand plane, resulting in a perfectly smooth edge that is ready for glue or finish. The long grain revealed by a rip cut is what most people associate with the "beauty" of wood, showing off the sweeping patterns of the tree's growth.
Conversely, the surface quality of a cross cut is often more porous and rough. Because the fibers have been severed, the end grain acts like a sponge, absorbing more stain or oil than the long-grain surfaces. This can lead to a darker appearance in finished kitchen pieces. If a cross cut is performed poorly, the resulting "tear-out" can ruin a piece of wood, requiring it to be shortened further to remove the damage. Achieving a high-quality edge on a cross cut involves using a sacrificial "zero-clearance" insert or scoring the cut line beforehand with a utility knife to ensure the fibers break cleanly rather than shattering.
Essential Safety Tips for Ripping and Crosscutting
Safety protocols differ significantly between these two types of cuts, and ignoring them can be dangerous in a workshop environment. When performing longitudinal rip cuts on a table saw, the primary danger is "kickback." This occurs when the wood pinches the back of the blade or twists away from the fence, causing the saw to hurl the board back at the operator. To prevent this, always observe the following:
- Use a riving knife or splitter to keep the kerf open behind the blade.
- Never rip a piece of wood that is wider than it is long without a specialized sled.
- Always use push sticks when the fence is close to the blade to keep fingers safe.
- Ensure the wood has one perfectly straight edge against the fence before cutting.
When crosscutting, the main risk is the board "pinching" the blade if it is not properly supported. You should never use the table saw fence and the miter gauge at the same time for a cross cut, as this creates a trapped piece of wood that can easily kick back. Instead, use a miter gauge or a cross-cut sled to guide the wood past the blade. By respecting the physics of how the blade interacts with the grain direction, you can maintain a safe environment while producing professional-grade kitchen components.
Choosing the Right Tool for the Direction
While many modern power tools are versatile, certain tools are specialists for specific directions. For crosscutting kitchen components like trim, molding, or cabinet face-frames, the Miter Saw (or "Chop Saw") is the industry standard. It is designed specifically to move the blade downward through the wood fibers with high precision. For longer cross cuts, such as those needed to shorten a 24-inch wide countertop, a circular saw guided by a straight edge or a dedicated track saw is the superior choice to ensure the cut remains perfectly square across the grain.
For longitudinal ripping, the Table Saw is the undisputed king. Its flat table and parallel fence are designed to guide long boards accurately, ensuring a consistent width from one end to the other. If you are working in a traditional manner with hand tools, you would choose a Rip Saw, characterized by large, chisel-like teeth, for ripping, and a Crosscut Saw, featuring smaller, knife-like teeth, for shortening boards. Choosing the right tool not only makes the job faster but also significantly reduces the amount of sanding and cleanup required before the final finish is applied to the wood.
Maximizing Material Strength Through Proper Cutting
In a kitchen, wood is subjected to heavy loads-think of a cabinet shelf holding a collection of cast iron pans or a heavy butcher block island. Maximizing the strength of these items requires a deep understanding of cut direction. Wood is strongest when the load is applied perpendicular to the grain. Therefore, when cutting shelves, the grain should always run the long way between the supports. This longitudinal orientation ensures the "straws" of the wood are working together to resist bending.
Furthermore, proper cutting helps manage the natural movement of wood caused by humidity. Wood expands and contracts significantly more across its width (across the grain) than it does along its length. By strategically choosing where to rip and where to cross cut, a builder can "plan" for this movement. For example, in a solid wood kitchen table, the breadboard ends are cross-cut pieces attached to the ends of the long-grain boards. This specific orientation helps keep the table flat while allowing the main body to expand and contract without cracking. Understanding the relationship between grain direction and structural integrity is what separates a novice DIYer from a master kitchen craftsman.


Comments