Ready to level up your kitchen skills? Mastering the right knife techniques can completely change the way you cook, making prep work faster and much more enjoyable. By learning how to use a fluid rocking motion and a precise push cut, you'll achieve the professional consistency needed for beautiful, evenly cooked meals. The rocking motion is perfect for mincing delicate herbs using the blade's natural curve, while the push cut allows you to power through dense vegetables with clean, vertical strokes. Understanding when to use each style is the ultimate key to efficiency and safety. For a deeper dive into which technique suits your cooking style, check out this guide on the rocking motion vs push cut.
Fundamentals of Precision Knife Control
Establishing a foundation for precision knife control begins with the grip. The most effective method used by professionals is the "pinch grip," where the thumb and index finger grip the blade's bolster while the remaining three fingers wrap comfortably around the handle. This technique shifts the balance point forward, providing significantly more leverage and stability than gripping the handle alone. A proper stance is equally vital; standing with feet shoulder-width apart and the body slightly angled toward the cutting board allows for a full range of motion without straining the lower back.
- Maintain a relaxed wrist to prevent fatigue and repetitive strain injuries.
- Keep the tip of the knife in contact with the board whenever possible for added stability.
- Ensure the cutting surface is secured with a damp paper towel underneath to prevent slipping.
- Focus your eyes on the guide hand rather than the blade itself to ensure consistent thickness.
By mastering these physical fundamentals, a cook transforms the knife into an extension of the arm. This control is the prerequisite for speed, as accuracy must always precede velocity in a professional kitchen environment.
Mastering the Anatomy of the Rocking Motion
The rocking motion is the hallmark of Western culinary tradition, specifically designed for knives with a curved belly, such as the classic French chef's knife. This technique relies on a continuous circular rhythm where the tip of the blade never leaves the cutting board. As the handle is lifted, the blade slides forward and down, creating a shearing action that minimizes the force required to move through dense vegetables or bundles of herbs.
- Position the product near the center of the blade's curve for maximum efficiency.
- Lift the heel of the knife while keeping the front third of the blade anchored.
- Push the blade forward as you lower the heel through the food item.
- Pull the blade slightly back as you reset for the next stroke, maintaining a rhythmic flow.
This motion is particularly effective for mincing garlic, parsley, or shallots, where fine textures are required. The constant contact with the board provides a pivot point that enhances safety and reduces the likelihood of the blade slipping sideways during rapid execution.
The Mechanics of the Efficient Push Cut
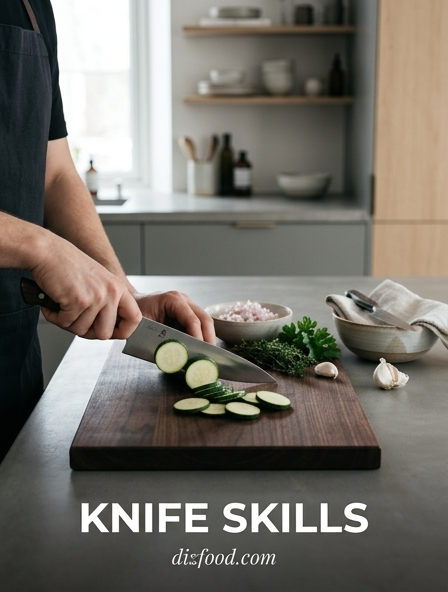
Unlike the rocking motion, the push cut involves a more linear, forward-and-down movement that is frequently associated with Japanese cutlery and flat-edged blades like the Nakiri or Santoku. This technique is prized for its ability to produce clean, vertical slices without bruising delicate cell structures. The mechanic relies on pushing the knife away from the body as it descends, ensuring that the entire edge makes contact with the board at roughly the same time.
- Best suited for high-moisture vegetables like cucumbers, zucchini, and peppers.
- Requires a razor-sharp edge to prevent crushing the product during the downward phase.
- Utilizes the "claw grip" on the non-cutting hand to act as a physical guide for the blade face.
- Excellent for creating long, uniform julienne strips with minimal friction.
Efficiency in push cutting comes from the economy of motion. By lifting the knife just high enough to clear the product and driving it forward, the chef maximizes the cutting surface used in a single stroke, leading to a faster output and a more professional finish on the final ingredients.
Choosing the Right Blade for Advanced Dicing
Selecting the appropriate tool is essential for achieving the uniform results required in advanced dicing. Different blade geometries and steel compositions react differently to specific ingredients. A heavy Western chef's knife provides the momentum needed for root vegetables, whereas a thinner, harder Japanese blade offers the precision necessary for intricate work like a brunoise.
| Blade Type | Ideal Use | Primary Advantage |
|---|---|---|
| Chef's Knife (8-inch) | General dicing, heavy veg | Versatility and weight balance |
| Santoku | Precision slicing, herbs | Thin profile, reduced sticking |
| Nakiri | Vegetable prep, flat cuts | Excellent for vertical push cuts |
| Paring Knife | Peeling, small garnishes | Extreme maneuverability |
When dicing, consider the height of the blade; a taller blade provides more surface area for the knuckles of the guide hand to rest against, increasing safety during high-volume prep. High-carbon steel is often preferred by professionals for its ability to hold an incredibly fine edge, which is necessary for the clean geometry of a perfect dice.
Safety Protocols for High Speed Cutting Techniques
Speed in the kitchen is a byproduct of efficient technique, not a goal to be pursued at the expense of safety. The most critical safety protocol is the "claw grip," where the fingertips of the guiding hand are tucked inward, and the knuckles act as a vertical fence for the blade. This ensures that even if the knife slips, it contacts the flat of the knuckle rather than the soft tissue of the fingertips. Furthermore, a chef must maintain a "clear zone" on the cutting board, ensuring that scraps do not accumulate and create an uneven surface.
- Never attempt to catch a falling knife; step back and let it land.
- Always carry a knife by the handle, pointed down, and close to your leg.
- Maintain total focus; do not engage in conversation while performing high-speed cuts.
- Stop immediately if you feel fatigue, as a tired hand is more likely to lose grip or form.
Ultimately, a sharp knife is safer than a dull one. A dull blade requires more pressure to penetrate the food, which increases the likelihood of the blade glancing off the surface and toward the fingers. Respecting the tool and the process ensures a safe and productive kitchen environment.
Transitioning Between Rocking and Pushing Motions
Versatile chefs understand that no single cutting motion is ideal for every ingredient. The ability to fluidly transition between a rocking motion and a push cut allows for maximum efficiency during complex prep lists. For instance, when prepping an onion, a chef may use the precision of a push cut for the initial horizontal and vertical incisions, then switch to a rocking motion to finish the final dice. This transition requires an intuitive understanding of the blade's sweet spot and a flexible wrist that can adapt to different angles of attack.
The key to a smooth transition lies in the subtle shift of body weight and the height at which the blade is lifted. During a rocking motion, the energy is focused on the pivot point at the tip. To transition into a push cut, the chef must lift the entire blade slightly and shift the emphasis to a forward-driving force. Practicing these shifts during daily prep tasks helps build the muscle memory needed to select the most efficient stroke subconsciously, reducing time spent on each ingredient and improving the overall flow of the workspace.
Achieving Consistent Dice Sizes Every Time
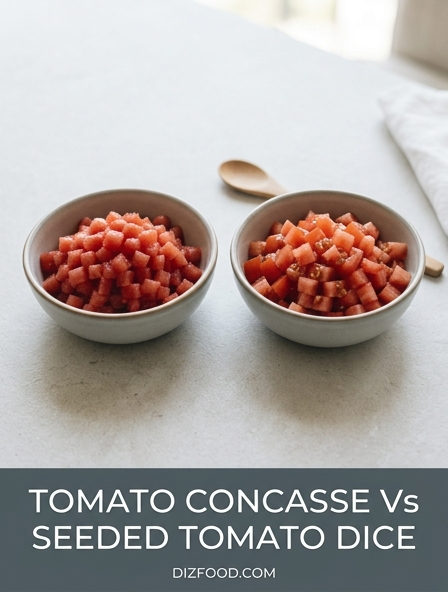
Consistency in dicing is not merely for aesthetics; it is a functional requirement for even cooking. If pieces of potato or carrot vary significantly in size, the smaller pieces will overcook and disintegrate while the larger pieces remain raw. To achieve professional uniformity, start by "squaring off" the vegetable. By trimming the rounded edges of a spherical or cylindrical vegetable to create a rectangular block, you establish a stable base and ensure that every subsequent cut results in a perfect cube.
- Ponti-neuf: Thick batons (approx. 1/2 inch).
- Macédoine: Medium dice (approx. 1/4 inch).
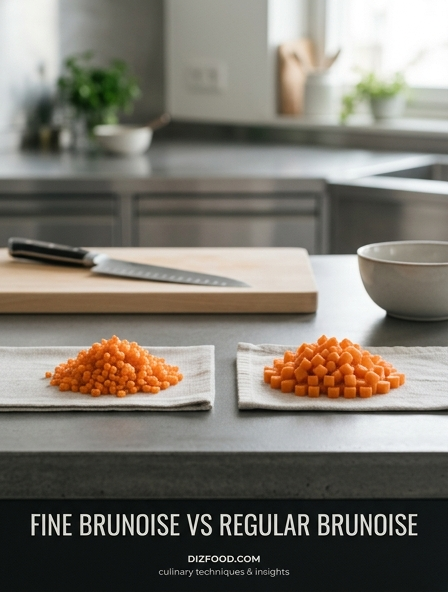
- Brunoise: Fine dice (approx. 1/8 inch).
- Fine Brunoise: Extra fine dice (approx. 1/16 inch).
Always use the previous cut as a visual guide for the next. If the first julienne strip is 1/4 inch wide, ensure all following strips match it exactly before turning them 90 degrees to complete the dice. This disciplined approach eliminates guesswork and results in a final product that looks and cooks perfectly every time.
Common Pitfalls in Professional Knife Work
Even experienced cooks can fall into bad habits that hinder their performance and increase the risk of injury. One of the most common pitfalls is "sawing" through food rather than using a clean slicing motion. This usually occurs when the knife is dull or when the cook is applying too much downward pressure without enough horizontal movement. Another frequent error is lifting the heel of the knife too high during a rocking motion, which can cause the tip to slip backward and result in an accidental cut.
- Using a cutting board that is too small for the task at hand.
- Neglecting to hone the blade regularly during long prep sessions.
- Hunching the shoulders, which leads to back pain and reduced control.
- Failing to tuck the thumb of the guide hand behind the fingers.
Additionally, many beginners struggle with "walking" the product, where the food items gradually shift across the board, leading to uneven cuts. Maintaining a firm but gentle pressure with the guide hand and keeping the board clean are the best ways to combat these common technical failures.
Drills to Improve Your Cutting Rhythm
Developing a consistent cutting rhythm is a matter of muscle memory and tempo. Like a musician practicing scales, a chef should use repetitive drills to refine their movements. One effective drill is the "celery cadence." Using a long stalk of celery, practice making consistent 1/8-inch slices using a metronome set to a slow beat (60 BPM). Focus on matching the downward stroke of the knife with the click of the metronome. As you become comfortable, gradually increase the tempo.
- Practice "air cutting" without food to focus purely on the path of the blade.
- Dice a large bag of potatoes into uniform cubes to build endurance and consistency.
- Mince a bunch of flat-leaf parsley as finely as possible using only the rocking motion.
- Perform the "horizontal onion cut" slowly to master the tension required to hold the layers together.
The goal of these drills is to eliminate jerky movements and replace them with a smooth, fluid cycle. Over time, the sound of the knife hitting the board should become a steady, percussive rhythm, indicating that you have achieved a professional level of control and efficiency.
Maintenance Tips for Razor Sharp Performance
A knife is only as good as its edge. Professional maintenance involves a two-tiered approach: daily honing and periodic sharpening. Honing is the process of using a ceramic or steel rod to realign the microscopic teeth of the blade that bend during use. This does not remove metal but keeps the edge straight. Sharpening, conversely, involves removing metal using whetstones to create a new, sharp edge. This should be done whenever honing no longer restores the knife's "bite."
| Maintenance Task | Frequency | Purpose |
|---|---|---|
| Honing | Before every use | Realigns the edge for smoother cuts |
| Whetstone Sharpening | Every 3-6 months | Removes metal to restore the bevel |
| Hand Washing | After every use | Prevents corrosion and handle damage |
| Oil Application | Monthly (Carbon Steel) | Prevents oxidation and rust spots |
Never put professional knives in a dishwasher, as the high heat and harsh detergents can warp the handle and dull the blade. Store your knives in a wooden block, on a magnetic strip, or in a padded roll to protect the edges from coming into contact with other metal tools.


Comments