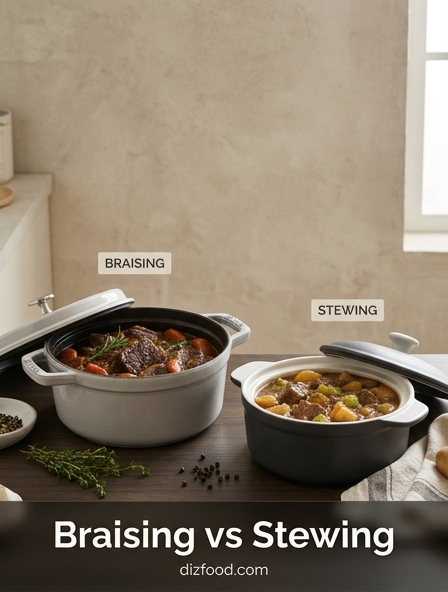
If you have ever wondered why some slow-cooked meats melt like butter while others feel lackluster, the secret lies in the subtle science of moist-heat cooking. Braising and stewing are both culinary heavyweights when it comes to transforming tough, collagen-rich cuts into succulent masterpieces, but they achieve tenderness through different liquid ratios. Braising is the "low and slow" hero for large, bone-in cuts like short ribs, using a shallow bath to gently steam and simmer the meat simultaneously. Stewing, on the other hand, fully submerges bite-sized pieces in liquid, creating a uniform environment where connective tissues break down into a silky gravy. While both techniques deliver incredibly tender results, your choice ultimately depends on whether you want a grand, sliceable centerpiece or a cozy, fork-tender bowl of comfort.
| Feature | Braising | Stewing |
|---|---|---|
| Meat Size | Large, whole cuts (pot roast, shanks) | Small, uniform cubes (1-2 inches) |
| Liquid Level | Partially submerged (1/3 to 1/2 way) | Fully submerged (completely covered) |
| Cooking Method | Seared, then covered; oven or stovetop | Seared, then simmered; usually stovetop |
| Texture Focus | Succulent, sliceable, or "shreddable" | Soft, uniform, and integrated with sauce |
| Liquid Density | Concentrated jus or reduced glaze | High-volume gravy, sauce, or thick broth |
| Best Cuts | Chuck roast, short ribs, lamb shanks | Beef chuck, pork shoulder, venison cubes |
Understanding the Core Differences Between Braising and Stewing
Braising and stewing are both moist-heat cooking methods that transform tough, inexpensive cuts of meat into tender, flavorful dishes. While they share the common goal of breaking down connective tissue through low and slow heat, the primary differences lie in the size of the ingredients and the amount of liquid used during the process. Understanding these nuances is essential for any home cook looking to master the art of comfort food.
Braising generally involves cooking large, whole cuts of meat-such as a pot roast, lamb shanks, or whole chicken legs-in a small amount of liquid. The meat is typically partially submerged, allowing the exposed portion to benefit from the surrounding steam while the submerged portion simmers. In contrast, stewing involves smaller, uniform bite-sized pieces of meat that are completely submerged in liquid. Because the meat in a stew is cut into smaller portions, it often cooks slightly faster and results in a dish where the meat and vegetables are served together as a unified, thick soup-like consistency.
- Ingredient Size: Braising uses large or whole cuts; stewing uses small, uniform cubes.
- Liquid Volume: Braising uses minimal liquid (one-third to halfway up the meat); stewing requires total immersion.
- Presentation: Braised meats are often removed and sliced before serving; stews are served as a complete, bowl-based meal.
- Texture: Braising relies on a combination of steaming and simmering; stewing is a pure simmer.
How Liquid Levels Distinguish Braising From Stewing
The volume of liquid in the pot is perhaps the most visible indicator of whether you are braising or stewing. In a braise, liquid is used as a flavor enhancer and a source of moisture, but it is not intended to cover the protein. Typically, the liquid-often a combination of stock, wine, or aromatics-should reach only about one-third to halfway up the side of the meat. This creates a dual-zone cooking environment where the bottom of the meat simmers while the top is basted by condensing steam. This technique is ideal for preserving the integrity of a large roast while ensuring the interior becomes succulent.
Stewing operates on the principle of total submersion. The liquid acts as the primary heat conductor, enveloping every piece of meat and vegetable. Because the ingredients are completely covered, they cook evenly from all sides. This high liquid volume also serves as the foundation for the sauce that will eventually be consumed with the dish. In a stew, the liquid level must be maintained throughout the cooking process to prevent the ingredients from drying out or scorching against the bottom of the pot. While braising requires occasional flipping or basting, stewing is generally more "hands-off" once the liquid levels are set, provided the heat remains at a gentle, consistent simmer.
Selecting the Right Cuts of Meat for Braising
Success in braising starts at the butcher counter. Because braising involves long cooking times, lean and tender cuts like chicken breast or pork tenderloin are unsuitable; they will become dry and stringy long before the cooking process is complete. Instead, you must look for "tough" cuts that are rich in collagen and connective tissue. These tissues, which make meat tough when grilled or seared quickly, melt into gelatin during a slow braise, providing a silky mouthfeel and intense moisture.
The best cuts for braising come from the hardworking muscles of the animal. For beef, the chuck, brisket, and short ribs are gold standards. For pork, the shoulder (or Boston butt) is the preferred choice. These cuts are often more affordable than steaks but offer significantly more flavor when prepared correctly. Below are some of the most common cuts used for a successful braise:
- Beef: Chuck roast, short ribs, brisket, oxtail, and shank.
- Pork: Pork shoulder, pork cheeks, and hock.
- Lamb: Lamb shanks, shoulder, and neck.
- Poultry: Chicken thighs, drumsticks, and whole legs (dark meat only).
Best Ingredients for a Rich and Hearty Stew
A great stew is more than just meat and water; it is a layered composition of aromatics, liquids, and starches that thicken over time. The foundation of any rich stew begins with the "mirepoix" or "holy trinity"-a mix of onions, carrots, and celery that provides a baseline of sweetness and depth. From there, the choice of liquid determines the character of the dish. While water is an option, using high-quality bone broth, dry red wine, or even a dark stout beer adds a complexity that cannot be replicated.
Vegetables in a stew must be hardy enough to withstand 60 to 90 minutes of simmering. Root vegetables are the traditional choice because they hold their shape while absorbing the flavors of the cooking liquid. Additionally, adding umami-rich ingredients can elevate a standard stew to something extraordinary. Consider the following ingredients for your next pot:
- Root Vegetables: Potatoes (Yukon Gold or Russet), parsnips, turnips, and rutabagas.
- Aromatics: Garlic, leeks, and shallots.
- Umami Boosters: Tomato paste, Worcestershire sauce, soy sauce, or dried mushrooms.
- Herbs: Thyme, rosemary, and bay leaves (woody herbs that don't lose flavor quickly).
The Role of Searing in Building Complex Flavors
Searing is an essential preliminary step for both braising and stewing, often referred to as "developing the fond." When you brown meat over high heat before adding liquid, you trigger the Maillard reaction. This chemical reaction between amino acids and reducing sugars creates hundreds of different flavor compounds and gives the meat a deep, savory crust. Without this step, meat cooked in liquid can appear gray and lack the "roasted" depth that characterizes professional-grade slow-cooked dishes.
The "fond" consists of the brown bits stuck to the bottom of the pan after searing. Once the meat is removed, these bits are deglazed with wine, stock, or vinegar. This process lifts the caramelized proteins into the cooking liquid, effectively seasoning the entire dish from within. It is important to sear the meat in small batches to avoid crowding the pan; crowding lowers the temperature and causes the meat to steam rather than brown. By taking the time to properly sear each piece of meat to a deep mahogany color, you ensure that the resulting sauce will have a complex, robust profile that salt and spices alone cannot provide.
Optimal Temperature and Time for Slow Cooking
The "slow" in slow cooking refers to the gradual breakdown of collagen into gelatin, a process that only happens within a specific temperature window. If the temperature is too low, the collagen won't melt; if it is too high (boiling vigorously), the muscle fibers will tighten and squeeze out all their moisture, resulting in tough meat. The ideal environment for both braising and stewing is a gentle simmer, where the liquid stays between 180°F and 200°F (82°C to 93°C).
While stovetop cooking is common, the oven provides a more consistent, multi-directional heat source that is less likely to scorch the bottom of the pot. A heavy Dutch oven set in a 300°F (150°C) oven is the gold standard for most home kitchens. The timing varies based on the cut of meat, but generally follows these guidelines:
| Meat Type | Approximate Time | Target Texture |
|---|---|---|
| Stew Meat (Cubes) | 1.5 - 2.5 hours | Fork-tender but holds shape |
| Short Ribs | 3 - 4 hours | Falling off the bone |
| Pork Shoulder | 4 - 6 hours | Easily shreddable |
| Chicken Thighs | 45 - 60 minutes | Succulent and opaque |
Essential Kitchen Tools for Braising and Stewing
The most critical tool for these techniques is a heavy-bottomed pot with a tight-fitting lid. An enameled cast iron Dutch oven is widely considered the best vessel for both braising and stewing. The thick walls provide excellent heat retention and distribution, which prevents hot spots that could burn the food during a three-hour simmer. The heavy lid is equally important; it traps moisture and prevents the cooking liquid from evaporating too quickly, ensuring the meat stays moist throughout the process.
While a Dutch oven is versatile, other tools can be used depending on the specific recipe and convenience needs. Modern kitchen appliances have made these traditional methods more accessible to busy cooks. Here are the primary tools used in modern kitchens:
- Dutch Oven: The versatile standard for stovetop-to-oven cooking.
- Slow Cooker (Crock-Pot): Ideal for long, unattended stews, though it lacks the ability to sear meat directly.
- Pressure Cooker (Instant Pot): Drastically reduces cooking time by using high-pressure steam to break down collagen in under an hour.
- Braiser: A wider, shallower version of a Dutch oven specifically designed for large cuts of meat like short ribs or chicken pieces.
- Kitchen Twine: Useful for tying large roasts (braising) to ensure they cook evenly.
Achieving the Perfect Sauce Consistency and Texture
A common pitfall in both braising and stewing is ending up with a thin, watery liquid rather than a rich, clinging sauce. For a stew, the sauce is often thickened during the cooking process. This can be achieved by dredging the meat in flour before searing or by adding starchy vegetables like potatoes that break down and release their starches into the broth. If the stew is still too thin at the end, a slurry of cornstarch and water or a roux (flour and butter) can be whisked in to provide body.
In braising, the sauce is usually finished after the meat has been removed. Once the meat is tender, it is set aside to rest while the cooking liquid is strained and simmered over high heat. This reduction process evaporates excess water, intensifying the flavors and naturally thickening the liquid into a "glace" or gravy. For an extra-luxurious finish, a technique called "monter au beurre" can be used, where a few cold pats of butter are whisked into the reduced sauce just before serving. This adds a glossy sheen and a velvety texture that elevates the dish to restaurant quality.
Common Mistakes When Braising and Stewing Meat
One of the most frequent errors is using a "boil" instead of a "simmer." High heat causes the proteins in meat to contract violently, resulting in a rubbery texture regardless of how much liquid is in the pot. The surface of the liquid should only show occasional, gentle bubbles. Another mistake is failing to trim enough fat. While some fat is necessary for flavor, an excessive fat cap will result in an oily, greasy sauce that masks the delicate flavors of the aromatics and wine.
Overcrowding the pot is another issue that affects the quality of the final dish. If you pack too many vegetables and meat pieces into the pot, the heat cannot circulate effectively, leading to uneven cooking. Additionally, many cooks add their vegetables too early. Delicate vegetables like peas, spinach, or even carrots can become mushy if cooked for the full duration required for a tough beef roast. To avoid this, consider these tips:
- Maintain a Simmer: Keep the temperature low to ensure the meat stays tender.
- Degrease Regularly: Skim the fat from the surface of the liquid periodically.
- Stagger Vegetables: Add softer vegetables during the last 30 minutes of cooking.
- Don't Rush Searing: Take the time to get a dark brown crust on the meat.
- Use Quality Stock: Avoid using only water, as it provides no flavor base.
Quick Reference Guide for Choosing the Best Method
Choosing between braising and stewing usually depends on the specific cut of meat you have on hand and how you intend to serve the meal. If you have a large, singular piece of meat that you want to serve as a centerpiece, braising is the superior choice. It allows for a more formal presentation and provides a concentrated sauce. If you have smaller scraps of meat or want a one-pot meal that is easy to portion and serve in bowls, stewing is the more practical and traditional approach.
The following table provides a quick comparison to help you decide which technique to use based on your ingredients and desired outcome:
| Feature | Braising | Stewing |
|---|---|---|
| Meat Size | Large, whole cuts | Small, uniform cubes |
| Liquid Level | Partially submerged | Fully submerged |
| Cook Time | Often longer (3-5 hours) | Slightly shorter (1.5-3 hours) |
| Vegetable Use | Usually large chunks/aromatics | Mixed bite-sized pieces |
| Serving Style | Sliced or shredded on a plate | Served in a bowl with liquid |


Comments