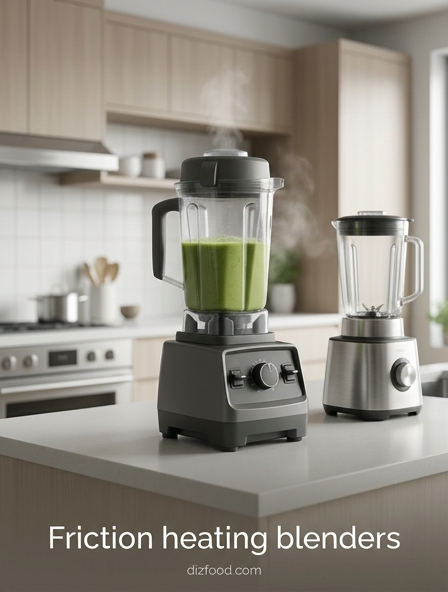
When you're aiming for that ultra-creamy acai bowl or a perfectly emulsified nut butter, the battle between tamper and non-tamper blenders often comes down to how they handle resistance. A tamper is a specialized tool designed to safely push thick, stubborn ingredients directly into the blades while the motor is running, effectively eliminating the air pockets (cavitation) that stall high-performance blending. While non-tamper models rely on specific jar geometries and vortex technology to circulate food, they often require you to stop, scrape, or add excess liquid to keep things moving. For those who prioritize power and precision, a blender with a tamper is the undisputed master of high-viscosity mixtures, ensuring a professional, silky-smooth consistency without the frustration of manual shaking or frequent motor stalls.
| Feature | Tamper Blenders | Non-Tamper Blenders |
|---|---|---|
| Thick Mixtures | Superior; processes nut butters/frozen fruit with ease. | Struggles; often requires extra liquid or pauses. |
| Air Pocket Removal | Instant; manual intervention bursts bubbles mid-blend. | Passive; relies on gravity or jar shape to collapse air. |
| Blending Speed | Faster for heavy loads; maintains constant blade contact. | Slower for solids; prone to "spinning air." |
| Motor Longevity | Higher; reduced strain via manual ingredient assistance. | Variable; higher risk of overheating during stalls. |
| User Input | Active; requires hands-on "tamping" for best results. | Passive; "set-it-and-forget-it" (mostly for liquids). |
| Texture Quality | Professional-grade; uniform, dense, and velvety. | Inconsistent; may leave unblended chunks in thick recipes. |

Understanding Tamper vs Non Tamper Blender Mechanics
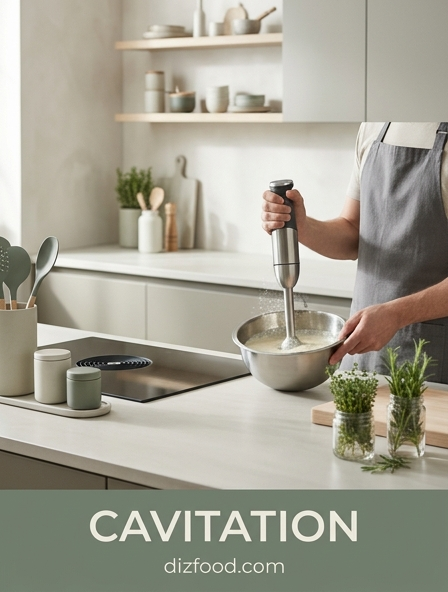
The fundamental difference between tamper and non-tamper blenders lies in how they manage the movement of ingredients during the blending cycle. A tamper-based system utilizes a specialized tool designed to fit through the lid of the blender, allowing the user to physically push ingredients toward the spinning blades. This mechanical intervention is crucial when dealing with cavitation, a phenomenon where an air pocket forms around the blade, causing it to spin freely without engaging the food. By manually displacing these air pockets, the tamper ensures that thick or frozen mixtures remain in constant contact with the cutting assembly.
In contrast, non-tamper blenders rely entirely on the internal geometry of the jar and the specific configuration of the blades to create movement. These machines are engineered to foster a passive vortex where gravity and the shape of the container walls pull ingredients downward. While tamper models prioritize user control and high-torque physical processing, non-tamper models prioritize convenience and automation. Key mechanical differences include:
- Jar Shape: Tamper jars often have wider bases to accommodate manual movement, while non-tamper jars may feature ridges or "wild" sides to disrupt the flow and force food back into the blades.
- Blade Pitch: Non-tamper models frequently use asymmetrical blade designs to create more turbulence without external help.
- Lid Security: Tamper lids feature a central opening with a safety collar, whereas non-tamper lids are usually solid to prevent splashing during high-speed automated cycles.
The Role of the Tamper in Creating a Vortex
A vortex is the swirling funnel of liquid that pulls solid ingredients into the center of a blender's blade assembly. In a high-performance blender, a perfect vortex is essential for a smooth, homogenous result. However, when working with very thick mixtures like acai bowls or nut butters, a natural vortex often fails to form because the viscosity of the material resists the centrifugal force. This is where the tamper becomes a vital aerodynamic tool. By inserting the tamper into the corners of the jar, the user breaks the "bridge" of unblended food that often hangs above the blades.
The tamper does not just push food down; it effectively acts as a secondary agitator that redirects the flow of the mixture. As the user moves the tamper in a rhythmic motion, it forces the dense material into the path of the blades, which then expels the processed food toward the walls of the jar. This creates a continuous cycle of circulation that would otherwise be impossible with thick substances. The precision of this manual intervention allows the blender to maintain a high-speed rotation without the motor "stalling" due to lack of ingredient engagement. Without this tool, the user would be forced to stop the machine frequently to scrape down the sides with a spatula, interrupting the thermal development and texture refinement of the recipe.
Benefits of Manual Food Processing in High Power Blenders
Manual food processing through the use of a tamper provides a level of culinary precision that automated systems often struggle to replicate. One of the primary benefits is the ability to process extremely thick, "spoonable" recipes with minimal added liquid. In the world of high-power blending, liquid acts as a lubricant; however, too much liquid can dilute flavors and ruin the consistency of sauces or frozen desserts. A tamper allows the chef to bypass the need for excess water or oil by providing the physical force necessary to keep the solids moving.
Furthermore, manual intervention gives the user immediate feedback on the progress of the blend. You can feel the resistance of a whole frozen strawberry or a chunk of ice through the tamper, allowing you to focus your efforts on specific areas until the resistance vanishes. This tactile control is particularly beneficial for the following tasks:
- Emulsifying: Ensuring oils are perfectly integrated into thick bases like mayonnaise or hollandaise.
- Grinding: Forcing whole grains or nuts into the blade path for a consistent flour or paste.
- Temperature Control: Speeding up the processing of frozen items to prevent them from melting due to prolonged blade friction.
Ultimately, the manual approach empowers the cook to achieve professional-grade textures that require a balance of high power and physical manipulation.
How Non Tamper Blenders Automate Food Circulation
Non-tamper blenders are designed for a "set it and forget it" user experience, utilizing sophisticated engineering to replace manual labor. To ensure ingredients circulate without a tamper, manufacturers employ various design strategies focused on fluid dynamics. The most common method involves the use of pre-programmed pulse cycles. By varying the speed of the motor, the blender allows ingredients to settle before quickly ramping up the RPMs to create a sudden burst of suction, effectively pulling the top layer of food down into the blades.
Beyond electronics, the physical architecture of the blender plays a massive role in automation. Designers often use "ribbed" jar designs or square containers that interrupt the circular flow of the liquid. When the mixture hits these corners or ribs, it is deflected back toward the center. This creates a chaotic environment where food cannot simply "ride" the walls of the jar. The following table highlights common automation features in non-tamper models:
| Feature | Functionality |
|---|---|
| Auto-iQ / Smart Programs | Uses timed pulses and pauses to let gravity move ingredients. |
| Tapered Jar Walls | Funnels ingredients toward the blade using gravity. |
| Multi-Level Blades | Blades at different heights to catch food throughout the jar. |
| Reversing Motors | Changes blade direction to clear jams and pull food down. |
Texture Comparison Between Tamper and Hands Free Models
The choice between a tamper and a hands-free blender often comes down to the desired final texture of the food. Tamper-equipped blenders are the gold standard for achieving "micro-smooth" consistencies in high-density recipes. Because the user can continuously force every particle through the blades, the resulting purees, soups, and nut butters tend to be devoid of even the smallest grit. The tamper ensures that nothing escapes the high-impact zone, making it ideal for culinary applications where a silk-like mouthfeel is required, such as in a fine dining coulis.
Hands-free models, while highly efficient for smoothies and protein shakes, may occasionally struggle with consistency in very thick or fibrous mixtures. Because these models rely on the natural fall of ingredients, some small pieces can occasionally get trapped in the upper corners or stay suspended in an air pocket just out of reach of the blades. This can result in a slightly more "textured" finish. However, for standard liquid-based recipes, the difference is negligible. In a hands-free model, the texture is often lighter and more aerated because the automated pulse cycles incorporate more air into the mixture. Conversely, a tamper allows the user to press air out of the mixture, resulting in a denser, creamier product. Users who prioritize thick smoothie bowls usually prefer the tamper, while those who want a quick, frothy beverage often favor the automated hands-free design.
The Impact of Tampers on Thick Recipe Success
Thick recipes represent the ultimate challenge for any kitchen blender. Ingredients like frozen bananas, chickpeas for hummus, or roasted peanuts have very little moisture to facilitate a natural flow. In these scenarios, the presence of a tamper is often the difference between success and a frustrated motor. Without a tamper, thick ingredients frequently bridge over the blades; the blades spin at high speeds, creating a small "cave" in the food, and the rest of the ingredients remain stationary. This not only prevents blending but can also cause the motor to overheat because it is spinning without the cooling effect of moving mass.
The tamper solves this by acting as an extension of the chef's arm. By pushing the ingredients into the blades, the user maintains the load on the motor, which paradoxically helps keep it cool by ensuring the energy is being spent on cutting rather than just spinning air. Thick recipes that specifically benefit from a tamper include:
- Nut Butters: Forcing dry nuts into a paste without adding extra oil.
- Hummus: Achieving a thick, commercial-grade texture that stays on a pita.
- Sorbet: Keeping frozen fruit chunks in the blade path to create a smooth, frozen consistency before it has time to melt.
- Pesto: Ensuring leafy greens and nuts are pulverized into a thick, uniform sauce.
Safety and Design Differences in Modern Blending Tools
Safety is a paramount concern when integrating manual tools into a high-speed appliance. A tamper is not just a plastic stick; it is a precision-engineered component with a specific length. The most critical safety feature of a tamper is the "security collar" or "step." This wider section near the handle prevents the tamper from ever reaching the blades, even when pushed down with maximum force. This design ensures that the tool can manipulate food within millimeters of the spinning steel without risking a dangerous collision that could shatter the jar or damage the motor.
In contrast, non-tamper blenders often feature "interlock" safety systems. Since there is no opening in the lid for a tool, these machines frequently require the lid to be fully locked and the jar to be perfectly seated before the motor will engage. This "hands-off" approach eliminates the risk of accidental contact with the blades. The design philosophies differ significantly in their approach to user interaction:
| Design Element | Tamper Models | Non-Tamper Models |
|---|---|---|
| Lid Construction | Two-piece with removable plug. | Solid, often with vacuum seals. |
| Blade Accessibility | Accessible during operation via plug. | Completely enclosed during use. |
| Tool Material | High-impact, BPA-free plastic. | Usually no tools included. |
| User Proximity | User stays close to the machine. | User can walk away. |
Why Professional Blenders Rely on Manual Intervention
In a commercial kitchen or a busy juice bar, speed and reliability are the two most important factors. Professional chefs almost exclusively use tamper-equipped blenders because they cannot afford the time it takes for an automated cycle to "struggle" through a thick mixture. A professional can use a tamper to finish a thick smoothie in 30 seconds, whereas an automated cycle might take a minute or more, involving several pauses to let the ingredients settle. This efficiency increases the "throughput" of the kitchen, allowing more orders to be served in less time.
Furthermore, manual intervention allows for on-the-fly adjustments. If a chef sees that a sauce is too thick, they can remove the lid plug, use the tamper to integrate more liquid, and continue processing without ever stopping the motor. This continuous workflow is essential for maintaining the friction-generated heat required for certain soups or for ensuring a perfect emulsion in a vinaigrette. Professional-grade machines are also built with heavy-duty cooling systems specifically because the manufacturers know the user will be using a tamper to push the motor to its torque limits. The tamper provides the chef with a "feedback loop" that allows them to push the equipment to its maximum potential while ensuring the recipe meets exact culinary standards.
Optimizing Motor Efficiency With and Without Tampers
Motor efficiency in a blender is measured by how effectively the electrical energy is converted into mechanical cutting power. When a blender is running "empty" due to an air pocket (cavitation), the motor experiences a sudden spike in RPMs but a drop in efficiency, as no work is actually being performed. This can lead to "dry-running" the bearings and overheating the internal components. A tamper optimizes efficiency by ensuring the motor is always under a consistent load. By keeping the blades "fed" with ingredients, the tamper helps maintain a steady RPM, which allows the internal cooling fan to work at its designed capacity.
Non-tamper blenders optimize efficiency through software and blade physics. Modern high-end automated blenders use "smart" sensing technology that detects the resistance on the motor. If the resistance drops (indicating an air pocket), the motor will automatically slow down or pulse to allow the food to fall back onto the blades. This prevents the motor from spinning uselessly at high speeds. While this is efficient in terms of protecting the hardware, it is often slower than the manual method. To maximize efficiency in either style, users should follow these tips:
- Loading Order: Always put liquids in first, followed by powders, then solids, and finally ice.
- Speed Ramp: Start on the lowest speed to catch the food, then ramp up to high speed quickly.
- Batch Size: Avoid filling the jar less than one-third full, as this makes it harder for both tampers and automated systems to create a vortex.
Selecting the Best Blending Style for Your Kitchen Needs
Choosing between a tamper and a non-tamper blender depends on your personal cooking habits and how much "hands-on" time you want to spend at the counter. If you are a culinary enthusiast who frequently makes nut butters, thick dips, or frozen fruit sorbets, a blender with a tamper is almost certainly the better choice. The ability to manually control the blend ensures that you can tackle the toughest ingredients without having to add unwanted liquids. It is the tool of choice for those who view blending as a dynamic part of cooking.
On the other hand, if your primary use for a blender is making daily protein shakes, green smoothies, or simple pureed soups, a non-tamper, automated model offers unmatched convenience. These models are ideal for multi-taskers who want to start the blender and then walk away to pack a lunch or clean up. To help you decide, consider the following steps:
- Identify your most frequent recipe: If it's liquid-heavy, go non-tamper. If it's thick, go with a tamper.
- Assess your patience: Do you mind standing by the machine for 60 seconds? If yes, you need a tamper for speed.
- Check your storage: Tamper models are often taller; ensure you have the cabinet clearance.
- Evaluate the user: For beginners or those with mobility issues, an automated non-tamper model is often safer and easier to handle.

Comments