The Science of Perfect Toast Timing
Achieving the ideal slice of toast is less about luck and more about the precise application of the Maillard reaction. This chemical process occurs when heat interacts with amino acids and reducing sugars, transforming the surface of the bread into a complex network of flavor compounds and golden pigments. However, this window of perfection is incredibly narrow. A few seconds too short, and the bread remains soft and under-developed; a few seconds too long, and the reaction transitions into pyrolysis, resulting in bitter, carbonized edges.
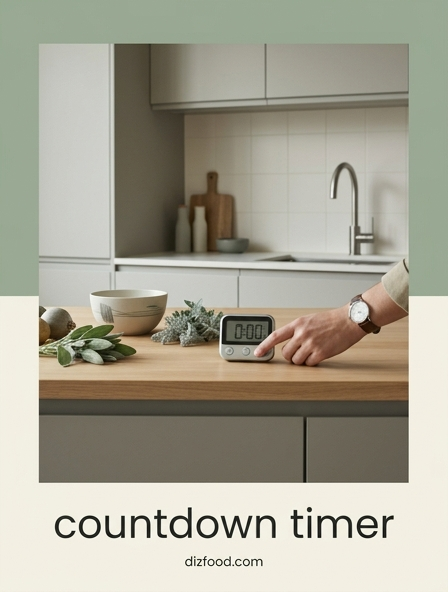
The role of a countdown timer in this scientific endeavor is to regulate the thermal exposure of the bread fibers. Because kitchen environments vary in humidity and ambient temperature, the moisture content of the bread fluctuates. A dedicated timer allows the cook to account for these variables by providing a repeatable metric for heat application. By understanding that toasting is a race against dehydration, one can use precise timing to ensure the exterior reaches a crisp state while the interior retains enough structural moisture to remain tender.
Why Every Kitchen Needs a Countdown Timer
The kitchen is an environment defined by competing priorities and rapid-fire tasks. Whether you are poaching eggs, brewing a delicate pour-over coffee, or searing proteins, the addition of a countdown timer provides a cognitive safety net. In the specific context of toasting, bread is often the most neglected component because it is perceived as a "set and forget" item. This neglect frequently leads to scorched slices that disrupt the flow of a meal.
Integrating a high-visibility timer into the workflow transforms the cooking experience from one of reactive stress to one of proactive control. Beyond toast, a reliable timer serves several critical functions:
- Ensuring consistent results across different batches of food.
- Preventing equipment damage caused by overheating or dry boiling.
- Allowing the cook to step away for brief intervals without losing track of progress.
- Synchronizing the completion of multiple dish components.
Without this tool, the home cook relies entirely on intuition, which is easily compromised by the sensory distractions of a busy kitchen.
Achieving Consistent Golden Results
Consistency is the hallmark of a professional kitchen, and it is equally desirable in a domestic setting. The challenge with toasting lies in the "residual heat" effect; a toaster that has been running for three cycles is significantly hotter than one being used for the first time in the morning. To maintain a specific shade of golden brown, the timing must be adjusted to compensate for this thermal buildup. A countdown timer allows for these micro-adjustments that built-in toaster dials often fail to capture accurately.
To help standardize your results, consider the following timing guidelines for standard white bread at medium heat settings:
| Desired Shade | Duration (Seconds) | Texture Description |
|---|---|---|
| Light Gold | 90 - 120 | Soft with slight surface crisp. |
| Medium Brown | 150 - 180 | Balanced crunch and tender center. |
| Deep Bronze | 210 - 240 | Hard crunch, fully dehydrated surface. |
Using a timer ensures that the second and third rounds of toast are just as perfect as the first, regardless of how much the toaster's internal temperature has risen.
Managing Multiple Tasks with Precision
Breakfast preparation is an exercise in synchronization. The goal is to have the eggs, protein, and toast arrive on the plate at their peak temperatures simultaneously. This level of coordination is nearly impossible without the aid of a countdown timer. When you know exactly how long a slice of sourdough takes to reach its optimal crunch, you can reverse-engineer the rest of the meal's timeline.
For example, if a soft-boiled egg requires exactly six minutes and your toast requires three, the timer dictates when the bread must be dropped into the slots. This prevents the "cold toast syndrome," where the bread sits and becomes leathery while the rest of the meal finishes cooking. By treating time as a measurable ingredient, the cook can manage the kitchen with the precision of a conductor. This reduces the mental load of guessing and allows for a more relaxed, efficient culinary process where every element of the plate is served at the absolute prime moment of its preparation.
The Impact of Timing on Toast Texture
The texture of toast is a direct consequence of how heat is managed over a specific duration. Rapid, high-heat toasting creates a thin, brittle crust while leaving the interior almost completely unchanged from its original bread state. Conversely, a slower, timed approach allows for a deeper "crust-to-crumb" ratio. This is particularly important for artisanal breads like ciabatta or dense rye, which contain higher moisture levels and require more time for the heat to penetrate the center.
A countdown timer enables the cook to experiment with these texture profiles. By tracking the seconds, you can identify the "shatter point"-the exact moment when the surface becomes crisp enough to crackle when bitten, but not so hard that it becomes unpleasant. This control over texture is vital for pairing toast with toppings. A soft avocado mash requires a sturdier, longer-timed toast to provide structural integrity, whereas a simple buttered slice might benefit from a shorter, lighter timing that preserves a fluffy interior. Timing is the invisible hand that crafts the mouthfeel of every bite.
Digital Accuracy for the Perfect Crunch
While many vintage toasters rely on bi-metallic strips or analog dials, these methods are notorious for their lack of precision. Factors such as mechanical wear and ambient temperature can cause an analog dial to vary by thirty seconds or more. In the world of toasting, thirty seconds is the difference between a golden masterpiece and a burnt offering. Digital countdown timers remove this ambiguity by providing second-by-second feedback and quartz-clock accuracy.
The transition to digital timing allows for a higher level of repeatability. If you discover that a specific brand of gluten-free bread toasts best at two minutes and fifteen seconds, a digital timer allows you to hit that mark every single time. This level of accuracy is especially beneficial for those with sensory preferences or dietary restrictions where consistency is paramount. A digital display also provides a visual cue that can be seen from across the room, allowing the cook to monitor progress while engaged in other tasks, ensuring that the "crunch" is never left to chance.
Mastering the Art of Controlled Browning
Controlled browning is an art form that requires a deep understanding of how different breads react to heat. Sugar-rich breads, such as brioche or cinnamon raisin, brown much faster than sourdough due to the caramelization of the added sugars. Without a timer, these delicate breads often burn before the cook realizes they have reached their limit. Mastering this process requires a methodical approach to timing that considers the specific composition of the loaf.
- Assess the sugar and fat content of the bread.
- Start with a conservative time estimate based on bread density.
- Use a timer to monitor the first batch closely.
- Record the successful time for future reference.
- Adjust by 5-10 second increments for different levels of freshness.
By using a countdown timer as a reference point, you can achieve a uniform mahogany finish on even the most temperamental breads. This level of control ensures that the subtle flavors of the grain are enhanced by the heat rather than being overwhelmed by a scorched exterior.
Essential Features of a Reliable Kitchen Timer
Not all timers are created equal, especially when it comes to the demands of a high-heat environment like the kitchen. A reliable countdown timer must be more than just accurate; it must be functional under pressure. When selecting a timer specifically for monitoring tasks like toasting and baking, certain features are non-negotiable for the serious cook.
A high-quality kitchen timer should include:
- High-Decibel Alarm: It must be loud enough to be heard over an exhaust fan or a bubbling pot.
- Magnetic Backing: For easy mounting on a refrigerator or oven vent, keeping it at eye level.
- Large Digital Interface: Clear, high-contrast numbers that are readable from a distance.
- Tactile Buttons: Buttons that respond well even when the cook's hands are slightly damp or floured.
- Multiple Channel Tracking: The ability to time two or three items simultaneously is a significant advantage.
Investing in a tool with these features ensures that your timing is always precise and your toast is always perfect, regardless of the chaos in the kitchen.
Professional Standards for Daily Toasting
In a professional culinary setting, nothing is left to guesswork. Chefs use standardized timing to ensure that every customer receives the same quality of food. Implementing these professional standards at home starts with the use of a countdown timer. By adopting a "standard operating procedure" for your morning toast, you eliminate the variability that often leads to food waste and frustration. This involves not only timing the heat cycle but also the "rest" period.
Allowing toast to rest for approximately thirty seconds on a wire rack-rather than a flat plate-prevents steam from being trapped underneath, which would otherwise turn the bottom of the slice soggy. Professional-grade results are the product of these small, timed habits. When you treat the toaster as a precision instrument rather than a simple appliance, and the timer as its navigator, the quality of your daily breakfast improves significantly. Efficiency, repeatability, and excellence become the new baseline for your kitchen activities, elevating the simple act of making toast to a craft.
Optimizing Heat Distribution with Timed Intervals
Toasters operate using infrared radiation, which is emitted by the heating elements. However, these elements do not reach peak efficiency the moment they are turned on. There is a "ramp-up" phase where the temperature climbs steadily. Using a countdown timer helps you understand the thermal rhythm of your appliance. If you are toasting multiple batches, the interval between batches also affects heat distribution. A timer can be used to manage these cool-down or recovery periods to ensure the toaster does not overheat.
Optimizing heat distribution is particularly important for thick-cut bagels or frozen bread. These items require a longer, more controlled exposure to heat to ensure the center is defrosted and warmed without the outside becoming excessively hard. By using a timer to implement a "double-toast" method-shorter bursts of heat with a timed rest in between-you can achieve a perfect uniform temperature. This sophisticated approach to heat management, guided by precise timing, ensures that every square inch of the bread is treated equally, resulting in a superior culinary outcome.

Comments