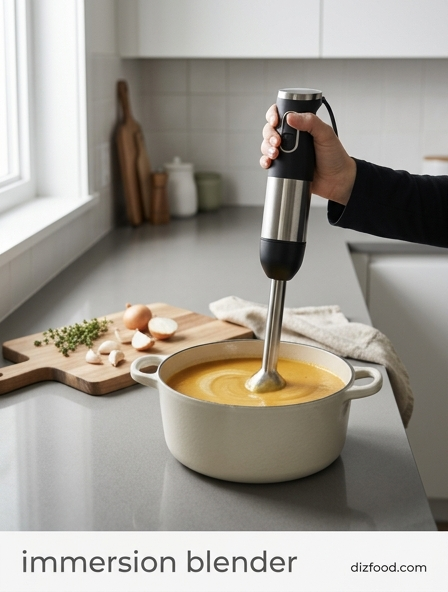
Mastering Immersion Blender Techniques
To master the immersion blender, one must understand the physics of the vortex. Unlike a stationary blender that relies on gravity to pull food toward the blades, a hand blender requires the user to manipulate the tool to create a consistent flow. Start by tilting the blender at a slight angle rather than holding it perfectly vertical; this allows for better circulation and prevents the vacuum effect that often sticks the guard to the bottom of the container. For thick mixtures, use a gentle up-and-down motion to draw ingredients into the blade housing.
- Pulse the motor initially to break down large chunks without over-processing.
- Keep the blade head fully submerged to prevent air from being incorporated.
- Move the wand in a slow, circular motion to ensure every corner of the pot is reached.
- Use high speeds only after the mixture has reached a semi-liquid state.
Consistency is achieved through patience and controlled movement. By varying the speed and angle, you can control the final texture, whether you are aiming for a rustic mash or a refined emulsion. Mastering these subtle physical adjustments ensures that your motor remains cool and your results remain professional.
Benefits of Blending Directly in the Pot
The primary advantage of using an immersion blender is the elimination of dangerous transfers. Pouring scalding hot liquids from a stockpot into a traditional blender jar is a common cause of kitchen accidents and significant messes. By blending directly in the cooking vessel, you maintain the temperature of the dish and streamline your workflow. This method is particularly beneficial for large batches of soup or sauce that would otherwise require multiple rounds of blending in a standard countertop appliance.
Beyond safety, the "one-pot" approach significantly reduces cleanup time. Instead of washing a bulky blender jar, lid, and base, you only need to rinse the detachable blending wand. This efficiency encourages more frequent preparation of healthy, vegetable-forward dishes. Furthermore, blending in the pot allows the cook to monitor the texture in real-time, making it easier to stop exactly when the desired consistency is reached. This level of control is difficult to replicate when the food is hidden behind the thick plastic or glass walls of a traditional blender unit, where over-processing can happen in a matter of seconds.
Essential Features for Professional Results
When selecting an immersion blender for high-performance tasks, the technical specifications dictate the quality of the output. A professional-grade motor typically starts at 300 watts, providing enough torque to handle fibrous vegetables and frozen fruits without overheating. Look for variable speed triggers that offer intuitive control; the harder you press, the faster the blades spin. This allows for seamless transitions between heavy chopping and delicate emulsifying.
| Feature | Professional Requirement | Benefit |
|---|---|---|
| Motor Power | 300W - 600W | Handles dense ingredients and long run times. |
| Material | Stainless Steel Wand | Resists staining, odors, and high heat. |
| Shaft Length | 8 to 12 inches | Reaches the bottom of deep commercial pots. |
| Speed Control | Variable Trigger | Prevents splashing with precise acceleration. |
The design of the blade guard also plays a crucial role. A vented guard prevents the "suction effect," allowing food to flow freely through the blades. This ensures a more even blend and prevents the motor from straining against the bottom of your cookware during operation.
Achieving Velvety Soup Textures
The hallmark of a professional soup is a texture so smooth it coats the back of a spoon without a single grain or fiber. To achieve this with an immersion blender, you must focus on the emulsification process. Start by simmering your vegetables until they are completely soft; any resistance in the ingredient will result in a gritty final product. Once softened, begin blending at a low speed to break down the bulk, then gradually increase to the highest setting.
- Simmer ingredients until they are fork-tender or slightly overcooked.
- Submerge the blender head before turning it on to avoid splashing.
- Incorporate a fat source, such as heavy cream or cold butter, during the final minute of blending.
- Pass the blended liquid through a fine-mesh sieve or chinois for an ultra-refined finish.
High-speed blending shears fat molecules into tiny droplets, creating a stable emulsion that feels rich and velvety on the palate. If your soup remains watery, adding a small amount of starch or fat while the blender is running at maximum speed can help create the necessary body and sheen for a gourmet presentation.
Best Practices to Avoid Splatters
Kitchen splatters are not only messy but can also lead to painful burns when dealing with hot liquids. The most critical rule for splatter-free blending is the "submerge before power" principle. Never activate the blades until they are fully buried beneath the surface of the liquid. Similarly, always ensure the motor has come to a complete stop before lifting the wand out of the pot. Even a split second of spinning blades above the liquid line can send droplets flying across the room.
- Use deep, narrow containers rather than shallow, wide pans.
- Keep the blender head flat against the bottom of the vessel initially.
- Start on the lowest speed setting to gauge the liquid's movement.
- Never fill a container more than two-thirds full to allow for the rise of the vortex.
If you are working with a small amount of liquid, tilt the pot or container to one side. This pools the liquid, providing enough depth to fully cover the blade guard. This simple adjustment ensures that air is not pulled into the blades, which is the primary cause of "burping" and splashing during the blending process.
Cleaning and Maintenance for Longevity
Proper maintenance ensures that your immersion blender remains a reliable tool for years. The most important step is to clean the attachment immediately after use. If food residues like starch or protein are allowed to dry inside the blade housing, they can become nearly impossible to remove and may damage the seals over time. Most modern immersion blenders feature a detachable wand that can be easily separated from the motor body, making the cleaning process straightforward and safe.
- Unplug the motor from the power source before detaching the blending wand.
- Rinse the blade area under hot running water immediately to remove debris.
- For stuck-on food, pulse the blender in a jar of warm soapy water.
- Dry the wand thoroughly, blade-side up, to prevent moisture from sitting in the bearings.
Never submerge the motor housing in water; instead, wipe it down with a damp cloth. Periodically check the blades for sharpness and ensure the coupling mechanism is free of grime. Proper storage is also essential; avoid kinking the cord and store the unit in a dry place to prevent any internal corrosion of the electrical components.
Cordless Versus Corded Portability Options
The choice between corded and cordless immersion blenders depends largely on your kitchen layout and cooking volume. Corded models are the traditional workhorses, providing consistent, high-wattage power without the risk of battery depletion. They are ideal for heavy-duty tasks like pureeing large batches of fibrous root vegetables or running for several minutes at a time. However, the cord can be an obstacle, limiting your reach and potentially dragging across hot stove burners.
| Type | Pros | Cons |
|---|---|---|
| Corded | Unlimited runtime; higher peak power. | Limited mobility; cord can be a safety hazard. |
| Cordless | Maximum portability; easy storage. | Needs recharging; usually lower torque. |
Cordless models have advanced significantly with the advent of lithium-ion technology. They offer the freedom to blend at an island or even at the dining table for tableside service. While they may lack the raw power of a 600-watt corded unit, they are more than sufficient for everyday tasks like frothing milk or blending a quick vinaigrette. For many home cooks, the convenience of not being tethered to an outlet outweighs the slight decrease in total power.
Professional Puree Consistency Tips
Achieving a professional-grade puree requires more than just high speed; it requires a balance of solids and liquids. If a puree is too thin, it will run across the plate; if it is too thick, it will look heavy and unappealing. To find the perfect balance, start with less liquid than you think you need. You can always add more broth, cream, or oil as the blender is running to reach the ideal viscosity. The mechanical action of the immersion blender is excellent for creating a shear force that results in a glossy, stable finish.
- Use high-starch vegetables like potatoes or parsnips for a thicker base.
- Incorporate cold fats at the end to create a "monte au beurre" effect.
- Blend for at least two minutes longer than you think is necessary to break down all fibers.
- Always season after the final texture is achieved, as flavors concentrate during blending.
For the smoothest possible result, consider the temperature of your ingredients. Pureeing while the ingredients are hot allows the cell walls of vegetables to break down more easily. If the mixture cools too much, the starches can become gummy rather than smooth, resulting in a less desirable mouthfeel.
Safety Guidelines for Hot Liquid Blending
Working with an immersion blender in a pot of boiling liquid requires strict adherence to safety protocols. One of the greatest risks is the creation of a "steam pocket" underneath the blender head. When the blades start, they can trap and then suddenly release hot steam, causing the liquid to erupt upward. To mitigate this, always start at the lowest possible speed and keep the wand slightly tilted to allow steam to escape from the blade housing. Always ensure your workspace is stable and that the pot is sitting firmly on a level burner.
- Never fill the pot to the brim; leave at least three inches of headspace.
- Turn off the heat source before you begin blending to stop the rolling boil.
- Wear an apron and oven mitts to protect your skin from incidental splashes.
- Ensure the cord is positioned away from the heating elements and hot surfaces.
Additionally, be mindful of the suction created by the motor. A high-powered blender can pull itself toward the bottom of the pot with significant force. If you are not prepared for this, the wand can jerk, leading to a loss of control. Maintain a firm, two-handed grip if necessary to keep the tool steady throughout the process.
Versatile Blade Attachments for Food Prep
Modern immersion blenders often come with a suite of interchangeable attachments that transform the tool into a multi-functional food processor. The standard S-blade is designed for general blending and pureeing, but specialized heads can expand your culinary capabilities. For instance, a whisk attachment is perfect for aerating egg whites or whipping heavy cream into soft peaks much faster than a manual whisk. Understanding which attachment to use can save significant time during prep work.
- Standard Blender Wand: Used for soups, smoothies, and emulsions.
- Whisk Attachment: Best for light aerating, meringues, and batters.
- Chopper Bowl: Ideal for mincing nuts, herbs, or onions without a knife.
- Milk Frother: Designed for creating micro-foam for lattes and cappuccinos.
When using attachments like the chopper bowl, the immersion motor connects to the top of a dedicated container. This provides the functionality of a small food processor without the bulky footprint. These attachments make the immersion blender one of the most space-efficient tools in the kitchen, capable of handling everything from morning smoothies to elaborate dinner party sauces with a simple click of a button.


Comments