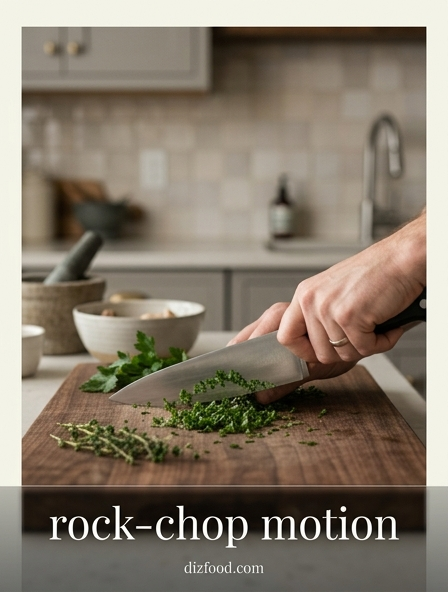
Understanding the Mechanics of the Rock Chop
The rock-chop motion is a cornerstone of professional culinary technique, predicated on the specific geometry of a chef's knife. This method utilizes the "belly" of the blade-the curved portion near the tip-to create a continuous, rhythmic slicing action. Unlike a vertical chop that requires the blade to leave the cutting board entirely, the rock chop maintains constant contact between the tip of the knife and the board. This contact point acts as a fulcrum, allowing the heel of the knife to move up and down in a circular arc.
To execute this effectively, the chef pushes the knife forward as it descends and pulls it back slightly as it rises. This dual-axis movement ensures that the blade slices through the cell walls of the produce rather than crushing them. Key mechanical factors include:
- Pivot Point: The front third of the blade remains grounded to stabilize the stroke.
- Arc Path: The hand follows an elliptical path rather than a strictly vertical one.
- Surface Friction: Minimal resistance is achieved by utilizing the entire length of the blade's curve.
Choosing the Right Professional Chef Knife
Not all knives are engineered for the rock-chop technique. The success of this motion depends heavily on the blade's profile and balance. A traditional Western or German-style chef's knife is usually the preferred tool because it features a significant curve, or "belly," which facilitates the rocking transition. In contrast, many Japanese knives, like the Santoku or Nakiri, have flatter edges designed for push-cutting or vertical chopping, which can cause the blade to "thud" or catch if rocked excessively.
When selecting a knife for high-volume prep, consider the following specifications to ensure ergonomic efficiency and performance:
| Feature | Ideal Specification | Reasoning |
|---|---|---|
| Blade Profile | Curved/Belly | Allows for smooth rocking without lifting the tip. |
| Bolster | Full or Tapered | Provides a comfortable transition for the pinch grip. |
| Weight | Balanced toward handle | Reduces wrist fatigue during repetitive motions. |
Mastering the Pinch Grip for Maximum Control
The pinch grip is the industry standard for securing a knife during complex cutting tasks. Instead of wrapping all four fingers around the handle-which limits mobility and shifts the center of gravity too far back-the chef "pinches" the blade itself. The thumb and the side of the index finger grip the base of the blade (the bolster), while the remaining three fingers wrap loosely around the handle. This technique effectively moves the hand closer to the blade's center of mass, transforming the knife into an extension of the arm.
By using the pinch grip, you achieve a level of precision that is impossible with a hammer grip. This hold provides several distinct advantages for the rock chop:
- Lateral Stability: Prevents the blade from wobbling or tilting mid-slice.
- Pressure Control: Allows for subtle adjustments in downward force based on the density of the ingredient.
- Leverage: Increases the power of the stroke while requiring less muscular effort from the forearm.
The Role of the Guiding Hand Claw
While the knife hand provides the power, the guiding hand provides the safety and the measurement. The "claw" position is the essential counter-technique to the rock chop. To form the claw, the chef tucks the fingertips inward toward the palm, resting the middle knuckles against the flat side of the blade. This creates a vertical barrier that prevents the sharp edge from coming into contact with the skin. The thumb remains tucked behind the fingers, acting as a stabilizer and helping to push the food forward.
Proper execution of the claw follows a specific sequence to ensure both safety and consistency in slice thickness:
- Position the ingredient firmly on the board.
- Rest the knuckles against the blade, ensuring the tips of the fingers are curled safely away.
- Use the knuckles as a physical gauge to move the hand backward in uniform increments.
- Maintain constant pressure on the food to prevent it from rolling or sliding.
Achieving Fluidity in the Rocking Motion
Fluidity in the rock chop is characterized by a lack of jarring stops or starts. It is a cyclical process where the knife never truly rests. As the heel of the knife clears the height of the ingredient, the hand moves forward and down. The moment the heel touches the board, the hand begins to move upward and backward. This creates a "rolling" sensation that is highly efficient for mincing herbs, dicing onions, or slicing carrots. The secret to this fluidity lies in the wrist; it should remain flexible but not floppy, acting as a shock absorber for the repetitive impact.
Beginners often make the mistake of lifting the entire knife off the board, which breaks the rhythm and increases the risk of uneven cuts. By focusing on keeping the tip anchored, the motion becomes more predictable. Over time, the sound of the knife against the board should change from a sharp "clack" to a soft, rhythmic "shush," indicating that the blade is slicing through the air and board with minimal wasted energy and maximum grace.
Optimizing Your Kitchen Prep Station
The environment in which you work dictates the ease of your knife skills. An optimized prep station reduces physical strain and maximizes the efficiency of the rock-chop motion. The height of the cutting board is the most critical factor; ideally, the board should sit at a level where your forearms are parallel to the floor when the knife is in the mid-rock position. If the board is too low, you will hunch, causing back pain; if too high, your shoulders will tense, leading to fatigue.
To create a professional-grade setup, follow these organizational guidelines:
- Stability: Place a damp paper towel or a silicone mat under the cutting board to prevent it from sliding during fast work.
- Mise en Place: Arrange bowls for "work," "finished product," and "scraps" in a semi-circle around the board to minimize reaching.
- Clearance: Ensure there is enough space to your right (or left for southpaws) so your elbow can move freely without hitting obstacles.
- Lighting: Position light sources to eliminate shadows over the blade's path.
Safety Protocols for Fast Knife Work
Speed is a byproduct of accuracy, but without strict safety protocols, it becomes a liability. High-speed rocking requires intense focus on the relationship between the blade and the guiding hand. One of the most important rules is to never look away from the knife while it is in motion. Even a split-second distraction can lead to the "claw" slipping, exposing fingertips to the edge. Additionally, chefs must maintain a clear "danger zone" on their cutting board, ensuring no other objects or fingers enter the path of the blade.
Implement the following safety measures to protect yourself during rapid prep sessions:
- Always keep the blade tip on the board to maintain a predictable pivot point.
- Ensure the knife is sharp; a dull blade requires more force and is more likely to slip off the skin of vegetables.
- Keep your cutting surface dry and free of debris to maintain traction.
- If you drop the knife, step back and let it fall; never attempt to catch a falling blade.
Essential Drills for Consistent Cutting Rhythm
Developing a consistent rhythm is a matter of muscle memory, which is best built through repetitive drills using low-cost ingredients. Celery, carrots, and potatoes are excellent practice materials because they offer different levels of resistance. A common drill involves slicing a carrot into uniform rounds using a metronome. Start at a slow tempo, perhaps 60 beats per minute, and focus on hitting the board exactly on the beat. This forces the brain to synchronize the guiding hand's movement with the knife's descent.
Another effective drill is the "herb mince," where a bunch of parsley or cilantro is bunched tightly and rocked through repeatedly. Focus on the following during your practice sessions:
- Uniformity: Check your slices for consistent thickness; variation indicates a rhythm break.
- Hand Synchronization: Ensure the guiding hand moves back exactly the same distance for every stroke.
- Posture Check: Pause every five minutes to reset your shoulders and grip to prevent tension buildup.
Maintaining Your Blade for Effortless Slicing
The rock-chop motion puts specific wear patterns on a knife, particularly on the belly and the tip. To maintain the effortless feel of a professional slice, the edge must be honed frequently and sharpened periodically. Honing with a ceramic or steel rod does not remove metal; rather, it realigns the microscopic "teeth" of the edge that bend over during use. For a chef performing high-volume rock chopping, honing should occur every 15 to 20 minutes of active cutting to ensure the blade remains perfectly vertical.
Understanding the difference between honing and sharpening is vital for tool longevity:
| Process | Frequency | Purpose |
|---|---|---|
| Honing | Daily / Per Task | Realigns the existing edge for immediate smoothness. |
| Sharpening | Every 3-6 Months | Removes metal to create a new, sharp apex on the blade. |
| Stropping | Weekly | Polishes the edge to a mirror finish for ultra-low friction. |
Transitioning from Slow Motion to Chef Speed
The transition from a slow, deliberate rock chop to "chef speed" is a journey of refinement rather than raw effort. Speed is simply the elimination of unnecessary movement. In the beginning, many cooks use excessively large motions, lifting the knife higher than necessary. As proficiency increases, the height of the rock decreases, and the circular motion becomes tighter and more efficient. This reduction in "travel distance" for the blade naturally results in a faster cutting speed without increasing the actual velocity of the hand.
To successfully increase your speed, focus on consistency first. Speed should never be forced; it should emerge naturally once the mechanics of the pinch grip, the claw, and the rocking arc are internalized. If you find yourself losing uniformity in your cuts or if your guiding hand feels frantic, you have exceeded your current "control ceiling" and should slow down. True professional speed is calm, quiet, and perfectly rhythmic, allowing the chef to process large quantities of food with minimal mental or physical strain.

Comments