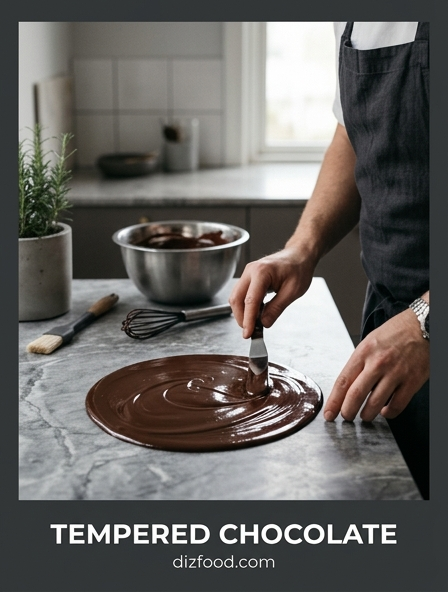
Understanding Ideal Temperature Ranges
Achieving the perfect temper requires precise thermal management to encourage the formation of stable Beta Type V crystals. Chocolate must first be melted completely to break down all existing fatty acid structures, typically reaching a temperature that ensures every crystal has dissolved. Once fully liquid, the mass is cooled to allow stable crystals to begin forming, before being slightly reheated to a working temperature that remains fluid but stable. This working window is narrow and varies significantly depending on the type of chocolate being processed.
| Chocolate Type | Melting Point | Cooling Point | Working Temp |
|---|---|---|---|
| Dark | 45-50°C | 27-28°C | 31-32°C |
| Milk | 40-45°C | 26-27°C | 29-30°C |
| White | 40-45°C | 25-26°C | 28-29°C |
Failure to adhere to these specific ranges results in the development of unstable crystals, leading to a dull finish and a soft, crumbly texture rather than a firm, professional snap. Precise digital thermometers are essential tools for monitoring these transitions in real time.
Preventing Moisture Seizure and Graininess
Chocolate is an anhydrous substance, meaning it contains very little water. When even a single drop of moisture enters the melting mass, it acts as a catalyst that binds the sugar particles together, pulling them out of the fat suspension. This creates a gritty, clumped paste known as "seized" chocolate, which is impossible to use for dipping or molding. Graininess can also occur if the chocolate is heated too quickly or unevenly, causing the sugar crystals to clump without the presence of external water.
- Always ensure whisks, spatulas, and bowls are bone-dry before use.
- Avoid using a lid on a double boiler, as condensation can drip into the bowl.
- Be cautious with water-based food colorings; use oil-based alternatives instead.
- Keep steam from the bottom pot of a bain-marie away from the chocolate bowl.
If seizure occurs, the chocolate cannot be returned to its original tempered state for coating. However, it may sometimes be salvaged for ganache or baking by adding a significant amount of warm liquid or fat, though the original structural integrity required for tempering will be permanently lost.
Avoiding Fat and Sugar Bloom
Bloom is a visual defect that appears as white streaks, spots, or a dusty film on the surface of set chocolate. There are two distinct types: fat bloom and sugar bloom. Fat bloom occurs when the cocoa butter separates from the solids and migrates to the surface, often due to improper tempering or exposure to fluctuating temperatures. Sugar bloom, conversely, is caused by moisture dissolving the sugar within the chocolate; once the moisture evaporates, large, gritty sugar crystals remain on the surface.
To prevent these issues, the crystallization process must be strictly controlled. Fat bloom is avoided by ensuring a high concentration of stable Type V crystals during the cooling phase. Sugar bloom is prevented by managing the environment, specifically avoiding "sweating" which occurs when cold chocolate is moved suddenly into a warm room. This transition causes atmospheric moisture to condense on the surface. Maintaining a consistent temperature during and after the setting process is the primary defense against both forms of bloom. While bloomed chocolate is safe to eat, it lacks the aesthetic appeal and smooth mouthfeel necessary for high-quality confectionery work.
Mastering Agitation for Smooth Texture
Constant movement is as critical to tempering as temperature control. Agitation facilitates the even distribution of stable cocoa butter crystals throughout the melted mass. Without consistent stirring, crystals may grow in isolated clusters, leading to uneven setting and a lack of uniformity in the finished product. Proper agitation also aids in the cooling process by moving the warmer chocolate from the center to the edges of the bowl, ensuring a homogenous temperature throughout the batch.
- Begin stirring immediately as the chocolate begins to melt to avoid localized hotspots.
- During the cooling phase, use a scraping motion to incorporate chocolate from the sides of the bowl.
- Avoid vigorous whipping, which introduces unwanted air bubbles into the suspension.
- Continue stirring while adding seed chocolate to ensure it melts and distributes evenly.
- Stir occasionally during the working phase to maintain an even temperature.
Consistent movement ensures that the cocoa butter molecules are forced into the desired tight-knit structure. This results in a product with a high-gloss finish and a smooth, silky mouthfeel that melts evenly on the palate.
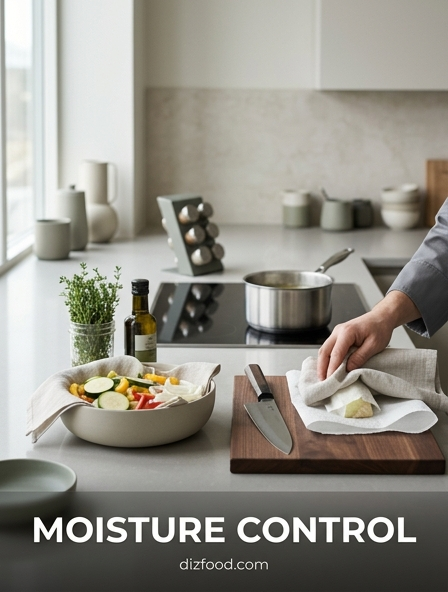
Controlling Humidity in the Kitchen
The kitchen environment plays a silent but pivotal role in the success of chocolate work. High relative humidity is a significant obstacle, as chocolate is hygroscopic, meaning it readily absorbs moisture from the air. When the humidity levels exceed 50%, the risk of the chocolate absorbing water increases, which can lead to a sticky surface, sugar bloom, or a loss of the characteristic "snap." Confectioners often utilize dehumidifiers to keep the workspace dry and stable.
Temperature and humidity work in tandem; a cool but humid room can be more detrimental than a slightly warmer, dry room. Ideally, the ambient temperature should remain between 18°C and 20°C. If the air is too damp, the chocolate may take longer to set, or it may never fully release from a mold. Furthermore, moisture in the air can affect the shelf life of the finished pieces, causing them to become tacky over time. Professional kitchens prioritize ventilation and climate control to ensure that the chocolate remains protected from these invisible environmental factors during every stage of the tempering and setting process.
Optimal Cooling Environments for Snap
The cooling phase is where the final structural integrity of the chocolate is established. If chocolate cools too slowly, the cocoa butter crystals may revert to unstable forms, resulting in a dull appearance. If it cools too quickly, such as in a standard freezer, the chocolate may contract unevenly or develop condensation upon removal. An ideal cooling environment features moderate airflow and a consistent temperature slightly below room temperature.
- Cooling Tunnel: Professional standard for even, rapid setting.
- Wine Cooler: Provides a stable environment around 15°C.
- Refrigeration: Use only briefly (5-10 minutes) to initiate a set in molds.
- Ambient Air: Best for dipped items in a climate-controlled room.
A successful set is indicated by the chocolate's natural contraction. As the cocoa butter crystallizes into a stable matrix, it shrinks slightly, allowing the chocolate to release cleanly from polycarbonate molds. This contraction is what produces the audible "snap" when the chocolate is broken. Proper airflow ensures that the latent heat released during crystallization is carried away, preventing the surface from warming back up and losing its temper.
Selecting High Quality Seed Chocolate
The "seeding" method relies on adding small pieces of tempered chocolate to a melted batch to "seed" the formation of stable crystals. The quality of this seed chocolate is paramount. It must be perfectly tempered, as it serves as a blueprint for the rest of the batch. Using inferior chocolate with low cocoa butter content or chocolate that has already bloomed will result in a failed temper. Couverture chocolate is the preferred choice for professional results due to its higher percentage of cocoa butter, which enhances fluidity and shine.
| Characteristic | Requirement for Seed |
|---|---|
| Crystal State | Must be pre-tempered (Beta V) |
| Cocoa Butter | Minimum 31% for fluidity |
| Form | Small callets or finely chopped blocks |
| Condition | No signs of fat or sugar bloom |
When selecting seed chocolate, ensure it has been stored correctly. If the seed itself has been compromised by heat, it will not contain the necessary crystal structures to catalyze the rest of the batch. High-quality couverture ensures a higher gloss and a more reliable set.
Managing Reheating Thresholds Carefully
Once chocolate has been cooled to its crystallization point, it must be gently reheated to its working temperature. This step is delicate; if the temperature rises just a few degrees above the working threshold, the stable Beta V crystals will melt away, and the temper will be lost. This necessitates starting the entire process over from the initial melting stage. Managing this window requires a gentle heat source, such as a hair dryer, a heat gun on a low setting, or brief bursts in a microwave.
The goal of reheating is to melt away any unstable, low-melting-point crystals while preserving the stable ones. It also improves the viscosity of the chocolate, making it thin enough for elegant dipping and thin-shelled molds. During the working period, the temperature will naturally drop as the chocolate sits. Frequent, cautious applications of heat are necessary to keep the mass within the 1-2 degree "goldilocks" zone. Continuous monitoring with an infrared or probe thermometer is the only way to ensure the chocolate does not cross the point of no return. Precision here ensures the last piece dipped looks as perfect as the first.
Identifying Early Signs of Overheating
Overheating chocolate can happen in seconds, especially when using high-intensity heat sources like microwaves or direct steam. Identifying the early warning signs allows a chef to intervene before the chocolate is permanently ruined. Overheated chocolate loses its shine, begins to thicken abnormally, and may eventually take on a "burnt" or bitter odor. In extreme cases, the solids and fats will separate completely, resulting in a thick, lumpy mess that cannot be tempered.
- Loss of Fluidity: The chocolate becomes heavy and difficult to stir.
- Thickening: A sudden change from a silky liquid to a pasty consistency.
- Dullness: The surface loses its reflective quality even while liquid.
- Grainy Appearance: Small clumps of scorched solids become visible.
If the chocolate is only slightly overheated (past the working range but not scorched), it can be saved by adding fresh, unmelted seed chocolate and bringing the temperature back down. However, if the chocolate has reached the point of scorching-typically above 55°C for dark chocolate-the proteins and sugars have chemically changed, and the batch must be discarded or used for alternative culinary purposes.
Proper Storage for Long Term Gloss
The work does not end once the chocolate has set. Proper storage is essential to maintain the gloss, snap, and flavor profile over time. Tempered chocolate is sensitive to its environment and can easily absorb odors from nearby food items like onions or spices. It should be stored in a cool, dark, and dry location, away from direct sunlight which can cause localized melting and fat migration. The ideal storage temperature is between 15°C and 18°C, with a relative humidity of less than 50%.
Airtight containers or vacuum-sealed bags are recommended to protect the chocolate from oxygen and moisture. When storing finished confections, avoid stacking them directly on top of each other, as the pressure can cause the surfaces to mar or stick. If the chocolate must be refrigerated due to extreme external heat, it should be wrapped in multiple layers of plastic wrap and placed in an airtight container. When removing it from the cold, it must reach room temperature before the container is opened to prevent condensation from forming on the surface. Following these protocols ensures that the professional finish achieved during tempering remains intact for weeks or even months.


Comments