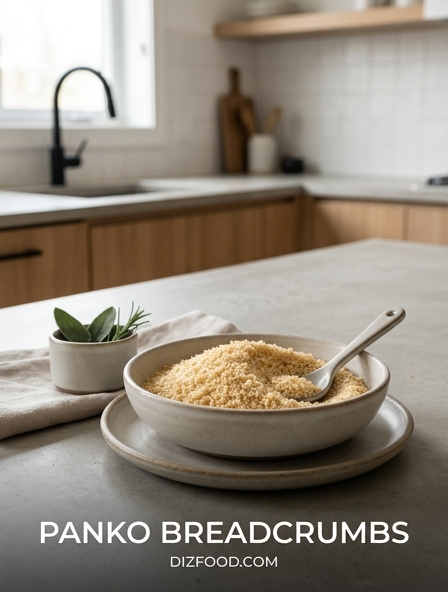
The Panko Advantage Over Traditional Crumbs
Panko breadcrumbs represent a significant departure from the standard sawdust-like texture of traditional Western breadcrumbs. Originating in Japan, Panko is produced using a unique electrical induction heating process that bakes the bread without creating a crust. This results in large, airy, sliver-like flakes rather than dense granules. Because the flakes have a larger surface area and a porous structure, they do not pack down tightly against the food, allowing for a lighter, more delicate crunch that is far superior to the heavy, doughy coating often associated with regular crumbs.
Furthermore, the physical properties of Panko offer a distinct health and texture advantage during the cooking process. Their jagged shape prevents them from absorbing as much oil as traditional crumbs, which often act like a sponge. This ensures that the final product remains crisp and clean rather than greasy. Chefs prefer Panko for its ability to maintain its structural integrity under heat, providing a satisfying "snap" that lasts long after the dish has left the pan. Whether used for deep-frying or as a crunchy topping for baked casseroles, the Panko advantage is found in its airy lightness and exceptional crispness.
Essential Dredging Station Setup
Creating a professional-grade breaded crust requires an organized and efficient dredging station. A chaotic workspace leads to uneven coating and "club hand," where your fingers become as breaded as the protein. The ideal setup utilizes three wide, shallow containers arranged in a specific linear order to facilitate a smooth workflow. Place your seasoned flour in the first dish, your liquid binder in the second, and your Panko breadcrumbs in the final dish. Position a wire rack or clean plate at the end of the line to hold the prepared items before they hit the hot oil.
To maintain cleanliness and ensure a perfect finish, follow the essential rules of station management:
- The Dry Hand/Wet Hand Rule: Designate one hand for dry ingredients (flour and Panko) and the other for wet ingredients (egg wash). This prevents clumping.
- Container Depth: Use containers with at least two inches of depth to prevent Panko from spilling over the sides.
- Proximity: Keep the dishes as close together as possible to minimize drips on the counter.
- Batching: Do not overcrowd the Panko dish; refresh the crumbs frequently to avoid them becoming damp from excess egg wash.
Optimal Oil Temperatures for Frying
The success of Panko-coated food depends almost entirely on precise temperature control. If the oil is too cold, the porous Panko flakes will absorb the fat, resulting in a heavy, soggy mess. Conversely, if the oil is too hot, the breadcrumbs will burn before the interior protein is safely cooked. For most applications, the "sweet spot" for frying Panko-coated items is between 350°F and 375°F. This range ensures that the moisture in the food evaporates rapidly, creating a steam barrier that prevents oil penetration while simultaneously browning the exterior to a perfect golden hue.
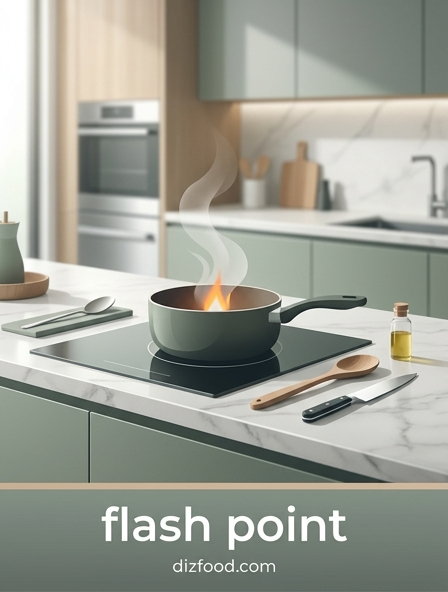
Maintaining this temperature requires constant monitoring, as adding cold food to the pan will naturally cause the temperature to drop. It is advisable to use a clip-on thermometer and fry in small batches to prevent significant fluctuations. Refer to the table below for common oil smoke points, which dictate which fats are safest for high-heat Panko frying:
| Oil Type | Smoke Point | Suitability for Panko |
|---|---|---|
| Canola Oil | 400°F | Excellent |
| Peanut Oil | 450°F | Superior |
| Extra Virgin Olive Oil | 325°F | Poor (Burns easily) |
| Grapeseed Oil | 420°F | Great (Neutral flavor) |
The Three Step Breading Process
Achieving a Panko coating that does not flake off in the pan requires a disciplined adherence to the three-step breading technique. This process creates a structural bond between the food and the crumbs, ensuring the crust remains an integrated part of the dish. Each step serves a functional purpose that cannot be skipped or rearranged without compromising the final texture.
- The Flour Foundation: Lightly coat the protein in seasoned all-purpose flour. This dries the surface and provides a "primer" for the liquid binder to cling to. Always shake off the excess flour.
- The Binder: Submerge the floured item into a liquid binder, usually beaten eggs mixed with a splash of water or milk. This acts as the glue. Ensure every crevice is moistened.
- The Panko Press: Transfer the item to the Panko. Instead of just tossing it, gently press the crumbs into the surface. This mechanical action ensures the large flakes adhere firmly to the egg wash, creating a thick, protective shield that will crisp up beautifully when heat is applied.
Infusing Flavors Into Your Panko
While Panko is prized for its texture, it is relatively neutral in flavor. This provides a blank canvas for chefs to introduce aromatic complexity directly into the crust. Enhancing the crumbs ensures that every bite is seasoned from the outside in, creating a more dynamic eating experience. The key is to use dry or finely minced ingredients that will not introduce excessive moisture, which could compromise the signature Panko crunch. When adding aromatics, ensure they are distributed evenly throughout the breadcrumbs to avoid concentrated "hot spots" of flavor.
Consider the following additions to elevate your breading mixture:
- Hard Cheeses: Finely grated Parmesan or Pecorino Romano adds a salty, umami depth that browns beautifully.
- Dried Herbs: Thyme, oregano, and parsley provide an earthy, Mediterranean profile.
- Spices: Smoked paprika, garlic powder, and cayenne pepper can add both color and heat.
- Citrus Zest: Lemon or lime zest provides a bright, acidic contrast to the richness of fried foods.
- Aromatic Seeds: Toasted sesame seeds or poppy seeds add extra texture and a nutty undertone.
Mastering the Shallow Fry Technique
Shallow frying is the most common and efficient method for cooking Panko-breaded cutlets and vegetables. Unlike deep frying, which requires large volumes of oil, shallow frying uses just enough fat to reach halfway up the side of the food. This method allows for better control and creates a distinct "seared" flavor that complements the toasted crumbs. To master this, choose a heavy-bottomed skillet, such as cast iron or stainless steel, which retains heat effectively even when cold proteins are added. The oil should be shimmering and hot before the first piece of food is introduced.
The secret to a perfect shallow fry lies in patience and observation. Avoid the urge to move the food immediately; the Panko needs time to set and form a rigid structure. When the edges of the breadcrumbs begin to turn a deep golden brown, use tongs or a fish spatula to flip the item gently. Because the food is in contact with the bottom of the pan, heat is transferred through both the oil and the metal, leading to a rapid crisping action. Always keep an eye on the oil level, as Panko can absorb a small amount of fat; add more if necessary, but allow it to come back up to temperature before continuing.
Avoiding Soggy Breaded Crusts
There is nothing more disappointing than a Panko crust that turns mushy or slides off the meat. This failure is usually the result of trapped moisture or improper temperature management. Moisture is the enemy of the crunch; if the surface of the protein is wet before it hits the flour, the coating will never properly bond. Similarly, if the steam escaping from the cooking meat has nowhere to go, it will soften the breadcrumbs from the inside out. Preventing sogginess requires a proactive approach from the moment of preparation through the final plating.
To guarantee a dry, shatteringly crisp result, follow these critical tips:
- Pat Dry: Always use paper towels to remove surface moisture from your protein before starting the dredging process.
- No Overcrowding: Frying too many items at once lowers the oil temperature and traps steam between the pieces.
- Proper Drainage: Never place freshly fried Panko items directly onto a flat plate or paper towel, as the bottom will steam and become soft.
- Pre-Toasting: If baking instead of frying, toast your Panko in a pan with a little oil beforehand to ensure it browns and crisps in the oven's dry heat.
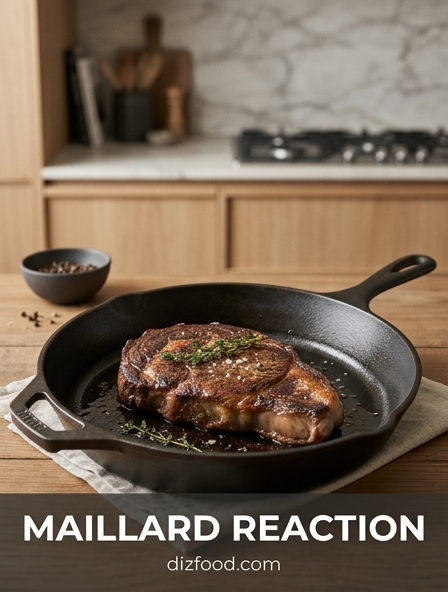
Secret to Uniform Golden Coloring
A perfectly cooked Panko dish should look like it was dipped in liquid gold, with an even, monochromatic finish that signals professional execution. Inconsistent coloring is often caused by hot spots in the pan or using oil that has become contaminated with burnt debris from previous batches. To achieve uniformity, you must manage the environment of the frying pan with precision. This includes choosing the right fat and ensuring that the food is not resting directly on the heat source for too long without movement. The large flakes of Panko catch light and heat differently than fine crumbs, making them more sensitive to uneven pans.
For oven-baked Panko, the "golden secret" is a light coating of fat. Without oil, Panko will remain pale and white, even when the food is cooked through. Using a high-quality oil spray can provide a fine, even mist that encourages the Maillard reaction across the entire surface. If frying, using a neutral oil with a high smoke point prevents the "burnt" flavor and dark spots associated with oil breakdown. Finally, regularly straining your oil between batches to remove stray, blackened crumbs will prevent them from sticking to the next piece of food and ruining the aesthetic.
Resting Techniques for Lasting Crunch
The moments immediately following the fry are just as critical as the cooking process itself. When food is removed from hot oil, it continues to cook internally through carry-over heat, and it releases significant amounts of steam. If you place a hot, breaded cutlet directly onto a solid surface, that steam is trapped against the bottom crust, turning it soggy in seconds. Proper resting techniques are designed to allow air to circulate around the entire surface area of the food, preserving the integrity of the Panko flakes while the internal juices redistribute.
The gold standard for resting breaded items is the stainless steel wire cooling rack. By elevating the food, you allow steam to escape from all sides. If you must use paper towels to absorb excess oil, place them under the wire rack rather than directly under the food. Additionally, avoid stacking breaded items on top of one another; the heat and moisture from the bottom layer will ruin the crunch of the layer above. Give the food approximately two to three minutes to "set" before serving. This brief pause ensures that the first bite is as crispy as the last, providing a professional finish to your culinary efforts.
Best Proteins for Panko Coating
Panko is incredibly versatile, but it shines brightest when paired with proteins that benefit from a high-contrast texture. Traditionally, it is the star of Japanese Tonkatsu (pork cutlets) and Ebi Furai (fried shrimp), where the light crunch complements the tender, juicy interior. However, its application extends far beyond Asian cuisine. Any protein that is relatively thin or can be pounded to a uniform thickness is a prime candidate for a Panko crust. The fast-cooking nature of the crumbs ensures the exterior is done at the exact moment the interior reaches safety.
The following table outlines the best proteins for Panko and why they work so effectively:
| Protein Source | Recommended Cut | Why It Works |
|---|---|---|
| Pork | Loin or Tenderloin | Provides a firm base that holds the crust well. |
| Chicken | Breast or Thigh | Absorbs flavors of seasoned Panko beautifully. |
| Seafood | Shrimp or Cod | Delicate meat is protected by the airy Panko shield. |
| Vegetables | Zucchini or Eggplant | Adds necessary structural crunch to soft vegetables. |

Comments