
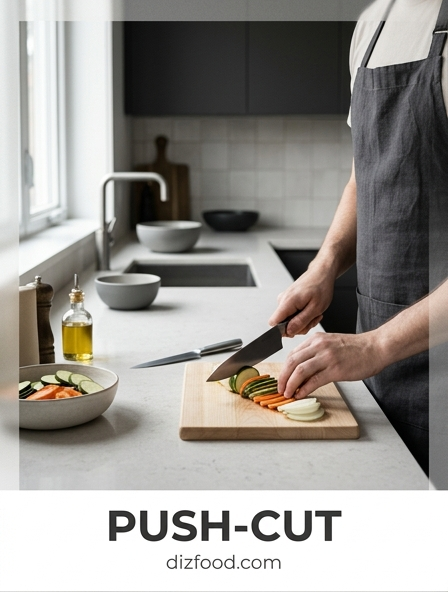
The Mechanics of the Push-Cut Technique
The push-cut is a fundamental knife skill used in professional kitchens to achieve clean, vertical separations in dense produce. Unlike the rocking motion used for herbs, the push-cut involves moving the blade both downward and forward simultaneously in a fluid, diagonal arc. This motion utilizes the entire length of the cutting edge, distributing the force of the cut to prevent the vegetable from crushing or splintering. By pushing the knife away from the body while descending, the chef ensures that the heel of the blade initiates the cut and the tip finishes it, resulting in a smooth surface on every slice.
- Direction: Downward and forward away from the chef.
- Engagement: The blade maintains contact with the product, not the board, until the final descent.
- Force Distribution: Horizontal momentum reduces the vertical pressure required.
- Product Application: Best suited for starchy tubers, hard squash, and fibrous roots.
This technique is particularly effective for maintaining the integrity of cellular structures within the vegetable. By sliding through the fibers rather than smashing them, the push-cut preserves moisture and ensures that the vegetable cooks evenly. Mastery of this mechanic requires a relaxed wrist and a rhythmic cadence that aligns with the natural weight of the knife.
Essential Knife Selection for Root Vegetables
Selecting the appropriate cutlery is vital for executing the push-cut effectively, especially when dealing with the resistance of heavy root vegetables. A knife with a flat profile or a very slight belly is preferred, as it maximizes contact with the cutting board at the end of the stroke. The weight of the knife should do a significant portion of the work, allowing the chef to guide the blade rather than forcing it through dense tissues like those found in rutabagas or sweet potatoes.
| Knife Type | Blade Profile | Primary Advantage |
|---|---|---|
| Nakiri | Flat Edge | Maximum surface contact for vertical dicing. |
| Gyuto | Slight Curve | Versatile for both pushing and slight rocking. |
| Chinese Cleaver | Rectangular | Heavier weight facilitates easier penetration of roots. |
| Santoku | Sheep's Foot | Short length provides exceptional tip control. |
Carbon steel or high-quality stainless steel with a thin spine is ideal. A thick spine can wedge in the middle of a large carrot or parsnip, causing the vegetable to crack prematurely. Professional chefs often opt for a blade with a 15-degree edge angle to ensure the push-cut remains effortless throughout a long prep shift.
Preparing Stable Bases for Precision Dicing
Precision in the push-cut technique begins with the physical stability of the ingredient. Most root vegetables are naturally cylindrical or irregular, which creates a significant rolling hazard during preparation. To mitigate this risk and ensure uniform results, the chef must first "square off" the vegetable. This process involves removing a thin slice from one side to create a flat, stationary surface that sits flush against the cutting board. Once the vegetable is anchored, the push-cut can be executed with maximum force and minimal deviation.
- Trim the stem and root ends to define the length of your work piece.
- Peel the skin thoroughly to expose the inner flesh and remove grit.
- Slice a small longitudinal sliver from the side to create a flat base.
- Rotate the vegetable onto the flat side to stabilize the entire structure.
- Proceed to cut planks of equal thickness, which will eventually become batons.
By establishing this "foundation," the chef eliminates the need to fight the vegetable's natural shape. This stability allows for the concentration of energy into the forward-pushing motion rather than balancing the product. A stable base is the prerequisite for achieving the geometric perfection required in high-end culinary presentations.
Mastering the Forward Motion for Clean Edges
The hallmark of a successful push-cut is a glassy, smooth edge on the cut surface of the vegetable. This is achieved by emphasizing the forward component of the "down and forward" motion. If a chef only pushes downward, the blade acts as a wedge, often bruising the cell walls of the vegetable and causing it to weep moisture. By sliding the blade forward as it descends, the sharp edge acts like a saw on a microscopic level, slicing through the tough lignins of root vegetables with surgical precision. This motion should be a single, confident stroke rather than a series of hesitations.
To master this, one must visualize the blade traveling on a 45-degree angle toward the front of the cutting board. The movement should originate from the shoulder and elbow rather than just the wrist, providing a more stable and powerful lever. When performed correctly, the sound produced is a clean "thud" against the board, indicating that the blade has traveled through the product and finished its forward arc. This technique prevents the "accordion effect," where vegetables remain attached by a thin skin at the bottom because the blade failed to complete its horizontal travel across the board surface.
Proper Hand Positioning and Grip Stability
The efficacy of the push-cut is heavily dependent on how the knife is held and how the non-cutting hand guides the ingredient. Professional chefs utilize the "pinch grip," where the thumb and index finger grip the bolster of the knife while the other three fingers wrap around the handle. This grip moves the center of gravity forward, allowing for better control over the forward-pushing motion. It provides a level of stability that a standard handle grip cannot offer, particularly when navigating the high-density centers of large beets or celery roots.
- Pinch Grip: Provides lateral stability and prevents the blade from twisting.
- The Claw: The non-cutting hand must tuck the fingertips inward to protect them.
- Guide Knuckle: The flat of the blade rests against the middle knuckle for distance measurement.
- Wrist Alignment: Keep the wrist straight to avoid repetitive strain during heavy prep.
The non-cutting hand, often referred to as the "guide hand," is equally important. By forming a "claw," the chef ensures the fingertips are safely away from the edge while the knuckles act as a fence for the blade. This physical contact between the knife and the knuckle allows the chef to measure the thickness of each slice by feel, facilitating rapid and identical cuts throughout the dicing process.
Achieving Perfectly Uniform Vegetable Cubes
Uniformity in dicing is not merely an aesthetic choice; it is a functional requirement for even cooking. When root vegetables are push-cut into identical cubes, they respond to heat at the same rate, preventing a dish from containing both mushy and raw pieces. The process follows a strict progression from planks to batons and finally to cubes. Using the push-cut throughout each phase ensures that the edges remain sharp and the dimensions stay true to the desired specification, whether it be a fine brunoise or a large carre.
- Cut the squared-off vegetable into planks of a specific thickness (e.g., 1/2 inch).
- Stack the planks neatly, ensuring they are perfectly aligned.
- Use the push-cut to slice the stack into long strips, known as batons.
- Rotate the batons 90 degrees and gather them into a tight bundle.
- Execute final push-cuts across the bundle to produce uniform cubes.
During the final dicing phase, the forward motion is critical. Because the chef is cutting through multiple batons at once, there is a tendency for the stack to splay. A firm guide hand and a clean, sliding push-cut will keep the bundle together, resulting in cubes with 90-degree angles and smooth faces that elevate the visual quality of soups, stews, and roasted medleys.
Safety Standards for Heavy Root Preparation
Working with dense root vegetables poses unique safety challenges due to the force required for processing. A dull blade is the primary cause of kitchen accidents, as it requires the chef to apply excessive downward pressure, increasing the likelihood of the knife slipping. In push-cutting, the blade must be sharp enough to bite into the surface of the vegetable immediately upon contact. Furthermore, the work environment must be optimized for stability to prevent the cutting board from shifting during the forward-thrusting motion of the knife.
- Board Security: Place a damp paper towel or a silicone mat under the cutting board.
- Blade Sharpness: Hone the edge every 15 minutes of heavy use to maintain its bite.
- Body Mechanics: Stand with feet shoulder-width apart to provide a stable base of support.
- Clear Workspace: Regularly clear scraps from the board to maintain a flat cutting area.
Safety also involves mental focus. Because the push-cut is a repetitive motion, it is easy to lose track of the guide hand's position. Chefs must maintain the "claw" at all times, ensuring the thumb is tucked behind the fingers. If the vegetable becomes too small to hold safely, it should be set aside for stocks rather than risked with a final, unstable cut.
Common Dicing Errors and How to Correct Them
Even experienced cooks encounter issues when applying the push-cut to stubborn root vegetables. One of the most frequent errors is the "tapered cut," where the top of the dice is smaller than the bottom. This usually occurs when the knife is tilted during the descent. Another common issue is the "accordion cut," where the vegetable pieces remain attached at the base because the knife did not complete its forward travel to reach the board. Identifying these errors early allows the chef to adjust their mechanics before processing the entire batch.
| Issue | Probable Cause | Correction |
|---|---|---|
| Tapered Cubes | Knife tilting laterally. | Keep blade perpendicular to the board. |
| Accordion Pieces | Insufficient forward push. | Extend the stroke further toward the front. |
| Cracked Vegetables | Applying too much downward force. | Sharpen blade and increase sliding motion. |
| Uneven Thickness | Guide hand moving inconsistently. | Use knuckle as a consistent gauge. |
To correct these issues, slow down the tempo. Focus on the geometry of the blade relative to the board. Ensure that the heel and the tip both finish the cut in a flat position. By consciously monitoring the exit of the blade from the vegetable, the chef can eliminate the partial cuts that ruin the uniformity of a professional dice.
Impact of Blade Geometry on Edge Sharpness
The physics of the push-cut are dictated by the geometry of the knife's edge. A blade that is too thick at the "shoulders" (the area just above the sharpened edge) will create a splitting effect rather than a slicing effect. This is particularly noticeable in carrots and parsnips, where a thick blade will cause the vegetable to "snap" before the edge has reached the bottom. For a successful push-cut, the blade should have a distal taper-thinning from the spine to the edge and from the heel to the tip-allowing for minimal resistance as it slides through the produce.
Blade hardness also plays a role. Harder steels (60+ Rockwell Scale) can hold a much finer, more acute angle, which is perfect for the precision required in dicing. However, these edges are also more brittle. When push-cutting, it is vital to avoid any twisting or lateral movement, as this can chip a high-performance edge against the dense fibers of a root. A well-maintained 50/50 bevel is generally recommended for the push-cut, providing a balanced path through the vegetable and making it easier to maintain a straight line from the start to the finish of the stroke.
Daily Drills for Speed and Cutting Consistency
Consistency in the kitchen is the result of muscle memory, which can only be developed through focused practice. To improve speed and accuracy with the push-cut, chefs often utilize "potato drills." Potatoes are inexpensive and provide the perfect resistance for practicing the forward-motion technique. By dedicating ten minutes a day to dicing a single large potato into uniform 1/4-inch cubes, a cook can refine their grip, their stance, and their rhythmic cadence without the pressure of a live service environment.
- Rhythm Practice: Use a metronome or a steady beat to time each push-cut.
- Size Matching: Compare cubes from the beginning of the drill to the end.
- Blind Gauging: Practice moving the guide hand without looking to build tactile awareness.
- Speed Increments: Only increase speed once 100% uniformity is achieved at a slow pace.
The goal of these drills is to make the push-cut an unconscious action. When the motion becomes fluid, the chef can focus on the broader environment of the kitchen while their hands maintain a high standard of precision. Over time, the transition from heavy root vegetables to softer produce will feel effortless, as the mechanics of the push-cut provide a universal foundation for superior knife work across all culinary applications.

Comments