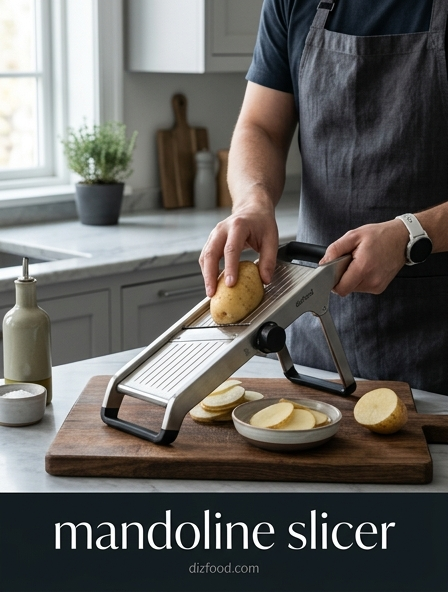
Essential Safety Gear for Mandoline Use
The mandoline slicer is widely regarded as one of the most hazardous tools in the kitchen due to the extreme sharpness of its fixed blades. To mitigate the risk of severe lacerations, utilizing appropriate safety gear is non-negotiable. The primary line of defense is a cut-resistant glove, typically rated ANSI Level A5 or higher. These gloves are woven with high-performance polyethylene or stainless steel filaments to prevent the blade from penetrating the skin during accidental contact.
- Cut-Resistant Gloves: Provides a tactile barrier for the hand holding the produce.
- Food Safety Holder (Pusher): A plastic guard that anchors the vegetable and keeps fingers away from the cutting deck.
- Chainmail Mitts: Used in professional environments for maximum protection against heavy-duty industrial blades.
In addition to wearable gear, the food holder provided with the unit should always be employed, especially as the vegetable becomes smaller. Attempting to slice the "tail end" of a radish or potato without a pusher is the leading cause of kitchen-related emergency room visits. Safety gear should be inspected regularly for fraying or damage to ensure continued efficacy during high-speed prep tasks.
Choosing the Right Blade for Uniformity
The geometry of the blade significantly impacts the quality of the cut and the ease of the slicing motion. Different mandoline models offer various blade configurations designed for specific textures and culinary outcomes. Selecting the correct blade ensures that the vegetable does not tear or bruise during the process.
| Blade Type | Best Used For | Resulting Texture |
|---|---|---|
| Straight Blade | Hard vegetables like potatoes and carrots | Clean, crisp slices |
| V-Shaped Blade | Soft produce like tomatoes or peppers | Even piercing from two angles |
| Serrated Blade | Waffle cuts and crinkle fries | Textured, decorative surfaces |
Professional chefs often prefer the straight blade for its versatility, while home cooks may find the V-shaped blade more forgiving for a wider variety of produce. The choice of blade should also consider the density of the food; a diagonal or V-cut reduces the initial resistance required to start the slice, leading to more uniform results across a large batch of ingredients.
Proper Hand Placement and Grip Techniques
Achieving consistent results with a mandoline requires more than just a sharp blade; it demands a disciplined approach to how the hand interacts with the food and the device. Improper grip not only increases the risk of injury but also leads to tapered or uneven slices. Mastering the grip involves balancing downward pressure with forward momentum.
- The Palm Press: Use the flat of the safety guard to apply even pressure across the entire surface of the vegetable.
- Centering the Load: Place the produce in the middle of the guard to prevent it from tilting or sliding off the side of the runway.
- The Claw Method: If a guard is unavailable, curl fingers inward and use the knuckles to guide the food, though this is discouraged for beginners.
- Consistent Vector: Ensure the hand moves in a straight line parallel to the slicer's frame.
The key is to avoid "death-gripping" the food. A relaxed but firm hold allows for a smoother glide. If the vegetable feels stuck, do not force it; stop, reset the position, and check for any obstructions. Maintaining a consistent angle of the hand relative to the blade is the secret to producing professional-grade translucent slices.
Mastering the Fluid Sliding Motion
The efficiency of a mandoline slicer relies on a rhythmic, fluid motion rather than brute force. A common mistake is using a jerky or hesitant movement, which causes the blade to catch and create "steps" in the produce. To achieve a perfect slice, one must engage the entire arm from the shoulder rather than just the wrist.
Start with the produce at the top of the ramp and apply steady, moderate pressure. As you slide the item toward the blade, maintain a constant speed. The follow-through is just as important as the initial contact; continue the motion until the food holder has completely cleared the blade assembly. This ensures that the tail end of the slice is just as clean as the beginning. Think of the motion like a pendulum-smooth, repetitive, and predictable. When slicing high-moisture vegetables like cucumbers, the speed can be increased, but for denser items like sweet potatoes, a slower, more deliberate stroke prevents the blade from deflecting and ensures the thickness remains calibrated throughout the entire prep session.
Adjusting Thickness for Professional Results
The ability to control thickness with microscopic precision is what sets the mandoline apart from a standard chef's knife. Most modern slicers utilize either a dial system or a set of swappable inserts to determine the gap between the deck and the blade. Understanding these increments is vital for achieving specific culinary textures.
- Paper Thin (0.5mm - 1mm): Ideal for radish garnishes, homemade potato chips, and carpaccio.
- Medium (2mm - 3mm): Perfect for cucumber salads, apple tarts, and slaw bases.
- Thick (5mm+): Best for eggplant rounds, gratin potatoes, and citrus wheels.
When adjusting the thickness, always perform a test cut on a scrap piece of vegetable. Different densities react differently to the blade; a setting that produces a perfect potato slice might result in a shredded mess when applied to a soft tomato. If your mandoline uses a screw-adjust mechanism, ensure both sides are tightened equally to prevent lopsided slices. Consistent thickness is not just about aesthetics; it is critical for ensuring that all pieces of food cook at the same rate, preventing a mix of burnt and undercooked morsels in the final dish.
Advanced Julienne and Dicing Methods
Beyond simple flat slices, many mandolines feature vertical teeth known as julienne blades. These secondary blades score the produce before it hits the primary cutting edge, resulting in uniform matchsticks or batons. Mastering this feature allows for rapid preparation of stir-fry vegetables and salad toppings with a level of precision difficult to achieve by hand.
To produce a classic julienne, engage the vertical teeth and use a firm, continuous stroke. For dicing, a "two-pass" technique is required. First, the vegetable is sliced with the julienne teeth engaged. Then, the produce is rotated 90 degrees before the second pass. While this requires careful coordination and the use of a specialized safety guard that can hold the pieces together, it results in perfectly cubic brunoise or mirepoix. It is essential to ensure the julienne teeth are fully retracted when switching back to standard slicing to avoid unwanted scoring. Keeping these teeth sharp is vital, as they encounter more resistance than the main blade due to the increased surface area of the cut.
Maximizing Efficiency in High Volume Prep
In a professional kitchen or during meal prep for a large family, the mandoline is an unmatched tool for speed. To maximize efficiency, the workspace must be organized to facilitate a "flow" from raw product to finished slice. This involves the Mise en Place philosophy, ensuring that there are no interruptions once the slicing begins.
- Standardize Produce: Trim the ends of vegetables so they have a flat surface to rest against the deck.
- Gravity Assistance: Position the mandoline at a slight downward angle to let gravity help pull the food through the blade.
- Batch Processing: Slice all of one type of vegetable before changing settings or blades.
- Collection Bin: Place a large container directly under the exit point to catch slices without them piling up and jamming the blade.
By minimizing the time spent picking up individual slices or hunting for the next vegetable, a cook can process several pounds of produce in a fraction of the time it would take with a knife. Efficiency also comes from maintaining a steady cadence, which reduces fatigue and ensures that the quality of the last slice is identical to the first.
Maintaining Your Mandoline for Peak Performance
A dull mandoline is significantly more dangerous than a sharp one because it requires more force to operate, increasing the likelihood of a slip. Maintenance starts with regular inspections of the blade edge for nicks or rolls. Unlike knives, many mandoline blades are intended to be replaced rather than sharpened, though high-end French models may allow for professional honing.
- Blade Inspection: Look for light reflecting off the edge, which indicates dullness.
- Screw Tightening: Ensure all adjustment knobs are secure to prevent the deck from shifting during use.
- Lubrication: Occasionally apply food-grade mineral oil to moving parts or adjustment tracks to keep them sliding smoothly.
Proper storage is the final step in maintenance. Never throw a mandoline into a crowded utensil drawer where the blade can be damaged or where it might cut someone searching for another tool. Use a dedicated blade guard or store the unit in its original box. If the blade is removable, store it in a protective sleeve. A well-maintained mandoline can last for decades, providing consistent, razor-sharp performance for every culinary project.
Stabilizing the Slicer for Consistent Cuts
Stability is the foundation of safety and precision when using a mandoline. If the slicer wobbles or shifts during a stroke, the thickness of the cut will vary, and the risk of the hand slipping off the guard increases. Most mandolines feature foldable legs with non-slip rubber feet designed to grip the countertop. Before starting, ensure these feet are clean and free of grease or flour, which can act as a lubricant and cause the device to slide.
For models without legs, the slicer is often designed to hook over the rim of a bowl. This method is excellent for catching produce directly, but it requires a bowl with a sturdy, wide base to prevent tipping. Always apply pressure in a downward and forward vector that pushes the slicer into the work surface rather than away from it. If working on a slippery granite or stainless steel table, placing a damp kitchen towel or a silicone mat under the mandoline can provide the necessary friction to lock the tool in place. A stable platform allows the user to focus entirely on the motion of the food, resulting in much cleaner and more professional-looking slices.
Cleaning and Blade Care Best Practices
Proper cleaning is essential for both hygiene and the longevity of the stainless steel components. Food particles, especially those from acidic vegetables like citrus or tomatoes, can cause microscopic pitting and corrosion if left on the blade. However, cleaning a mandoline is a high-risk activity that requires focused attention.
- Rinse Immediately: Run the slicer under hot water right after use to prevent starches and fibers from drying on the blade.
- Directional Brushing: Use a long-handled dish brush to scrub the blade. Always brush in the direction away from the sharp edge, never across it.
- Hand Wash Only: Avoid the dishwasher, as high heat and harsh detergents can dull the blade and warp plastic components.
- Air Dry Thoroughly: Ensure the unit is completely dry before storage to prevent rust, paying close attention to the crevices around the adjustment knobs.
When drying with a towel, never wipe the blade directly. Instead, pat the frame and let the blade air dry, or use a blow dryer on a cool setting. By following a strict cleaning protocol, you ensure that the mandoline remains a sharp, sanitary, and reliable asset in your kitchen toolkit.

Comments