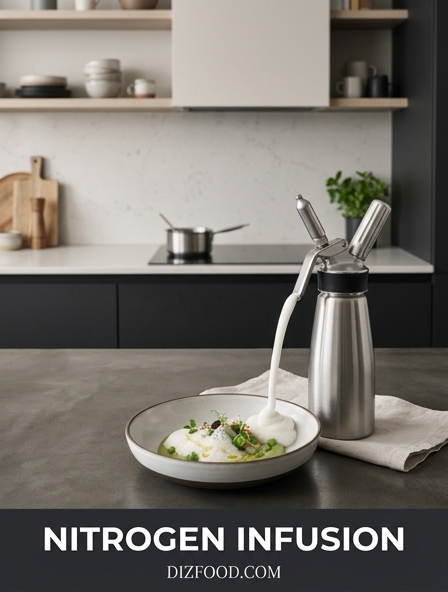
Elevate your beverage game by learning how to achieve a luxurious creamy texture using nitrogen infusion techniques that transform ordinary drinks into velvety masterpieces. This innovative process involves forcing nitrogen gas into liquids under high pressure, creating tiny, stable micro-bubbles that result in a dense, cascading foam and a remarkably smooth mouthfeel. Perfect for everything from artisanal cold brews to sophisticated cocktails, nitrogen infusion rounds out sharp flavor profiles while providing a rich consistency that lingers on the palate. To master the art of the pour, it is helpful to understand the distinct characteristics of Nitrogen Infusion Vs Carbonation.
The Science Behind Nitrogen Infusion
Nitrogen infusion relies on the physical properties of nitrogen gas (N2), which is largely insoluble in water compared to carbon dioxide. When liquid is subjected to high pressure with nitrogen, the gas is forced into the solution. Upon release through a restrictor plate, the pressure drops rapidly, causing the gas to form millions of microscopic bubbles. This process is known as nucleation. Unlike carbonation, which creates large, volatile bubbles of carbonic acid, nitrogen produces tiny, stable bubbles that do not easily dissipate.
- Inert Nature: Nitrogen does not react with the liquid, preserving the original flavor profile.
- Bubble Size: N2 bubbles are roughly 0.1mm, significantly smaller than CO2 bubbles.
- Solubility: Low solubility ensures the bubbles remain suspended, creating a long-lasting head.
The science also involves the "cascade effect," where bubbles near the glass walls sink while those in the center rise. This fluid dynamic occurs because the small bubbles are easily pushed by internal currents, resulting in the iconic visual swirl seen in nitro cold brew or stout beers.
Benefits of Nitrogen for Creamy Texture
The primary culinary appeal of nitrogen is the transformation of a liquid's mouthfeel. By introducing microscopic bubbles, the viscosity of the beverage appears to increase, creating a rich, velvety texture that mimics the presence of fats or dairy. This is particularly beneficial for black coffee or tea, where the nitrogen provides a creamy sensation without the need for milk or cream. The dense foam created by nitrogen acts as a structural element, sitting atop the liquid to provide a soft landing for the palate with every sip.
Furthermore, nitrogen infusion alters the perception of flavor. The tiny bubbles coat the tongue more evenly, which can suppress the perception of bitterness and enhance the natural sweetness of the ingredients. This textural enhancement is why nitrogenated drinks are often perceived as smoother and more balanced. In a gourmet kitchen, this technique allows chefs to create aerated sauces and mousses that are exceptionally light yet hold their shape, providing a luxurious sensory experience that traditional whisking or carbonation cannot replicate.
Essential Tools for Nitro Brewing
To achieve a professional nitrogen infusion at home or in a commercial kitchen, specific hardware is required to manage the high pressures involved. The setup varies depending on the volume of production, ranging from handheld dispensers to full kegging systems. At the core of any system is the nitrogen source and the vessel where the infusion takes place.
| Tool | Function |
|---|---|
| Whipped Cream Siphon | Small-batch infusion using N2O or N2 chargers. |
| Nitrogen Regulator | Controls the flow and pressure from a high-pressure tank. |
| Stout Faucet | Includes a restrictor plate to create the foam cascade. |
| Gas Cylinder | Stores food-grade nitrogen or "beer gas" (N2/CO2 blend). |
For those specializing in nitro cold brew, a dedicated "kegerator" setup is often preferred. This includes stainless steel kegs and high-pressure hoses designed to withstand up to 45-50 PSI. The stout faucet is the most critical component for the final presentation, as its internal perforated disc is what actually "strips" the gas out of the liquid to create the foam.
Step by Step Nitrogen Infusion Guide
Successful nitrogen infusion requires precision and patience to ensure the gas properly integrates with the liquid. Follow these steps for a perfect batch of nitro beverage using a pressurized vessel.
- Chill the Liquid: Cold liquids absorb gas more efficiently. Ensure your beverage is below 40°F (4°C).
- Fill the Vessel: Pour the liquid into your siphon or keg, leaving about 20% head space for the gas to occupy.
- Charge with Nitrogen: Connect your nitrogen source. If using a siphon, insert one N2 charger. If using a tank, set the regulator to 40 PSI.
- Agitate: Shake the vessel vigorously for 30 to 60 seconds. This increases the surface area contact between the gas and liquid.
- Rest: Allow the vessel to sit refrigerated for at least 15 minutes to let the pressure stabilize.
- Dispense: Hold the nozzle at a 45-degree angle and pull the lever completely to engage the restrictor plate.
Always ensure all seals are tight before pressurizing to avoid gas leaks or inconsistent infusion quality.
Comparing Nitrogen and Carbon Dioxide
While both gases are used to "carbonate" or pressurize drinks, they interact with liquids in fundamentally different ways. Carbon dioxide is highly soluble and reacts with water to form carbonic acid, which adds a sharp, tingly bite to the drink. Nitrogen, conversely, is an inert gas that does not change the acidity of the liquid, focusing instead on physical texture. The choice between the two depends on whether the goal is refreshing effervescence or smooth creaminess.
| Feature | Carbon Dioxide (CO2) | Nitrogen (N2) |
|---|---|---|
| Bubble Size | Large and aggressive | Tiny and silky |
| Flavor Impact | Adds acidic tartness | Neutral / Enhances sweetness |
| Mouthfeel | Prickly and sharp | Creamy and thick |
| Typical Use | Sodas, Seltzers, Lagers | Cold Brew, Stouts, Matcha |
In many draft systems, a blend of the two (often 75% nitrogen and 25% CO2) is used to provide enough pressure to push the liquid while maintaining the desired creamy head without over-carbonating the beverage.
Perfecting the Pour for Maximum Foam
The visual appeal of a nitrogenated drink is defined by the "surge and settle" effect. To achieve the perfect cascade, the dispensing technique is just as important as the infusion itself. Start with a clean, tulip-shaped glass, which helps concentrate the nitrogen bubbles and support the foam head. Hold the glass at a 45-degree angle, approximately one inch below the faucet. Open the tap quickly and fully; a partial opening can cause turbulence that results in large, uneven bubbles rather than a fine micro-foam.
As the glass fills to about three-quarters, gradually straighten it to an upright position. The goal is to create a controlled swirl that allows the nitrogen to rise slowly. Unlike a standard beer pour, a nitro pour often requires a brief rest period. Let the drink settle for about 30 seconds to allow the dark liquid and the white foam to separate into distinct layers. This separation creates a dense, long-lasting head that remains until the glass is empty. If the foam is too thin, try increasing the pressure or ensuring the liquid is colder.
Top Recipes for Nitrogenated Beverages
Nitrogen is not just for coffee; its ability to soften flavors makes it ideal for a variety of beverages. By experimenting with different bases, you can create sophisticated non-alcoholic drinks and cocktails that feature a unique textural twist. The key is to use liquids that are free of large particles which could clog the restrictor plate.
- Nitro Cold Brew: The classic. Use a 1:8 coffee-to-water ratio for a bold concentrate that stands up to the nitrogen.
- Nitro Matcha Latte: Whisk high-quality matcha with hot water, chill, and then infuse for a vibrant green, frothy treat.
- Earl Grey Nitro Tea: Steep tea with bergamot, add a touch of simple syrup, and nitrogenate for a creamy "London Fog" effect.
- Nitro Negroni: A pre-batched cocktail that, when nitrogenated, takes on a softer edge, muting the bitterness of the Campari.
When creating recipes, remember that nitrogen can dull the intensity of aromatics. You may need to slightly increase the concentration of your base ingredients to ensure the flavors shine through the thick, creamy texture.
Nitrogen Infusion in Gourmet Cooking
Modernist chefs have expanded the use of nitrogen beyond the beverage glass, utilizing it to create ethereal textures in solid and semi-solid foods. In the kitchen, nitrogen is often used via a whipped cream siphon to create "espumas" or foams. By combining a flavored liquid with a stabilizing agent like gelatin, agar-agar, or lecithin, and charging it with nitrogen, chefs can produce sauces that are incredibly light yet intensely flavored. These foams provide a burst of flavor that vanishes on the tongue, leaving no heavy residue.
Nitrogen is also used for rapid infusions. Under high pressure, nitrogen forces flavors from herbs, spices, or fruits into liquids (like oils or spirits) in a matter of minutes, a process that usually takes weeks. When the pressure is released, the gas expands and escapes the cell walls of the ingredients, pulling the flavor into the liquid. This technique, often called "flash infusion," allows for fresh, vibrant flavor profiles in oils and tinctures without the cooked taste associated with heat-based extraction. From aerated chocolate mousses to savory hollandaise foams, nitrogen is a versatile tool for textural innovation.
Optimal Pressure and Temperature Settings
The success of nitrogenation is highly dependent on the relationship between temperature and pressure. Because nitrogen is difficult to dissolve, you must optimize these variables to achieve the desired micro-foam. Cold temperatures are non-negotiable; the closer the liquid is to freezing (without actually freezing), the better the gas will integrate. Ideally, maintain your liquid between 32°F and 38°F.
- Cold Brew Coffee: Best served at 40-45 PSI for a thick, creamy cascade.
- Nitro Cocktails: Require slightly lower pressure, around 30-35 PSI, to avoid over-foaming.
- Storage Pressure: If keeping a keg on tap, maintain a constant pressure of 30 PSI to keep the gas in solution.
- Siphon Charging: One 2g nitrogen bulb is typically sufficient for a 0.5-liter vessel.
If the pour is too "spitty" or explosive, the pressure is likely too high or the liquid is too warm. If the drink appears flat, you may need to increase the pressure or shake the vessel more vigorously to encourage gas absorption.
Maintaining Your Nitrogen Infusion System
Cleanliness is paramount when dealing with pressurized food systems, as nitrogenated liquids (especially those containing sugars or proteins) can easily clog delicate components. After every use, the system must be thoroughly purged and cleaned to prevent bacterial growth and ensure mechanical longevity. Biofilms can form quickly in the small holes of a stout faucet's restrictor plate, which will eventually ruin the pour quality.
- Flush the Lines: Run warm water through the hoses and faucet immediately after the keg is empty.
- Disassemble the Faucet: Unscrew the nozzle and remove the restrictor disc. Soak these in a food-safe degreaser or sanitizer.
- Check the Seals: Inspect O-rings and gaskets for cracks or flattening. Lubricate them with food-grade silicone to maintain an airtight seal.
- Sanitize the Vessel: Use a no-rinse sanitizer inside the keg or siphon to ensure no residual yeast or mold remains.
Regular maintenance not only ensures the safety of your beverages but also prevents expensive gas leaks and ensures that every pour is as creamy as the first.

Comments