
Whether you're topping a savory bowl of ramen or prepping a high-protein snack for the week, mastering the art of egg consistency is a fundamental kitchen skill that transforms a simple staple into a culinary highlight. The primary difference between a soft-boiled and hard-boiled egg lies in the precision of timing, where mere minutes dictate the transition from a luscious, jammy yolk to a fully set, pale center. By understanding how heat affects protein structures, you can achieve the perfect texture tailored to your specific dish-choosing delicate, runny yolks for dipping toast soldiers or firm, reliable whites for a classic Nicoise salad.
| Feature | Soft-Boiled Egg | Hard-Boiled Egg |
|---|---|---|
| Boiling Time | 6-7 Minutes | 9-12 Minutes |
| Yolk Consistency | Liquid, syrupy, or "jammy" | Fully solid, opaque, and pale |
| White Texture | Soft, tender, and just-set | Firm, bouncy, and resilient |
| Best Culinary Use | Ramen, avocado toast, dipping | Egg salad, deviled eggs, snacks |
| Peeling Difficulty | High (requires delicate handling) | Low (firm structure stays intact) |
| Storage Life | Best consumed immediately | Up to 7 days in the refrigerator |
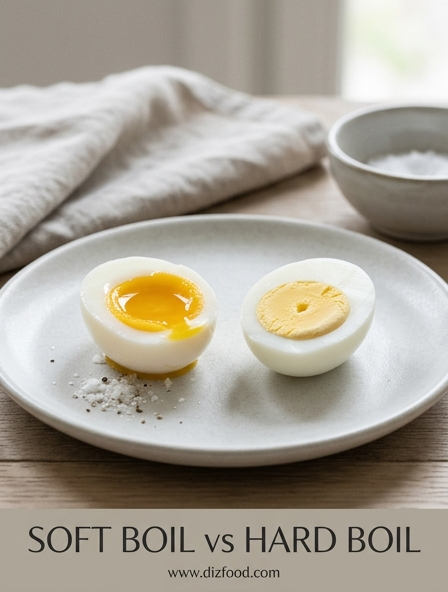
Understanding the Core Differences Between Soft and Hard Boiled Eggs
The distinction between a soft-boiled egg and a hard-boiled egg primarily concerns the state of the yolk and the albumen, or egg white, following a specific duration of heat exposure. In a soft-boiled egg, the cooking process is intentionally interrupted early, resulting in a whites that are set but delicate, while the yolk remains fluid or viscous. This state requires precise temperature control, as the yolk begins to thicken at approximately 144°F (62°C) and sets completely by 158°F (70°C). Achieving the perfect soft boil is an exercise in timing, as only a few seconds separate a liquid gold center from one that is starting to solidify.
Hard-boiled eggs, conversely, are cooked until both the white and the yolk are fully coagulated and solid. This method is generally more forgiving regarding timing but requires care to avoid overcooking. When an egg is subjected to high heat for too long, a chemical reaction occurs between the sulfur in the whites and the iron in the yolks, creating a green-gray ring around the yolk and a sulfurous odor. Understanding these core differences is essential for any home cook, as the two styles provide vastly different mouthfeels and structural integrity, dictating their suitability for various dishes and preparation techniques throughout the culinary world.
The Ultimate Timing Guide for Perfect Soft and Hard Boiled Eggs
Timing is the most critical variable when boiling eggs, as even a one-minute difference can drastically alter the final product. The following guide assumes the eggs are added to boiling water and then simmered. Smaller eggs may require slightly less time, while jumbo eggs may need an additional thirty seconds to a minute to reach the desired consistency.
| Time (Minutes) | Resulting Consistency | Best Used For |
|---|---|---|
| 6 Minutes | Very soft whites, liquid yolk. | Dipping toast (soldiers). |
| 7 Minutes | Firm whites, "jammy" custard-like yolk. | Ramen and avocado toast. |
| 8 Minutes | Firm whites, soft but set yolk. | Salad toppings. |
| 10 Minutes | Fully set whites, creamy solid yolk. | Sandwiches. |
| 12 Minutes | Fully set whites, firm and pale yolk. | Deviled eggs and egg salad. |
To ensure accuracy, always start your timer the moment the eggs submerge in the boiling water. Use a slotted spoon to lower them gently to prevent the shells from cracking against the bottom of the pot. Maintaining a gentle simmer rather than a rolling boil helps prevent the eggs from bouncing into each other, which ensures a more even cook and preserves the integrity of the shell.
Texture Comparison Runny Yolks vs Firm Centers
The sensory experience of eating an egg is defined by its texture. A soft-boiled egg is celebrated for its contrast; the exterior is bouncy and firm enough to hold its shape, while the interior offers a rich, velvety liquid that acts as a natural sauce. The "jammy" egg, sitting right in the middle of the spectrum, offers a fudgy, spreadable texture that clings to a fork. This texture is highly prized in modern gastronomy for its ability to add moisture and fat to dry ingredients without being entirely liquid.
Hard-boiled eggs offer a completely different profile, characterized by structural stability and a crumbly or creamy density. When cooked perfectly to the hard-boiled stage, the yolk should be bright yellow and easily mashed with a fork. It provides a dry, rich mouthfeel that absorbs flavors well, particularly when mixed with fats like mayonnaise or mustard. Below are the key textural milestones:
- Liquid Yolk: Completely fluid, pours easily when the white is pierced.
- Jammy Yolk: Thick, translucent, and slightly sticky, similar to a soft caramel.
- Creamy Hard Yolk: Fully opaque and solid, but still moist to the touch.
- Firm Hard Yolk: Dry, crumbly, and pale, providing maximum structural integrity for slicing.
Choosing between these textures often depends on whether you want the egg to be a standalone feature of the dish or a structural component that can be sliced, diced, or mashed.
Step by Step Methods for Boiling the Perfect Egg
Achieving the perfect egg requires a systematic approach to heat management. While there are several methods, the "boiling water start" is widely considered the most reliable for consistent results and easy peeling. Follow these steps to ensure success every time:
- Boil the Water: Fill a medium saucepan with enough water to cover the eggs by at least one inch. Bring it to a rolling boil over high heat.
- Lower the Heat: Once boiling, turn the heat down to a low simmer. This prevents the eggs from cracking when you add them.
- Add the Eggs: Gently lower cold eggs from the refrigerator into the water using a slotted spoon.
- Simmer and Time: Turn the heat back up slightly to maintain a gentle simmer and start your timer immediately based on your desired doneness (6 to 12 minutes).
- Prepare an Ice Bath: While the eggs cook, fill a bowl with cold water and plenty of ice cubes.
- Shock the Eggs: When the timer goes off, immediately transfer the eggs to the ice bath. Let them sit for at least five minutes.
The ice bath is a non-negotiable step. It serves two purposes: it stops the cooking process instantly so the yolks don't overcook, and it causes the egg membrane to shrink away from the shell, making the eggs significantly easier to peel later. Skipping this step often results in rubbery whites and difficult-to-remove shells.
Best Culinary Uses for Soft Boiled vs Hard Boiled Eggs
The application of a boiled egg in a recipe is usually determined by its internal moisture content. Soft-boiled eggs are the stars of breakfast and brunch. Their liquid yolks are ideal for dipping "soldiers" (strips of toasted bread) or being broken over a bowl of savory oatmeal or congee. In Japanese cuisine, the *Ajitsuke Tamago* (marinated soft-boiled egg) is an essential ramen topping, where the jammy yolk enriches the broth.
Hard-boiled eggs are the workhorses of the kitchen, valued for their portability and structural strength. They are the standard choice for classic picnic foods and protein-heavy salads. Some common uses include:
- Salads: Sliced hard eggs are a staple in Niçoise and Cobb salads, providing a substantial protein source that doesn't mess with the dressing.
- Deviled Eggs: The firm, centered yolk of a 12-minute egg is removed, seasoned, and piped back into the white.
- Egg Salad: Diced hard eggs hold their shape when folded into mayonnaise and aromatics.
- Curries: In many Indian and Southeast Asian recipes, whole hard-boiled eggs are fried and then simmered in spicy gravies.
When selecting a style, consider if you want the yolk to act as a sauce (soft) or if you need the egg to be portable and easily handled (hard).
How to Peel Soft and Hard Boiled Eggs Without a Mess
Peeling an egg can be a frustrating task if the membrane sticks to the white, leading to a pockmarked and unattractive result. The secret to a clean peel begins before the egg even hits the water. Older eggs are actually better for boiling; as an egg ages, the air cell at the large end expands and the pH of the white increases, which causes it to adhere less strongly to the shell membrane.
The temperature shock method is the most effective way to ensure a clean peel. By dropping cold eggs into boiling water and then immediately into ice water, you create a physical contraction that separates the egg from its housing. To peel, gently crack the shell all over by tapping it on a flat surface. Start peeling from the wider end where the air pocket is located. If possible, peel the egg under a thin stream of cool running water or submerged in the ice bath. The water helps lubricate the space between the membrane and the white, allowing the shell to slide off in large pieces. For soft-boiled eggs, be extremely gentle, as the whites are much more fragile and can tear easily under pressure.
Nutritional Breakdown of Different Boiling Techniques
From a macronutrient perspective, soft and hard-boiled eggs are nearly identical. A large egg typically contains about 70 calories, 6 grams of protein, and 5 grams of fat. However, the cooking method can slightly influence the bioavailability of certain nutrients and the oxidation of fats. Eggs are rich in vitamins A, D, B12, and choline, most of which are concentrated in the yolk.
| Nutrient | Soft Boiled (6-7 min) | Hard Boiled (12 min) |
|---|---|---|
| Protein | Highly Bioavailable | Fully Coagulated |
| Cholesterol | Less Oxidized | Slightly More Oxidized |
| Vitamin A/D | Fully Preserved | Minimally Reduced |
| Digestibility | Very High | High |
Some nutritional experts suggest that soft-boiled eggs may be slightly superior because the yolk remains unexposed to high heat for a shorter duration. This prevents the oxidation of the cholesterol found in the yolk. Oxidized cholesterol has been linked to higher risks of cardiovascular issues in some studies. Additionally, the proteins in the whites become more digestible when cooked, which occurs in both methods. Regardless of the choice, boiling is one of the healthiest ways to prepare eggs as it requires no added fats or oils, unlike frying or scrambling.
Mastering the 6 Minute Egg vs the 12 Minute Egg
The 6-minute egg and the 12-minute egg represent the two bookends of the boiling spectrum. Mastering these two specific timings allows a cook to handle almost any culinary requirement. The 6-minute egg is often referred to as the "soft-set" egg. At this mark, the whites have just barely turned opaque and solid enough to be handled, while the yolk is entirely liquid. This egg is best served in an egg cup, with the top of the shell removed, seasoned simply with salt and pepper.
The 12-minute egg is the gold standard for a fully set hard boil. At this point, the yolk is cooked through to the very center, losing its translucency and becoming a pale, opaque yellow. It is sturdy enough to be transported in a lunchbox or sliced into thin rounds for a sandwich. The challenge with the 12-minute egg is avoiding the "15-minute egg," where the texture becomes rubbery and the yolk develops that unappealing green tint. By focusing on these two specific durations, you develop a mental baseline for egg texture. If you want something slightly thicker than the 6-minute version, you know to aim for 7 or 8. If you want a hard egg that is still a bit creamy, you pull it at 10 minutes. These two markers are the foundation of egg cookery precision.
Storage Tips and Shelf Life for Every Type of Boiled Egg
Proper storage is essential for maintaining food safety and flavor, particularly with boiled eggs which can develop strong odors in the refrigerator. Hard-boiled eggs are remarkably durable. When kept in their shells, they can last up to seven days in the refrigerator. It is best to store them in a sealed container or the original egg carton to prevent them from absorbing odors from other foods like onions or leftovers.
Soft-boiled eggs have a much shorter shelf life and are best consumed immediately. Because the yolk is still liquid, it is more susceptible to bacterial growth if not handled correctly. If you must store them, keep them in their shells and consume them within 24 to 48 hours. Once an egg is peeled, regardless of its boil level, it should be eaten within the same day for the best texture and safety. To keep peeled eggs fresh for a few hours, you can place them in a bowl of cold water in the fridge.
- In-Shell Hard Boiled: 7 days in the fridge.
- In-Shell Soft Boiled: 1-2 days in the fridge.
- Peeled (Any Style): Best within 12-24 hours.
- Freezing: Boiled eggs do not freeze well; the whites become tough and watery.
Choosing the Right Boiling Style for Your Recipe Needs
Selecting the appropriate boiling style is a matter of balancing flavor, presentation, and function. When the egg is meant to be a decadent topping that melds with other ingredients, the soft-boiled approach is superior. The liquid yolk acts as a rich, fatty binder for grains, greens, or toast. This is particularly effective in dishes like "shakshuka" or savory breakfast bowls where a dry yolk would feel out of place. The visual appeal of a sliced jammy egg, with its vibrant orange center, is also a key factor in modern food styling.
However, functionality often dictates a hard-boiled egg. If you are preparing food for a crowd, such as a large batch of potato salad or a platter of hors d'oeuvres, the hard-boiled egg is the only practical choice. It can be prepared well in advance, is easy to transport, and maintains its aesthetic integrity even when diced or sliced. Furthermore, if you are introducing eggs to children or individuals with compromised immune systems, the hard-boiled egg is the safer option as it ensures that any potential pathogens are neutralized by the heat. Ultimately, the "right" style is the one that complements the texture of your main ingredients; use soft for moisture and hard for structure.

Comments