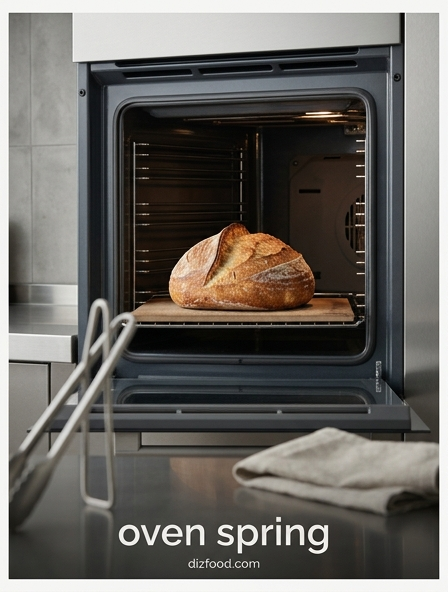
Achieving a breathtaking oven spring is the ultimate goal for any baker looking to master artisan loaves with a dramatic rise and an airy, open crumb. This explosive growth occurs during the first few minutes of baking, where the perfect synergy of intense heat, steam, and strong fermentation allows the dough to expand rapidly. By refining your shaping techniques and scoring with precision, you create the path for your bread to reach its full potential and develop that signature professional texture. To ensure your starter has the strength required for this expansion, it is vital to understand the functional differences between active sourdough vs. discard before you begin your next bake.
Understanding the Science of Oven Spring
Oven spring refers to the final, rapid expansion of bread dough during the initial stages of baking. This phenomenon occurs when the dough is first placed into a hot oven, triggering a sequence of physical and chemical reactions before the crust sets and solidifies. The primary driver of this growth is the rapid expansion of carbon dioxide gas and water vapor trapped within the gluten network. As the temperature rises, the yeast experiences a final "burst" of activity, consuming sugars and producing gas at an accelerated rate until the internal temperature reaches approximately 140°F (60°C), at which point the yeast cells die.
Simultaneously, the gases already present in the dough expand according to Charles's Law, which states that gas volume increases with temperature. Water also begins to evaporate, turning into steam and further inflating the air cells. This expansion continues until the starch gelatinizes and the proteins denature, creating the permanent structure of the loaf. Achieving a dramatic oven spring is the hallmark of a well-fermented, properly handled loaf, indicating a successful balance between gas production and dough strength.
Optimizing Dough Hydration for Maximum Expansion
Hydration levels play a critical role in determining the potential for oven spring. Water acts as a plasticizer, making the gluten network more extensible and allowing it to stretch significantly without tearing. Higher hydration doughs often exhibit more dramatic expansion because they generate a higher volume of steam during the baking process. However, the relationship between water content and rise is a delicate balance; too much water can weaken the dough's structure, causing it to collapse under its own weight rather than rising upward.
- Low Hydration (50-60%): Resulting in a tighter crumb and more predictable rise, but limited expansion.
- Medium Hydration (65-75%): The "sweet spot" for many artisanal breads, providing a balance of strength and extensibility.
- High Hydration (80%+): Capable of massive expansion and open crumb, but requires advanced handling and high gluten strength.
To maximize oven spring, bakers must match the hydration to the flour's protein content. Higher protein flours can absorb more water while maintaining the structural integrity necessary to hold the expanding gases during the heat of the oven.
Strengthening Gluten Structure Through Proper Shaping
The ability of a loaf to expand upward rather than outward is directly tied to the tension created during the shaping process. Proper shaping builds a "skin" on the surface of the dough, which acts like a biological balloon. This surface tension contains the internal pressure of the expanding gases, forcing the dough to rise vertically. Without sufficient tension, the dough will likely spread into a flat pancake once it hits the hot baking surface, regardless of how much gas is produced.
- Degassing: Gently pressing out large, irregular bubbles ensures a more even distribution of gas for a consistent rise.
- Pre-shaping: Organizing the gluten strands into a preliminary shape allows the dough to relax before final tension is applied.
- Tension Pulls: Dragging the dough against a clean work surface to tighten the outer membrane.
A well-shaped loaf maintains its structural integrity throughout the proofing stage. By creating a strong, organized gluten matrix, the baker ensures that the energy of the oven spring is channeled into height and volume, resulting in a proud, aesthetically pleasing silhouette.
Mastering Bulk Fermentation and Proofing Times
Timing is perhaps the most difficult variable to master in the quest for the perfect oven spring. The goal is to load the dough into the oven when it has reached its peak gas-holding capacity but still possesses enough "fuel" for the final burst of expansion. This state is often referred to as being "perfectly proofed." If a dough is under-proofed, it may have too much internal resistance, leading to erratic tearing or a dense core. Conversely, over-proofed dough has exhausted its sugars and weakened its gluten structure, leading to a collapse when heat is applied.
The "poke test" is a reliable method for evaluating readiness. When the dough is gently pressed with a finger, it should spring back slowly and leave a slight indentation. If it snaps back instantly, it needs more time; if it leaves a permanent hole and feels fragile, it is likely over-proofed. Monitoring the bulk fermentation-the first rise-is equally important, as this stage builds the foundational strength and flavor profile that the final proofing stage will eventually finalize before the heat of the oven takes over.
Precision Scoring Techniques for Unrestricted Growth
Scoring, or slashing the surface of the dough with a sharp blade (lame), is not merely decorative; it is a functional necessity for maximizing oven spring. When dough enters the oven, it expands rapidly. Without a designated path for this expansion, the pressure will cause the crust to rupture at its weakest point, often resulting in "blowouts" at the base or sides. A clean, decisive score provides a controlled "release valve," allowing the dough to expand fully and symmetrically.
The angle and depth of the cut significantly influence the final look and volume of the bread. For a classic sourdough "ear," the blade should be held at a 30-degree angle to the surface, cutting about half an inch deep. This creates a flap of dough that lifts and curls as the bread rises. In contrast, vertical cuts are better for round boules to encourage an even, blooming expansion. Using a very sharp blade and moving with confidence prevents the dough from dragging, ensuring that the scores open cleanly and allow the loaf to reach its maximum height during those crucial first ten minutes of baking.
Harnessing Steam for a Pliable Bread Crust
Steam is the secret ingredient for achieving professional-level oven spring. When steam is introduced into the oven during the first third of the baking process, it settles on the surface of the dough, keeping the exterior moist and elastic. This moisture delays the formation of a hard crust, allowing the dough to continue expanding for a longer duration. If the environment is too dry, the crust will set prematurely, effectively locking the loaf in its current size and stifling any further oven spring.
Beyond elasticity, steam also improves the final appearance of the bread. It facilitates the gelatinization of starches on the surface, which leads to a thin, crispy, and translucent crust with a characteristic "shatter" when bitten. Common home-baking methods for generating steam include placing a cast iron skillet with lava stones or rolled towels at the bottom of the oven and pouring boiling water over them just as the bread is loaded. Alternatively, using a spray bottle to mist the oven walls can provide a quick burst of humidity, though this is often less effective than a continuous steam source for the first fifteen minutes.
The Impact of Thermal Mass and Preheating
Oven spring requires an immediate and intense transfer of heat to the bottom of the dough. This is why the use of thermal mass-such as baking stones or baking steels-is essential in a home kitchen. Standard oven racks do not hold enough heat to prevent the oven temperature from plummeting when the door is opened. A preheated stone or steel acts as a heat reservoir, providing a constant, high-temperature surface that initiates the expansion of gases the second the dough touches it.
For the best results, the oven should be preheated for at least 45 to 60 minutes prior to baking. This ensures that the thermal mass has reached a uniform temperature throughout. A baking steel is particularly effective because it conducts heat more rapidly than stone, leading to a faster rise and a more charred, artisanal-style bottom crust. By maximizing the "bottom heat," the baker ensures that the internal temperature of the loaf rises as quickly as possible, capitalizing on the yeast's final activity and the expansion of water vapor before the crumb structure sets permanently.
Using Dutch Ovens to Control Heat and Moisture
For many home bakers, the Dutch oven is the most effective tool for achieving a massive oven spring. This heavy, lidded pot creates a "micro-oven" within the larger appliance. The primary advantage is its ability to trap the natural moisture evaporating from the dough itself. This creates a self-steaming environment that keeps the crust soft and expandable without the need for external steam sources. Furthermore, the thick walls of the Dutch oven provide excellent radiant heat, mimicking the conditions of a professional deck oven.
| Feature | Open Oven Bake | Dutch Oven Bake |
|---|---|---|
| Steam Retention | Requires manual effort | Naturally trapped by lid |
| Heat Distribution | Subject to hot spots | Highly consistent radiant heat |
| Crust Development | Often thicker/tougher | Thin, crispy, and blistered |
| Expansion Potential | Moderate | Maximum |
The lid is typically removed after the first 15 to 20 minutes of baking. This allows the trapped steam to escape and the dry heat to finish the crust, developing a deep golden-brown color and a firm texture.
Reading the Crumb to Evaluate Internal Structure
After the loaf has cooled, the internal crumb serves as a roadmap of the oven spring's success. An open, airy crumb with large, irregular alveoli (holes) indicates that the dough had sufficient strength and hydration, was timed perfectly during proofing, and experienced a vigorous oven spring. Conversely, a tight or gummy crumb suggests that the expansion was limited. By analyzing the "after-action" results, a baker can diagnose specific issues in their process.
If the crumb shows large tunnels near the top but a dense bottom, it may indicate under-proofing or improper shaping where air was trapped. A "flying crust," where the top crust separates from the crumb, often points to a lack of steam or excessive surface drying. Ideally, the crumb should be springy and well-aerated, with thin walls between the air pockets. This indicates that the gluten was strong enough to hold the gas but extensible enough to stretch. Regular evaluation of the crumb is the best way to calibrate fermentation times and shaping techniques for future bakes.
Troubleshooting Flat Loaves and Poor Rise
Failure to achieve oven spring is a common frustration, but it usually stems from a few identifiable culprits. If a loaf comes out flat and dense, the first variable to check is the starter or yeast health. Weak leavening agents cannot produce enough gas to drive expansion. The second most common issue is over-proofing; if the dough sits too long at room temperature, the gluten structure breaks down and can no longer support the weight of the loaf, leading to a "deflated" appearance once it enters the oven.
- Low Oven Temp: Ensure you use an oven thermometer to verify the actual temperature.
- Weak Shaping: If the dough spreads out rather than up, focus on building better surface tension.
- Excessive Scoring: Too many deep cuts can cause the dough to collapse rather than expand.
- Under-fermentation: Resulting in a "fool's crumb" with large holes but a dense, heavy texture.
By systematically adjusting these factors-ensuring a hot oven, timed fermentation, and proper moisture-bakers can transform flat, uninspired bread into tall, airy loaves with a spectacular rise.


Comments