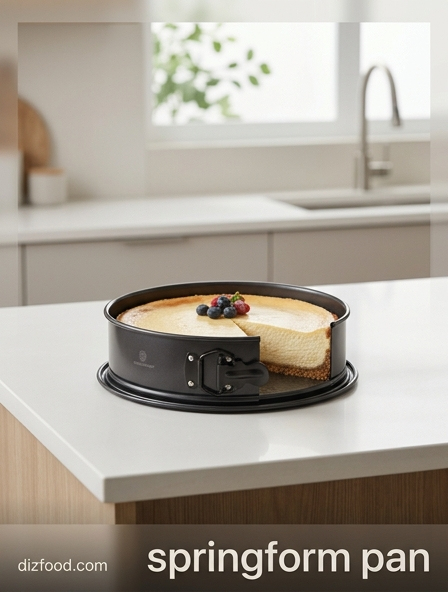
Preparing Your Springform Pan
The unique design of a springform pan, featuring a detachable base and a sides-locking collar, requires specific preparation to ensure a successful bake. Begin by inspecting the interlocking mechanism to ensure the latch closes tightly and the base sits flush within the groove of the ring. To facilitate the easy removal of delicate cakes like cheesecakes or tortes, thorough greasing is mandatory. Use softened butter or a high-quality non-stick baking spray to coat the interior surfaces generously.
- Trace the base on parchment paper and cut out a perfect circle to line the bottom.
- Cut long strips of parchment for the side walls if you are baking high-moisture batters.
- Dust the greased surfaces with flour or cocoa powder depending on the flavor profile of your dessert.
- Double-check that the textured side of the base is facing upward to provide a better grip for the crust.
Proper preparation not only prevents the batter from sticking but also protects the metal from potential corrosion over time. Taking these extra minutes ensures that the structural integrity of your dessert remains intact during the critical release phase after cooling.
Water Bath Leak Proofing Strategies
A water bath, or bain-marie, provides the gentle, consistent heat necessary for custards and cheesecakes, but the two-piece nature of a springform pan makes it vulnerable to seepage. To prevent a soggy crust, you must create a reliable waterproof barrier around the exterior of the pan. Standard aluminum foil is often too thin and prone to micro-tears, so heavy-duty foil is the preferred choice for this specific task.
- Lay out two or three large, overlapping sheets of heavy-duty aluminum foil on a flat surface.
- Place the assembled springform pan in the center of the foil sheets.
- Gather the foil upward around the sides of the pan, pressing it firmly against the metal.
- Ensure the foil reaches at least three-quarters of the way up the sides to exceed the water line.
For even greater security, some bakers utilize silicone pan protectors or place the springform pan inside a slightly larger solid cake pan before submerging it in the roasting tray. These layers of defense ensure that the hot water remains outside the pan, preserving the crispness of your base and the creamy texture of your filling.
Essential Room Temperature Ingredients
Achieving a smooth, emulsified batter is nearly impossible if you use ingredients straight from the refrigerator. Cold cream cheese or butter will remain lumpy regardless of how much you whisk them, leading to an uneven bake and internal air pockets. When ingredients are at room temperature, their molecular structures are more relaxed, allowing them to bond effectively during the mixing process. This is particularly vital for springform pan recipes that rely on dense, fatty bases.
| Ingredient | Resting Time | Target State |
|---|---|---|
| Cream Cheese | 60-90 Minutes | Completely soft to the touch |
| Large Eggs | 30 Minutes | No chill felt on the shell |
| Sour Cream/Yogurt | 45 Minutes | Thin and easily stirrable |
| Unsalted Butter | 60 Minutes | Indentable with light pressure |
Planning ahead by setting your ingredients on the counter at least an hour before baking will significantly improve the final mouthfeel of your dessert. This practice also reduces the total mixing time required, which helps maintain the proper density of the batter.
Avoiding Overmixing the Batter
In the context of springform baking, overmixing is one of the primary causes of unsightly surface cracks and an unpleasantly spongy texture. When you incorporate too much air into the batter, it expands rapidly in the oven and then collapses as it cools. This rise-and-fall cycle creates tension that the delicate structure of a cheesecake cannot withstand. The goal is to mix only until the ingredients are fully incorporated and the mixture appears uniform.
- Always beat the cream cheese and sugar together first until perfectly smooth.
- Add eggs one at a time, mixing on the lowest speed possible.
- Stop the mixer immediately once the yellow of the yolk disappears.
- Use a rubber spatula to scrape the bottom and sides of the bowl manually.
- Tap the filled springform pan firmly on the counter to release trapped air bubbles.
By maintaining a low speed and minimizing the duration of mechanical mixing, you ensure a dense, creamy result. High speeds should be avoided at all stages of the process once the primary fats have been creamed, as the introduction of excess oxygen is detrimental to the final product.
Creating a Stable Crust Foundation
The crust of a springform dessert provides the structural anchor for the entire dish. Whether you are using graham crackers, digestive biscuits, or crushed cookies, the ratio of crumbs to binding fat must be precise. A crust that is too dry will crumble upon slicing, while one with too much butter will become greasy and hard. After mixing your crumbs with melted butter and sugar, it is essential to compress the mixture firmly into the bottom of the pan.
- Pour the moistened crumbs into the center of the prepared springform pan.
- Use the flat bottom of a measuring cup or a glass to press the crumbs into an even layer.
- Work the mixture slightly up the sides if the recipe requires a walled crust.
- Pre-bake the crust at 325°F for about 8 to 10 minutes to set the structure.
- Allow the crust to cool completely before adding the liquid filling.
This pre-baking step creates a moisture barrier that keeps the crust crisp even after hours of contact with a wet filling. A well-compacted foundation ensures that when the springform ring is released, the edges remain sharp and the base stays intact during transfer.
Low and Slow Baking Temperatures
Springform pans are often used for recipes with high moisture and fat content, which are highly sensitive to heat fluctuations. Baking at a high temperature causes the outer edges of the cake to set and brown quickly while the center remains raw. As the center eventually cooks and expands, it exerts pressure against the already-set edges, leading to deep fissures across the surface. By utilizing a "low and slow" approach, usually between 300°F and 325°F, you allow the heat to penetrate the center gradually.
This controlled thermal environment prevents the proteins in the eggs from over-coagulating, which results in a silky, melt-in-the-mouth texture rather than a rubbery one. Many professional bakers also suggest using an oven thermometer to verify the actual internal temperature, as home ovens often fluctuate. Additionally, the use of a water bath in conjunction with low heat provides a humid environment that protects the delicate top layer from drying out. Patience is the most important ingredient when working with these types of pans, as rushing the thermal process will almost certainly compromise the visual and textural quality of the bake.
Gentle Cooling Process Methods
Sudden temperature changes are the enemy of any dessert baked in a springform pan. If you move a hot cheesecake directly from a 325°F oven to a 70°F kitchen counter, the rapid contraction of the proteins will cause the cake to pull away from the sides and crack. A gradual cooling process is essential for stabilizing the internal structure. This transition allows the residual heat to finish cooking the center without over-baking the perimeter.
- Turn off the oven when the center of the cake still has a slight, rhythmic jiggle.
- Prop the oven door open slightly using a wooden spoon.
- Leave the pan inside the cooling oven for at least one full hour.
- Move the pan to a wire rack on the counter to reach room temperature.
- Chill in the refrigerator for a minimum of six hours, preferably overnight.
This multi-stage cooling method ensures that the delicate bond between the crust and the filling remains secure. Furthermore, refrigeration allows the fats to solidify completely, which is necessary for a clean release and professional presentation during the final serving stage.
Preventing Surface Cracks Effectively
Surface cracks are a common frustration when using springform pans, but they can be avoided through careful environmental control. Most cracks occur because the cake sticks to the sides of the pan as it shrinks during the cooling process. If the edges are glued to the metal, the center is forced to pull apart to accommodate the reduction in volume. To prevent this, you must intervene early in the cooling cycle to ensure the cake can move freely.
- Run a thin, flexible palette knife around the inside edge of the pan after 10 minutes of cooling.
- Maintain a high-humidity environment in the oven using a water tray.
- Avoid opening the oven door frequently, which causes internal temperature spikes.
- Ensure the batter is not over-aerated during the final mixing stages.
- Do not over-bake; the cake is done when the edges are set but the center is still wobbly.
By ensuring the cake is physically detached from the vertical walls of the springform pan, you allow it to shrink inward toward the center uniformly. This simple step, combined with a moist baking environment, is the most effective way to maintain a flawless, glass-smooth surface on your desserts.
Proper Springform Release Techniques
The moment of truth occurs when it is time to release the springform latch and reveal the sides of your creation. This should only be attempted once the cake is thoroughly chilled and set. If the dessert is too warm, the sides may bulge or collapse under their own weight. Before touching the latch, perform a final check of the edges to ensure no part of the filling is still adhered to the metal ring.
- Gently warm the outside of the pan with a hot towel or a hair dryer for thirty seconds.
- Slowly unlatch the spring mechanism, allowing the ring to expand by just a few millimeters.
- Lift the ring straight upward with a steady, vertical motion to avoid scraping the sides.
- If resistance is felt, stop immediately and use a warm knife to loosen the sticking point.
- Keep the cake on the base for serving, or slide a thin offset spatula underneath to move it.
A successful release is a testament to the preparation steps taken earlier. If you greased and lined the pan correctly, the ring should slide away effortlessly, leaving behind a perfectly smooth and professional vertical edge that requires minimal touch-ups.
Achieving Clean Slices for Service
Presenting a dessert from a springform pan requires a slicing technique that honors the time spent baking it. Because these cakes are often dense and creamy, a standard dry knife will stick to the filling, resulting in jagged, messy edges and cross-contamination of crumbs. The key is to use heat and moisture to glide through the layers. This is especially important for multi-layered tortes where distinct color definitions are desired between the crust and the filling.
| Tool | Technique | Result |
|---|---|---|
| Thin Chef's Knife | Dip in hot water and wipe dry between every single cut | Sharp, professional edges |
| Unflavored Dental Floss | Pull taut and press straight down through the cake | Zero sticking or compression |
| Offset Spatula | Use to lift slices from the base to the plate | Maintains bottom crust integrity |
Always cut the cake while it is cold, even if you intend to serve it at room temperature. For the cleanest look, avoid a "sawing" motion; instead, press the knife down firmly in one smooth stroke and pull it out through the bottom or side. This ensures that each guest receives a pristine, restaurant-quality portion.

Comments