Understanding the Crumb Coat Basics
The crumb coat is an essential preliminary step in cake decorating that serves as a thin, foundational layer of frosting. Much like a primer used in painting, its primary purpose is to seal in loose cake particles and create a smooth, stable surface for the final decorative layer. Without this initial barrier, crumbs can easily break away from the sponge and become suspended in the outer icing, resulting in a speckled and unprofessional appearance. This technique is particularly vital for cakes that are naturally delicate or prone to shedding, such as chocolate or carrot cakes.
Beyond aesthetics, the crumb coat provides structural integrity. It helps to level out minor imperfections, fill in gaps between layers, and ensure the final coating adheres uniformly. When properly executed, this layer acts as a "glue" that locks moisture within the cake while providing the decorator with a clean canvas. While it may seem like an extra step that adds time to the process, it ultimately saves effort by preventing the frustration of a messy finish. It is the hallmark of a disciplined baker who prioritizes precision over speed.
Essential Tools for Flawless Icing
Achieving a smooth crumb coat requires a specific set of tools designed to manipulate frosting with precision. Using the right equipment minimizes the physical contact with the cake, which reduces the risk of tearing the delicate sponge. A rotating turntable is perhaps the most critical investment, as it allows for continuous motion while smoothing the sides. Without a turntable, the decorator must stop and start, often leaving behind unsightly ridges or uneven patches in the icing.
- Offset Spatula: The angled blade provides better control and keeps your knuckles away from the frosting surface.
- Bench Scraper: A tall, flat edge made of stainless steel or plastic used to create perfectly vertical and smooth sides.
- Piping Bags: These can be used to apply a controlled amount of frosting before smoothing it out.
- Cardboard Cake Rounds: These provide a stable base that matches the diameter of your cake for easy handling.
- Small Palette Knife: Excellent for detailed work around the top edges and filling small divots.
By assembling these tools before you begin, you ensure a streamlined workflow that prevents the frosting from setting or crusting prematurely.
Preparing Your Cake Layers for Success
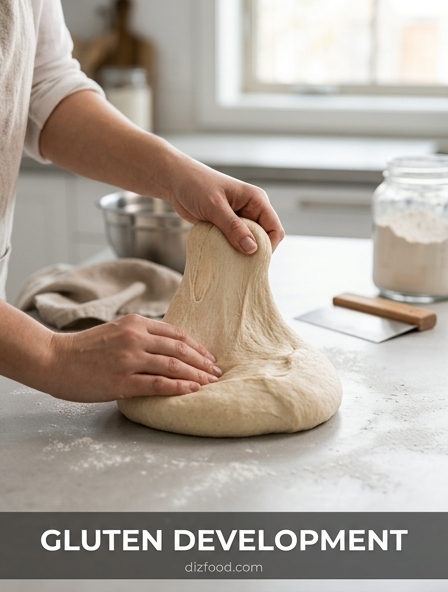
A successful crumb coat begins long before the frosting touches the sponge. The preparation of the cake layers is the most influential factor in how easily the base layer will apply. If the layers are uneven, domed, or overly warm, the structural integrity of the entire project is compromised. Consistency is key, and taking the time to properly groom each layer will prevent the cake from leaning or sliding during the decoration process.
- Leveling: Use a serrated knife or a wire cake leveler to remove the domed tops from your cakes, ensuring they are perfectly flat.
- Trimming: Remove any overly browned or crusty edges that might be too hard or shed excessive crumbs.
- Brushing: Use a pastry brush to gently remove loose crumbs from the surface and sides of the sponge.
- Chilling: Wrap the leveled layers in plastic wrap and refrigerate for at least two hours. Cold cake is much firmer and less likely to crumble during icing.
Properly prepared layers create a symmetrical foundation that makes the application of the crumb coat effortless and ensures the final cake looks professional and balanced.
Mastering Frosting Consistency and Texture
The texture of your frosting determines how easily it will spread across the cake without pulling at the delicate surface. For a crumb coat, the frosting should be slightly softer and more spreadable than what is used for piping flowers or borders. If the icing is too stiff, it will drag against the sponge and cause it to tear; if it is too soft, it will fail to provide the necessary structural support for the final layer.
| Frosting Type | Ideal Consistency | Best Use Case |
|---|---|---|
| American Buttercream | Medium-Soft | Standard layered cakes; very stable. |
| Swiss Meringue | Silky/Creamy | High-end finishes; spreads effortlessly. |
| Cream Cheese | Chilled/Stiff | Heavy cakes; requires careful temperature control. |
| Ganache | Peanut Butter-like | Provides a very firm, sharp-edged base. |
Always ensure your frosting is thoroughly whipped and free of air bubbles. If the frosting feels too firm, a few seconds in the microwave or the addition of a teaspoon of milk can adjust the viscosity to a perfect spreading consistency.
Step by Step Guide to Applying the Base
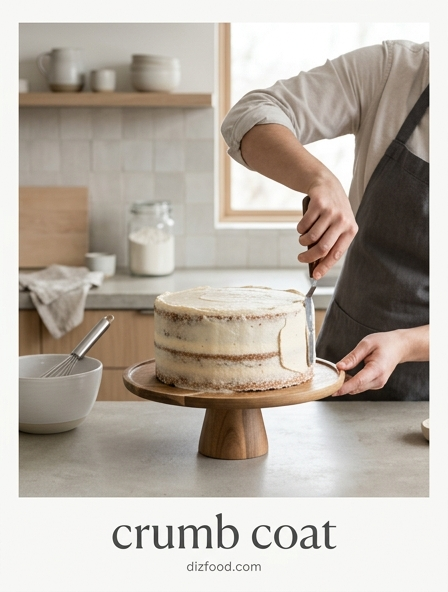
Applying the crumb coat is a systematic process that moves from the top down. Start by placing a dollop of frosting in the center of the top layer. Using your offset spatula, spread the frosting outward toward the edges in a thin, even layer. The goal is not to hide the cake entirely, but to create a translucent seal. Once the top is covered, move to the sides. Use the spatula to "plaster" the frosting onto the cake, working in small sections while rotating the turntable.
It is important to use a separate bowl for "dirty" frosting-frosting that has touched the cake and may contain crumbs. Never dip a crumb-laden spatula back into your main batch of clean icing. After the cake is covered, take your bench scraper and hold it at a 45-degree angle against the side of the cake. Spin the turntable in one continuous motion to strip away excess frosting. This leaves behind a thin, smooth veneer that reveals the silhouette of the cake layers while locking in every stray particle for a perfect finish.
Techniques for Achieving Sharp Edges
Sharp, crisp edges are the hallmark of a high-quality crumb coat and provide the necessary guide for the final layer of decoration. To achieve this, focus on the "crown" or the ridge of frosting that forms at the top edge of the cake while you are smoothing the sides. As you pull the bench scraper around the circumference, the excess frosting will naturally push upward, creating a lip that extends above the top surface. Do not smooth this down immediately; let it build up slightly.
Once the sides are perfectly vertical and smooth, take your offset spatula and gently pull the raised ridge toward the center of the cake. This "pull-in" motion should be executed with a light touch, keeping the spatula perfectly horizontal. Wipe the spatula clean after every single stroke to avoid dragging old frosting back onto the clean edge. Repeat this process around the entire perimeter until the top edge is flat and sharp. This precision ensures that when you apply your final coat, the corners remain defined rather than rounded, giving the cake a clean, modern silhouette.
The Critical Role of Temperature Control
Temperature is the invisible hand that can either help or hinder your crumb coating process. The interaction between the temperature of the cake and the temperature of the frosting is vital for a smooth application. If a cake is too warm, the frosting will melt and slide off the sides. Conversely, if a cake is frozen, the thin layer of crumb coat will set almost instantly upon contact, making it impossible to smooth out ridges or fill in gaps. Ideally, the cake should be refrigerator-cold.
After the crumb coat is applied, the cake must be returned to the refrigerator for a minimum of 30 to 60 minutes. This chilling period allows the fats in the frosting to firm up, effectively "locking" the crumbs and the structure in place. You should be able to touch the surface of the cake without any icing sticking to your finger. This firm foundation is what allows the final decorative layer to glide on without disturbing the work you have already done. Ignoring this cooling phase is the most frequent cause of "sliding" layers and bulging sides in finished cakes.
Common Mistakes That Ruin Your Finish
Even experienced bakers can encounter pitfalls during the crumb coating stage if they rush the process or overlook small details. One of the most common errors is applying too much frosting. The crumb coat should be thin enough to see the cake layers through it; an overly thick base can make the final cake look bulky and lead to structural instability. Another frequent mistake is failing to clean the tools regularly. Any dried bits of frosting or trapped crumbs on your spatula will create streaks and tears in the smooth surface.
- Double-Dipping: Returning a crumb-contaminated spatula to the clean frosting bowl ruins the entire batch.
- Inconsistent Pressure: Pressing too hard with the bench scraper can gouge the cake or remove too much icing.
- Ignoring Air Pockets: Failing to pop air bubbles results in "blowouts" where the final layer of icing bulges.
- Skipping the Chill: Proceeding to the final coat while the crumb coat is still soft leads to a messy, blended finish.
By remaining mindful of these errors, you can ensure that your foundation remains pristine and ready for the next level of artistry.
Transitioning to the Final Decorative Layer
Once the crumb coat is chilled and firm to the touch, the transition to the final decorative layer can begin. This is the stage where the cake truly comes to life, as the thin, translucent base is hidden beneath a thick, opaque blanket of frosting. Because the crumb coat has already sealed the surface and leveled the shape, the final layer requires much less manipulation. You can apply the frosting more generously, knowing that no crumbs will rise to the surface to mar the aesthetic.
Start the final layer by placing a large amount of frosting on the top of the cake, spreading it out to the edges just as you did before. Because the base is cold, you will notice the new frosting sets slightly faster, which helps in maintaining the shape. When smoothing the sides, the bench scraper will now glide over a perfectly flat surface, allowing for a much faster and more satisfying result. This transition is the most rewarding part of the process, as the effort spent on the foundational steps results in a flawless, mirror-smooth finish with minimal corrections needed.
Expert Secrets for a Bakery Quality Look
Professional bakers use several subtle tricks to elevate a standard crumb-coated cake into a bakery-quality masterpiece. One secret is the use of heat. After the final layer is applied and smoothed, many experts dip their metal bench scraper into very hot water, wipe it dry, and then perform one last pass around the cake. The residual heat slightly melts the surface fats, resulting in an ultra-glossy, glass-like finish that is otherwise impossible to achieve with a cold tool.
Another expert tip is the use of high-quality fats. Incorporating a portion of high-ratio shortening with butter can increase the stability of the frosting, making it more resistant to humidity and temperature fluctuations. Additionally, professionals often use a "spirit level" to ensure the top of the cake is perfectly horizontal before the crumb coat sets. Finally, always work in a well-lit environment. Side-lighting is particularly useful as it casts shadows on any bumps or dips, allowing you to identify and fill imperfections that wouldn't be visible under overhead light. These small, meticulous adjustments distinguish an amateur effort from a professional-grade dessert.

Comments