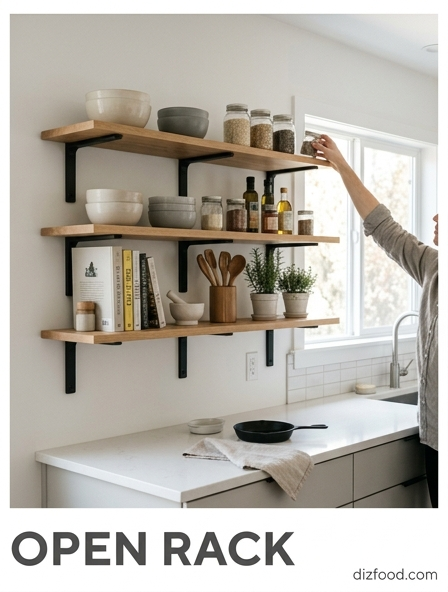
Maximize Airflow for Uniform Heat
Achieving a perfectly toasted surface depends heavily on the dynamics of air movement within your appliance. When using an open rack, the primary objective is to facilitate an unobstructed path for thermal energy to circulate around the bread. Unlike a solid baking sheet, a wire rack allows hot air to contact the bottom surface of the slice simultaneously with the top. This dual-sided exposure ensures that the Maillard reaction occurs at a synchronized rate across the entire exterior. Without this level of airflow, heat becomes trapped beneath the bread, leading to uneven temperature zones and a disappointing, patchy finish.
- Position the rack in the center of the oven to avoid cold spots.
- Ensure the wire gauge is thin enough to minimize contact points.
- Avoid overcrowding the rack, which can lead to "steam pockets."
- Use a convection setting if available to further accelerate air velocity.
By prioritizing airflow, you transform the rack from a simple holder into an active component of the heating process. This environmental control is the secret to professional-grade results in a home kitchen setting.
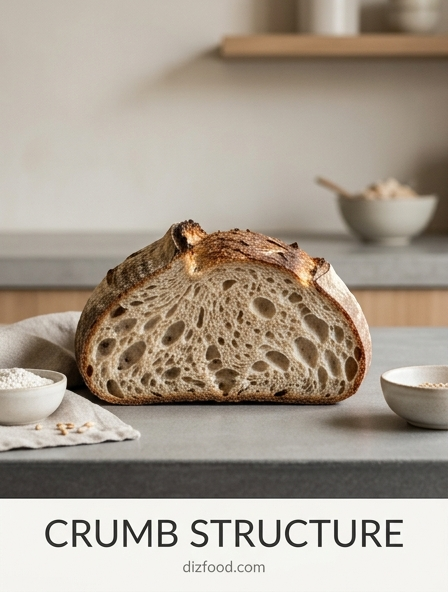
Selecting Sourdough for Better Texture
The structural integrity of sourdough makes it an ideal candidate for open rack toasting. Because sourdough typically features a higher hydration level and a complex fermentation profile, it reacts uniquely to dry heat. The large, irregular alveoli-the "holes" in the crumb-allow hot air to penetrate deeper into the slice than a standard sandwich loaf would permit. This internal airflow creates a multi-dimensional crunch that persists even after the bread has cooled slightly. When selecting a loaf, look for a firm, naturally leavened crust that can withstand the direct intensity of the heating elements without collapsing.
Furthermore, the inherent acidity of sourdough influences how the sugars caramelize on the rack. The lactic and acetic acids produced during fermentation provide a chemical foundation for a more complex flavor profile when subjected to high heat. A well-fermented sourdough will develop deep amber tones rather than a simple burnt char. This synergy between the bread's physical architecture and its chemical makeup ensures that every square inch of the slice benefits from the open rack's ability to distribute heat efficiently.
Preventing Moisture Traps on Racks
One of the most common pitfalls in the kitchen is the formation of moisture traps that ruin the texture of toasted goods. When a hot item is placed on a flat, non-porous surface, the residual steam escaping from the food has nowhere to go. This steam quickly condenses into water droplets, turning a crisp crust into a soggy mess within seconds. An open wire rack solves this issue by providing a dedicated escape route for evaporating water vapor, ensuring that the underside remains as dry as the top.
| Surface Type | Moisture Retention | Resulting Texture |
|---|---|---|
| Solid Baking Tray | High | Soggy/Soft |
| Ceramic Plate | Moderate | Damp Bottom |
| Open Wire Rack | Very Low | Uniformly Crisp |
Utilizing a rack during both the heating and cooling phases is essential for maintaining structural integrity. The goal is to allow the bread to "breathe" as it transitions from the high-heat environment to room temperature. By eliminating these moisture traps, you ensure that the effort put into toasting is not undone by poor ventilation.
The Science of Convection Toasting
Convection toasting relies on the physical principle that moving air transfers heat more rapidly than stationary air. When an open rack is used in a convection environment, the fan forces heated molecules into every crevice of the food surface. This process significantly reduces the "boundary layer"-a thin film of cooler air that naturally surrounds food as it cooks. By stripping away this layer, the rack allows for a faster rate of evaporation and a more rapid increase in surface temperature, which is the catalyst for a superior crust.
This method is particularly effective for thick-cut slices or artisanal breads that require significant energy to crisp. The combination of the wire grid and forced air ensures that the thermal energy is not just hitting the bread, but wrapping around it. This creates a high-pressure environment for flavor development, as the concentrated heat forces moisture out of the exterior cells while locking it into the interior. Understanding this fluid dynamics approach allows you to manipulate your kitchen equipment for better culinary outcomes, turning a simple task into a precise scientific process.
Adjusting Rack Height for Even Browning
The distance between your bread and the heating element is perhaps the most critical variable in the toasting process. Most ovens and toaster ovens offer multiple rack positions, each serving a distinct purpose in heat management. Placing the rack too high can lead to rapid charring before the center is warmed, while placing it too low may result in a dried-out, leathery texture without any significant color. Finding the "sweet spot" requires an understanding of how your specific appliance radiates energy.
- Top Position: Best for quick searing and "broiler" style browning.
- Middle Position: Ideal for standard toasting and general convection work.
- Bottom Position: Used for reheating thick items where core temperature is the priority.
By adjusting the rack height, you control the intensity of the infrared radiation reaching the bread. For an open rack to function at its peak, it must be positioned where the convective air currents are most stable. This usually occurs in the center of the oven, where the air can cycle from the bottom to the top without being obstructed by the oven walls or the heating elements themselves.
Essential Wire Rack Preheating Tips
Preheating isn't just for the oven cavity; the rack itself should be brought to temperature before the bread is introduced. A cold rack acts as a heat sink, drawing energy away from the bread at the points of contact. This can result in "pale stripes" on the bottom of your toast where the wires touched the surface. By allowing the rack to heat up alongside the oven, you ensure that the initial contact with the bread triggers immediate searing, which prevents sticking and promotes a more even color distribution across the entire slice.
To optimize this, place the empty rack in the oven at least five minutes before you plan to start toasting. This ensures that the metal wires have reached thermal equilibrium. When you finally place your sourdough or brioche on the rack, the preheated metal will contribute to the browning process rather than hindering it. This small adjustment in timing can significantly reduce the overall toasting time and improve the consistency of your daily breakfast or artisanal sandwich preparation. Consistency is the hallmark of a well-managed kitchen, and it starts with the temperature of your tools.
Maintaining Inner Crumb Moisture
The ultimate goal of toasting on an open rack is to create a stark contrast between a crunchy exterior and a soft, pillowy interior. This balance is often lost when the toasting process takes too long, as the heat eventually migrates to the center of the bread and evaporates the internal moisture. To prevent this "crouton effect," the surface must be heated rapidly. An open rack facilitates this by allowing the highest possible temperature to hit the crust immediately, sealing the exterior before the core temperature rises significantly.
- Use high heat settings for shorter durations to preserve the crumb.
- Start with bread that is at room temperature rather than frozen.
- Spray a very fine mist of water on the crust if the bread is slightly stale.
- Limit the toast time to under four minutes for standard slices.
By leveraging the airflow of the rack, you can achieve a "flash-toasted" effect. This ensures that when you bite through the golden-brown surface, you are met with a steaming, moist interior. This dual-texture experience is what defines high-quality toast and is only possible when the rack allows for rapid, efficient heat transfer to the outside while leaving the inside protected.
Achieving the Perfect Golden Crust
A perfect golden crust is the result of the Maillard reaction, a chemical interaction between amino acids and reducing sugars. On an open rack, this reaction is enhanced because the bread is suspended in a hot, dry environment. Unlike a pan where the bread might fry in fat, or a toaster where the heat is extremely localized, a rack in a controlled oven environment allows for a slow and steady development of color. This results in a deeper, more complex flavor profile that isn't just "burnt" but is instead "caramelized."
To achieve this, monitoring the color change is vital. The transition from pale to gold happens quickly, but on a rack, it is more predictable because the heat distribution is so uniform. You want to look for an even, honey-brown hue that extends to the very edges of the crust. Because the rack supports the bread without blocking the air, the edges-which are often the most flavorful part of an artisanal loaf-get the attention they deserve. This leads to a slice of toast that is aesthetically pleasing and packed with the nutty, sweet notes that only proper heat application can produce.
Avoiding Sogginess After Toasting
The critical moments immediately following the toasting process determine whether your bread stays crisp or becomes limp. As soon as you remove the toast from the heat, it begins to release steam as it cools. If you place the toast directly onto a ceramic plate, the bottom of the slice will trap that steam, creating a soggy texture in less than sixty seconds. The use of an open cooling rack is non-negotiable for anyone seeking professional results.
| Post-Toast Action | Moisture Outcome | Crispness Duration |
|---|---|---|
| Immediate Plating | Steam trapped under slice | < 1 minute |
| Stacking Slices | Steam trapped between slices | < 2 minutes |
| Elevated Rack Cooling | Full vapor escape | 5+ minutes |
By allowing the toast to rest on a wire rack for just thirty to sixty seconds before plating, you allow the surface to "set." This brief cooling period ensures that the crust hardens and the internal steam dissipates harmlessly into the air. This practice is especially important if you plan to add moist toppings like avocado, poached eggs, or jam, as a strong, dry base is required to support the additional weight and moisture.
Optimal Air Circulation Secrets
The layout of your kitchen rack is just as important as the rack itself. To maximize circulation, you must understand the "crowding effect." When slices of bread are placed too close together, they create a wall that disrupts the natural flow of air, essentially turning the open rack into a solid surface. For the best results, maintain at least an inch of space between each slice. This allows the hot air to swirl around each individual piece, ensuring that the sides of the bread are toasted just as effectively as the top and bottom.
Another secret involves the orientation of the rack wires. If possible, place the bread perpendicular to the wires to minimize the surface area of the metal touching the dough. This further reduces heat sink issues and maximizes the "openness" of the environment. In a convection oven, try to align the bread so the air from the fan can pass through the gaps between the slices. These small logistical adjustments might seem minor, but they represent the difference between an average piece of toast and a masterpiece of kitchen engineering. True mastery of the kitchen involves controlling these invisible currents to serve your culinary goals.


Comments