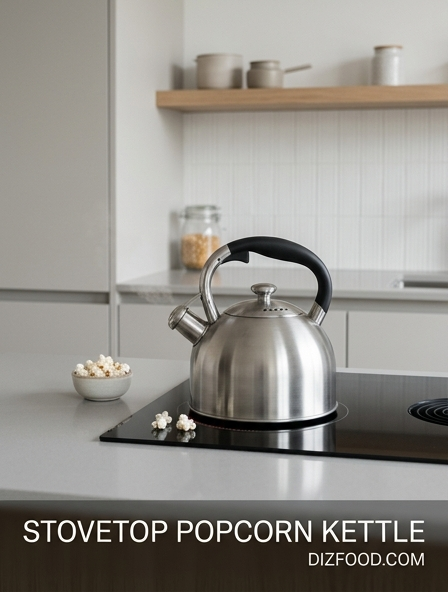
Bringing that nostalgic, cinematic crunch into your own kitchen starts with mastering the stovetop popcorn kettle. Unlike standard microwave bags, using a dedicated kettle allows you to achieve that elusive, authentic theater-style flavor by perfectly balancing heat with high-quality oils and seasonings. This traditional method ensures every kernel pops to its maximum potential, resulting in a crisp texture and rich taste that truly elevates your snacking game. It's an easy way to turn a simple movie night into a gourmet experience that your friends and family will love. To decide which tool is right for your kitchen, compare the pros and cons of a stovetop popcorn kettle vs hot air popper.
Choosing Your Stovetop Popcorn Kettle
Selecting the right stovetop popcorn kettle is the first step toward achieving cinema-quality snacks at home. Unlike standard pots, dedicated popcorn kettles are designed with integrated stirring mechanisms that prevent kernels from settling and burning. When shopping, consider the material: aluminum is prized for its superior heat conductivity and rapid response to temperature changes, while stainless steel offers greater durability and a polished aesthetic. Capacity is another vital factor, as most enthusiasts find a six-quart kettle provides the ideal volume for family-sized batches without overcrowding the vessel.
- Mechanical Stirrer: Look for internal paddles that sweep the entire bottom surface.
- Lid Design: Choose a model with dual-sided hinged lids for easy pouring and steam release.
- Handle Length: Ensure the handle is long enough to stay cool while positioned over a gas burner.
- Gear Material: Metal gears typically outlast plastic versions in high-heat environments.
Ultimately, the weight of the kettle matters. A lightweight kettle allows for easier agitation, whereas a heavy-bottomed pot ensures even heat distribution, reducing the likelihood of "hot spots" that cause localized scorching during the popping cycle.
Best Oils for High Heat Popping
The choice of oil significantly impacts both the flavor and the texture of your popcorn. Because stovetop popping requires high temperatures, you must select an oil with a high smoke point to avoid acrid flavors and unhealthy compounds. Coconut oil is the traditional favorite in movie theaters, offering a distinct buttery aroma and a clean finish. For those seeking a more neutral profile or a healthier fat content, avocado oil and grapeseed oil are excellent alternatives due to their stability under thermal stress.
| Oil Type | Smoke Point | Flavor Profile |
|---|---|---|
| Refined Coconut Oil | 450°F | Rich and Traditional |
| Avocado Oil | 520°F | Clean and Neutral |
| Ghee (Clarified Butter) | 485°F | Intense Buttery |
| Peanut Oil | 450°F | Slightly Nutty |
Avoid using extra virgin olive oil or unrefined nut oils, as their low smoke points will lead to smoke in the kitchen and a bitter taste on the kernels. Always ensure the oil coats the bottom of the kettle entirely before adding your kernels.
The Secret of Theater Style Salt
The defining characteristic of professional popcorn is not just the saltiness, but the texture and adherence of the salt used. Standard table salt consists of large, heavy crystals that often fall to the bottom of the bowl, leaving the popcorn bland. Theater-style salt, often referred to as "flour salt," is pulverized into a microscopic powder. This fine consistency allows the salt to nestle into the crevices of the popped kernels, clinging to the oil for a consistent flavor in every bite.
Many professionals use Flavacol, a specific brand of seasoned salt that contains yellow food coloring and artificial buttery flavoring. If you prefer a more natural approach, you can create your own theater salt by processing sea salt in a high-speed blender or clean spice grinder until it reaches a dust-like consistency. For the best results, add a portion of the salt directly into the kettle with the oil and kernels. This "wet-salting" method ensures that the salt is bonded to the corn the moment it expands, creating a deep, integrated flavor that topical salting simply cannot replicate.
Selecting Premium Butterfly Popcorn Kernels
Not all popcorn kernels are created equal, and for stovetop kettles, "butterfly" kernels are the gold standard. These kernels are characterized by their irregular shapes and protruding "wings" that emerge upon popping. This expansive surface area is ideal for catching salt, melted butter, and dry seasonings. In contrast, "mushroom" kernels pop into round, sturdy spheres better suited for heavy caramel glazes, but they can feel chewy if served with only light seasonings.
- Freshness: Always check the harvest date; older kernels lose moisture and result in smaller, tougher pops.
- Expansion Ratio: Premium kernels boast a higher expansion ratio, meaning they produce more volume per cup of raw corn.
- Hull Quality: Look for "hull-less" or "thin-skin" varieties to minimize the amount of debris that gets stuck in your teeth.
- Organic Options: Choosing non-GMO, organic kernels ensures a chemical-free snack with a pure corn flavor.
By investing in high-quality butterfly kernels, you ensure a light, crunchy texture that melts in the mouth. Storing your kernels in an airtight container in a cool, dark pantry is essential to maintain the internal moisture balance required for a forceful, fluffy pop.
Mastering Heat Control and Agitation
Successful stovetop popping is a delicate balance between heat intensity and physical movement. You should begin by preheating the kettle with the oil on medium-high heat. A common test for readiness is placing three "test kernels" in the oil; once they pop, the oil is at the optimal temperature for the rest of the batch. Once the full measure of kernels is added, the agitation process must be constant. Turning the crank at a steady, rhythmic pace ensures that every kernel is exposed to the hot oil and prevents any single kernel from resting on the heated surface for too long.
As the popping intensifies, you may need to adjust the heat slightly downward to prevent the already-popped corn from scorching against the kettle walls. The agitation serves two purposes: it facilitates even heat distribution and encourages the unpopped kernels to migrate toward the bottom while the lighter, popped corn rises. Listen closely to the frequency of the pops; once the rapid firing slows to about two or three seconds between pops, the process is complete, and the kettle should be removed from the heat source immediately to preserve the delicate texture.
Venting Steam for Ultimate Crispness
The greatest enemy of crunchy popcorn is steam. When a kernel pops, it releases a small burst of moisture. If this moisture is trapped inside the kettle, it creates a humid environment that effectively steams the popcorn, resulting in a rubbery, tough texture. Most high-quality stovetop kettles feature built-in vents in the lid, but these are often insufficient for a full batch of corn. To achieve ultimate crispness, you must proactively manage the steam release during the final stages of the popping cycle.
As the kettle fills and the lid begins to lift from the pressure of the expanding corn, ensure that the vents are wide open. If your kettle lacks sufficient venting, you can slightly crack the lid during the last thirty seconds of popping, provided you are careful to avoid flying kernels or hot oil splatters. This allows the hot vapor to escape rapidly, ensuring that the corn dries out instantly as it expands. Once the popping stops, immediately dump the popcorn into a wide, shallow bowl rather than leaving it in the kettle. This prevents residual steam from condensing on the bottom layer, keeping the entire batch light and crisp.
Perfecting the Real Butter Drizzle
While many turn to artificial sprays, nothing matches the decadence of real butter. However, pouring melted butter directly onto popcorn often results in soggy, saturated spots and large unbuttered sections. The secret to professional application lies in clarification. Regular butter contains water and milk solids; by simmering butter and skimming off the foam, you create clarified butter (or ghee), which is pure fat. Because the water is removed, clarified butter will not make your popcorn soggy, allowing it to remain crisp even when heavily coated.
- Heat the Butter: Ensure the clarified butter is warm but not boiling when drizzling.
- Layered Approach: Do not pour all the butter at once. Fill the bowl halfway, drizzle, then add the rest.
- The Toss: Use a large bowl to toss the corn vigorously while drizzling in a thin, steady stream.
- Aerosol Alternative: For an ultra-light coating, use a specialized kitchen mister filled with warm clarified butter.
By using clarified butter and a layered distribution technique, you achieve a uniform, golden coating that enhances the corn's natural flavor without compromising the structural integrity of the delicate butterfly wings.
Pro Tips for Even Seasoning Distribution
Achieving a perfectly seasoned batch of popcorn requires more than just a quick sprinkle over the top. Gravity naturally pulls seasonings toward the bottom of the bowl, leaving the top layer flavorless. To combat this, use a "toss and coat" method. Start with a bowl that is significantly larger than the volume of popcorn you have produced. This extra space allows the kernels to tumble and roll, ensuring that every surface comes into contact with your seasoning blend.
If you are using dry powders like nutritional yeast, garlic powder, or chili seasoning, apply them immediately after the butter or oil drizzle. The fat acts as a literal glue, trapping the fine particles on the popcorn's surface. For the most even distribution, use a fine-mesh shaker or sieve to dust the seasonings over the corn while someone else tosses the bowl. If you are working alone, add the seasonings in three distinct stages: a third of the popcorn, a third of the seasoning, then repeat. This structural layering ensures that the flavor is consistent from the very first bite at the top of the bowl to the very last kernel at the bottom.
Avoiding Burnt Kernels Every Time
The window between perfectly toasted and unpleasantly burnt popcorn is a matter of seconds. To avoid burnt kernels, you must rely on your senses of smell and hearing rather than a kitchen timer. As soon as the rapid "machine-gun" popping slows to a cadence where you can count "one-one-thousand, two-one-thousand" between pops, the kettle must be moved. Even if you suspect there are a few unpopped kernels remaining, it is better to sacrifice those few than to risk scorching the entire batch.
Residual heat is a common culprit for burning. A stovetop kettle, especially one made of heavy stainless steel, retains significant thermal energy even after being moved off the burner. Because of this, you should pour the popcorn into a serving bowl immediately. Never let the finished popcorn sit in the hot kettle while you look for a bowl or grab a drink. Additionally, keep your kettle clean; carbonized residue from previous batches can flake off and stick to new kernels, imparting a burnt taste even if the current batch was cooked perfectly. Diligent agitation and a quick exit from the heat are your best defenses against the bitter taste of scorched corn.
Cleaning Your Kettle for Longevity
Proper maintenance of your stovetop kettle ensures consistent performance and prevents the buildup of rancid oils. For aluminum kettles, a "seasoning" approach similar to cast iron is often recommended. After use, simply wipe the interior with a clean, dry paper towel while the kettle is still slightly warm. This removes excess oil while leaving a microscopic protective film that prevents sticking and corrosion. If the kettle becomes sticky or develops a thick residue, a gentle wash with warm, soapy water is necessary, followed by immediate and thorough drying to prevent water spots.
| Cleaning Frequency | Method | Benefit |
|---|---|---|
| After Every Use | Dry Wipe Down | Maintains seasoning and prevents oil buildup. |
| Monthly | Warm Soapy Wash | Removes old oils that can turn rancid. |
| Deep Clean | Baking Soda Paste | Removes stubborn carbonized stains on the bottom. |
Never place a mechanical stovetop kettle in the dishwasher, as the harsh detergents and high heat can damage the wooden handles and strip the lubrication from the internal gears. By hand-washing and properly storing your kettle, you will enjoy decades of perfect popcorn.


Comments