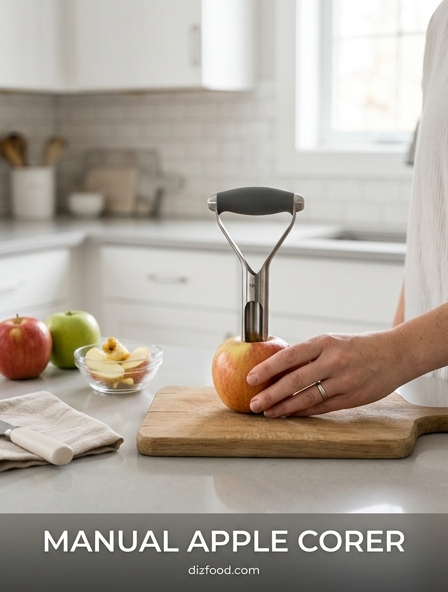
Anatomy of a Manual Apple Corer
The manual apple corer is a specialized kitchen instrument designed for precision and efficiency. At its core, the tool consists of a cylindrical stainless steel tube, often referred to as the barrel. The distal end of this barrel features a sharp, frequently serrated edge that allows the user to pierce the tough skin and dense flesh of the pome fruit with minimal resistance. This cylindrical design is specifically measured to encompass the seed housing of standard apple varieties without wasting excess fruit.
The proximal end is fitted with an ergonomic handle, usually constructed from reinforced plastic, silicone, or stainless steel. High-quality models often include a "butterfly" or "plunger" mechanism, which allows the barrel to split open or push the extracted core out easily. This prevents the common frustration of a core becoming lodged deep within the tool. Furthermore, the handle is often weighted to provide better balance during the downward plunging motion. Understanding these components helps the user leverage the tool's mechanical advantage, ensuring that the fruit remains intact while the fibrous center is cleanly removed for culinary preparations.
Essential Technique for Perfect Alignment
Achieving a perfectly centered hole requires more than just brute force; it necessitates a keen eye and a steady hand. To begin, place the apple on a stable, non-slip cutting board. It is vital to ensure the fruit is sitting upright. If the apple is lopsided, you may need to trim a thin slice off the bottom to create a level base. Locate the stem at the top center, as this serves as your primary visual guide for alignment. Position the serrated edge of the corer directly over the stem, ensuring the tube is perfectly vertical.
Apply firm, steady downward pressure while simultaneously twisting the handle back and forth. This rotational movement allows the serrated teeth to saw through the fibers rather than simply crushing them. Continue this motion until you feel the tool pass through the bottom of the fruit. Before pulling the corer back out, give it one final full rotation to ensure the bottom skin is completely severed. By maintaining a 90-degree angle relative to the cutting board, you avoid diagonal paths that might leave behind unwanted seeds or woody remnants in the edible portion of the apple.
Top Apple Varieties for Clean Coring
The success of your coring endeavor often depends on the physical characteristics of the apple variety being used. Firm-fleshed apples are the easiest to process because they offer enough structural resistance to prevent the fruit from collapsing under the pressure of the tool. Conversely, softer, mealier varieties may split or bruise during the extraction process.
| Apple Variety | Texture Profile | Coring Difficulty |
|---|---|---|
| Granny Smith | Very Firm / Crisp | Low - Very Clean |
| Honeycrisp | Crunchy / Juicy | Low - Excellent |
| Fuji | Dense / Firm | Moderate - Clean |
| McIntosh | Soft / Tender | High - Prone to Tearing |
| Pink Lady | Dense / Crispy | Low - Highly Uniform |
When selecting fruit for decorative rings or stuffed apple recipes, choosing a variety like the Granny Smith or Pink Lady ensures that the hollowed cylinder remains perfectly circular. These varieties possess a high pectin content and tight cellular structure, which allows the manual corer to glide through the flesh without causing jagged edges or internal fractures in the fruit wall.
Preserving Structural Integrity for Professional Platters
For professional culinary presentations, maintaining the structural integrity of the fruit is paramount. A manual corer is superior to a knife in this regard because it removes the internal waste without necessitating the bisection of the fruit. This is particularly important for creating whole baked apples or elegant fruit platters where visual symmetry is required. When the core is removed cleanly, the apple retains its spherical shape, providing a natural vessel for fillings like cinnamon-spiced oats, walnuts, or honey.
To ensure the apple does not split, avoid using excessive force on a cold apple straight from the refrigerator; allowing the fruit to reach room temperature can make the flesh slightly more pliable. Furthermore, if you are creating slices for a platter, coring the apple first allows you to cut perfectly uniform rings. This technique eliminates the unsightly star-shaped seed cavity often seen in hand-sliced fruit. By treating the apple as a single architectural unit, the manual corer allows chefs to produce consistent, high-end results that appear sophisticated and meticulously prepared for guests.
Achieving Uniformity for Consistent Baking Results
Uniformity is the cornerstone of successful baking. When preparing apples for tarts, pies, or galettes, consistent thickness ensures that every piece of fruit cooks at the same rate. Using a manual corer is the first step in this process. By removing the core as a perfect cylinder, you create a standardized starting point for all subsequent cuts. Whether you are dicing the fruit into cubes or slicing it into wedges, the absence of the irregular core allows for geometric precision that is nearly impossible to achieve when working around seeds with a paring knife.
In applications like apple chips or dehydrated snacks, uniformity is even more critical. Thin slices with a hollow center allow for better airflow during the drying process, leading to a crispier texture. If one slice contains a bit of core and another does not, they will dry at different speeds, resulting in a batch that is partially burnt and partially chewy. The manual corer acts as a calibration tool, ensuring that the densest, most moisture-laden part of the fruit is removed entirely, leaving only the uniform flesh for the oven or dehydrator.
Pro Tips for Effortless Core Removal
Maximizing the efficiency of a manual apple corer involves a few industry secrets that go beyond basic operation. These tips focus on reducing physical strain and ensuring a mess-free kitchen environment. While the tool is designed to be intuitive, small adjustments in your grip and movement can significantly enhance the user experience, especially when processing large bushels of fruit for preservation or holiday baking.
- The Twist Action: Never push straight down; always use a twisting motion to allow the serrated edge to slice through the skin.
- Bottom-Up Check: Before withdrawing the tool, check the bottom of the apple to ensure the corer has fully emerged.
- Lubrication: For particularly dry or dense apples, a tiny drop of lemon juice on the blade can reduce friction.
- Thumb Positioning: Place your thumb on the top of the handle for added leverage when piercing the initial skin layer.
- Core Ejection: Use a wooden skewer or the built-in lever to push the core out immediately so it doesn't dry and stick to the metal.
Following these steps will not only speed up your workflow but also protect the delicate edges of your coring tool. Consistent application of these methods ensures that the internal cavity of the apple is smooth, which is ideal for aesthetic presentations.
Safety Best Practices for Handheld Tools
While the manual apple corer is a relatively simple device, its sharp serrated edges require respect and careful handling. Safety begins with the environment; always work on a dry, stable surface to prevent the apple from sliding mid-plunge. One of the most common mistakes is holding the apple in the palm of the hand while coring. This is extremely dangerous, as the tool can easily slip through the fruit and puncture the skin. Always keep your non-dominant hand on the sides of the apple, well away from the top and bottom exit points.
Additionally, pay close attention to the condition of the tool. A dull corer requires more force, which increases the likelihood of a slip. Ensure the handle is dry and free of juice, as a slippery grip can lead to loss of control. When cleaning the device, use a long-handled brush rather than your fingers to reach inside the cylinder to remove stuck debris. By treating the corer with the same caution as a chef's knife, you can enjoy its convenience without the risk of common kitchen injuries.
Creative Snacking Ideas for Cored Apples
The utility of a manual apple corer extends into the realm of creative food styling and healthy snacking. Once the core is removed, the apple becomes a versatile canvas for various flavors. One popular idea is the "apple donut." By slicing the cored apple into thick rings, you create circular bases that can be topped with peanut butter, almond butter, or Greek yogurt. Sprinkling granola, chia seeds, or dark chocolate chips on top creates a healthy, visually appealing snack that children and adults alike will enjoy.
Another creative application involves stuffing the whole fruit. Because the corer creates a perfect tunnel, you can fill the center with string cheese, turkey sticks, or a mixture of cream cheese and chives for a savory twist. For a dessert option, try filling the cavity with a mix of dates and walnuts before slicing the apple horizontally into "sandwiches." The hollow center provides a natural pocket for these fillings, making the snacks easier to eat on the go without the mess of seeds or tough fibers. These methods transform a simple piece of fruit into a gourmet treat.
Maintenance and Blade Sharpening Essentials
To maintain the longevity and performance of your manual apple corer, proper maintenance is essential. Most high-quality corers are made of stainless steel, but they are still susceptible to mineral buildup and oxidation if not cared for correctly. After each use, rinse the tool under warm running water immediately to prevent fruit sugars from hardening. While many models are dishwasher safe, hand washing is often recommended to preserve the sharpness of the serrated teeth. Over time, the harsh chemicals in dishwasher detergents can dull the fine edge of the blade.
Sharpening a cylindrical, serrated blade can be challenging but is possible with the right tools. A small, tapered diamond rod or a ceramic honing stone can be used to touch up the individual serrations. You should focus on the outer bevel of the teeth, following the original angle established by the manufacturer. If the blade is not serrated, a round file can be used to keep the circular edge keen. Regular inspection of the handle-to-blade connection is also vital; ensure there are no cracks or wobbles that could compromise the tool's safety during use.
Troubleshooting Common Apple Coring Mistakes
Even with a dedicated tool, errors can occur during the coring process. One frequent issue is the "angled exit," where the corer enters the top center but exits through the side of the apple. This usually happens because the user is focusing on the downward pressure rather than maintaining a vertical orientation. To fix this, always check your angle from the side before the blade enters more than an inch into the fruit. If you notice a slant, gently adjust the handle back toward the center.
Another common problem is the "stuck core." This occurs when the fruit is particularly fibrous or when the core is slightly larger than the tube diameter. To resolve this, avoid pulling the tool straight out. Instead, continue the twisting motion while extracting. If the core remains lodged in the tool, never use your finger to push it out. Use a blunt object like the handle of a wooden spoon. Finally, if the apple splits, it is often a sign that the fruit was too cold or the blade was too dull. Ensure your apples are room temperature and your tool is sharp to provide the cleanest possible cut.

Comments