
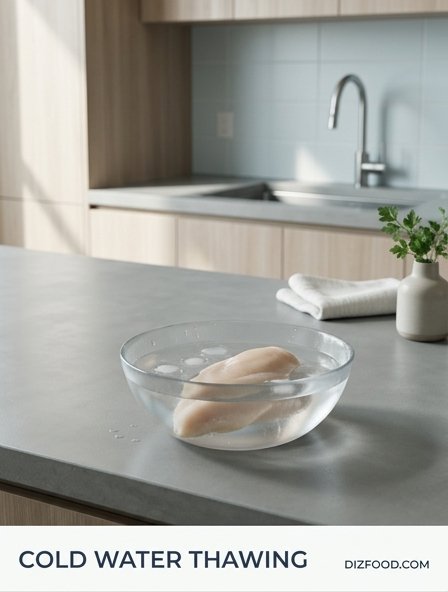
When you're in a time crunch and need dinner ready fast, cold water thawing is a reliable lifesaver that prioritizes both speed and food safety. To execute this properly, seal your food in a leak-proof bag to prevent contamination and submerge it entirely in cold tap water. By refreshing the water every thirty minutes, you maintain a safe temperature that inhibits bacterial growth while accelerating the defrosting process significantly. This technique is perfect for busy weeknights when you need efficiency without sacrificing meal quality. Ultimately, knowing these steps helps you choose between Cold Water Thawing Vs Refrigerator Thawing for your next meal.
The Science Behind Rapid Cold Water Thawing
The efficiency of cold water thawing is rooted in the principles of thermodynamics and thermal conductivity. Compared to air, water is a significantly more efficient conductor of heat. While air thawing in a refrigerator relies on slow convection, water molecules are more densely packed, allowing them to transfer energy to the frozen food item at a much higher rate. This process utilizes the latent heat of fusion, where the relatively warmer water provides the energy necessary to break the crystalline bonds of the ice within the protein.
By surrounding the food with a constant medium of liquid, you eliminate the insulating layer of cold air that often surrounds items in a dry environment. This method ensures that the temperature gradient remains consistent, pulling the frost from the core of the meat toward the surface. Scientists categorize this as forced convection when the water is moving, or steady-state conduction when the water is still but refreshed. This rapid energy exchange reduces thawing time by up to 75% compared to traditional refrigeration methods, making it an essential technique for professional chefs and home cooks who require speed without sacrificing the structural integrity of the cellular walls in the meat.
Essential Prep Using Leak-Proof Packaging
Proper preparation is the most critical step to ensure that the cold water thawing process does not ruin the texture or safety of your food. Before the item ever touches the water, it must be sealed in a completely leak-proof environment. If the packaging has even a pinhole leak, the food will absorb water, resulting in a soggy, waterlogged product that lacks flavor and possesses a compromised texture. Furthermore, meat tissues can act like a sponge, drawing in moisture that dilutes the natural juices.
- Vacuum-Sealed Bags: These offer the best protection as they remove all air and provide a tight barrier.
- Heavy-Duty Ziploc Bags: If using standard bags, ensure they are freezer-grade and double-check the seal.
- Air Removal: Use the water displacement method to push excess air out of the bag before sealing to ensure maximum contact with the water.
- Secondary Containment: Consider double-bagging items with sharp bones or edges that might puncture a single layer of plastic.
Ensuring a dry interior also prevents the introduction of bacteria from the tap water into the food itself, maintaining the highest possible quality for your ingredients.
Mastering the Submersion Technique
Simply placing a bag of frozen meat into a bowl of water is often insufficient for rapid thawing. To master the technique, you must ensure total submersion. Because frozen items contain trapped air or are less dense than liquid water, they frequently float. Any portion of the food exposed to the air will thaw at a significantly slower rate, leading to uneven temperatures and potential safety hazards. The goal is to maximize the surface area in direct contact with the cooling medium.
- Select a basin or large bowl that allows the food to be completely surrounded by at least two inches of water on all sides.
- Submerge the packaged food completely, ensuring no corners are poking above the surface.
- Place a heavy object, such as a ceramic plate, a small cast-iron skillet, or a heavy bowl, on top of the package to keep it pinned at the bottom.
- Position the setup in the sink or on a steady countertop where it can be monitored.
This "anchor" method ensures that the thermal exchange occurs uniformly across the entire surface of the protein, preventing a "frozen core" while the edges are already fully defrosted.
Running Water vs Static Bath Efficiency
There are two primary ways to utilize cold water for thawing: the static bath and the running water method. The static bath is more water-efficient but requires more manual intervention to maintain its effectiveness. In a static bath, the water surrounding the frozen item quickly drops in temperature, becoming an insulating "cold jacket" that slows down the thawing process. Conversely, the running water method uses a constant stream to create kinetic energy and maintain a steady temperature.
| Method | Efficiency | Water Usage | Maintenance |
|---|---|---|---|
| Static Bath | Moderate | Low | Change water every 30 mins |
| Running Water | High | High | Constant low-flow stream |
For most home kitchens, the static bath is the preferred balance of speed and conservation, provided the user is diligent about refreshing the water. If you choose the running water method, only a very thin, "pencil-lead" sized stream is necessary to keep the water circulating and prevent it from becoming too cold. This constant movement ensures that the thermal gradient remains high, accelerating the transition from frozen to chilled.
Critical Temperature Control for Food Safety
Temperature control is the line between a successful meal and a foodborne illness. The USDA refers to the range between 40°F and 140°F as the "Danger Zone," where bacteria like Salmonella and E. coli can multiply rapidly. When thawing in cold water, the objective is to keep the surface of the food out of this zone for as long as possible. The water must always feel cold to the touch-specifically, it should remain below 40°F (4°C).
If the water warms up to room temperature, the exterior of the meat will enter the danger zone while the interior remains frozen. This is why refreshing the water every thirty minutes is not just a suggestion; it is a safety requirement. Using a digital probe thermometer to check the water temperature is a best practice in professional environments. If the water exceeds 45°F, it is no longer safely pulling heat from the core and is instead incubating potential pathogens on the surface. Maintaining this tight temperature window ensures that the food stays at a refrigerated-safe temperature throughout the entire transition from a solid to a pliable state.
Estimated Thawing Times for Various Proteins
The time required for cold water thawing depends heavily on the thickness and total mass of the protein. Because water is so efficient, most small packages can be ready for the pan in under an hour. However, larger items require careful planning to ensure they are fully processed before the exterior reaches an unsafe temperature. Generally, you should allow approximately 30 minutes per pound of meat. Thinner cuts like fish fillets or steaks will naturally thaw much faster than dense roasts or whole birds.
- Small Items (Shrimp, Scallops): 15 to 20 minutes in a sealed bag.
- Individual Steaks or Chicken Breasts: 30 to 45 minutes depending on thickness.
- 1-2 Pound Ground Beef Bricks: 1 hour, provided the meat is flattened in the bag.
- Whole Chicken (3-4 lbs): 2 to 3 hours with frequent water changes.
- Large Roasts: 3 to 5 hours; these require the most attention to temperature control.
Always check for flexibility and the absence of ice crystals in the thickest part of the meat before beginning the cooking process to ensure even heat penetration during the cook.
Avoiding Cross-Contamination in the Kitchen Sink
The kitchen sink is often a hub for bacteria, and using it as a thawing station requires strict hygiene protocols. Cross-contamination can occur if raw meat juices leak into the basin or if the exterior of the packaging carries contaminants. Even if your packaging is perfectly sealed, the splash from a running faucet can aerosolize bacteria and spread it to nearby drying racks, sponges, or countertops. Therefore, treating the sink as a "biological zone" during this process is essential for kitchen safety.
- Clear the sink of all dishes and debris before starting.
- Sanitize the basin with a bleach-based cleaner or a food-safe disinfectant.
- Once thawing is complete, carefully remove the bag and dry the exterior with paper towels to prevent dripping.
- Immediately clean the sink, the faucet handles, and the surrounding backsplash with hot soapy water or sanitizer.
By isolating the thawing process and performing a deep clean afterward, you mitigate the risk of transferring pathogens from the raw protein or the sink environment to other food items being prepared in the kitchen.
The Dangers of Warm Water Defrosting
It is a common temptation to use warm or hot water to speed up the thawing process even further, but this is a dangerous culinary shortcut. Warm water thawing creates an extreme temperature disparity between the surface and the core of the food. The exterior of the meat will quickly reach temperatures above 40°F, entering the bacterial growth "Danger Zone" while the center remains a block of ice. By the time the middle is thawed, the outside could have been at a room temperature for over an hour, allowing pathogens to reach hazardous levels.
Furthermore, warm water begins to physically "cook" the edges of certain proteins, particularly delicate fish or poultry. This changes the protein structure, leading to a chewy, unappealing texture and loss of moisture. This partial cooking makes the meat unevenly cooked once it finally hits the stove or grill. The goal of thawing is to return the item to a cold, raw state, not to begin the cooking process in a basin of tepid water. Stick to cold tap water to maintain both the safety and the culinary quality of your ingredients.
Immediate Cooking Requirements After Thawing
Once an item has been thawed using the cold water method, it must be cooked immediately. Unlike refrigerator thawing, which keeps the food at a constant 35-38°F and allows for a day or two of storage before cooking, cold water thawing brings the food through a temperature transition that activates enzymes and potentially allows surface bacteria to begin their life cycles. The "buffer" time provided by the refrigerator is non-existent when using water as the medium.
Moreover, food thawed in cold water should never be refrozen in its raw state. The process of thawing and then refreezing causes massive cellular damage due to the expansion and contraction of water molecules, which destroys the texture of the meat. If you find you cannot use the meat immediately after thawing it in water, you must cook it fully first; once cooked, it is safe to freeze the finished dish. Planning your meal timing so that the heat source is ready as soon as the protein is pliable is the best way to ensure the freshest and safest results for your kitchen operations.
Optimizing Your Kitchen Workflow for Speed
Integrating cold water thawing into a busy kitchen workflow requires strategic timing and organization. Because this method is active rather than passive, it should be the first task you tackle when starting a meal. While the meat is submerged and the timer is set for the first thirty-minute water change, you can utilize that window for mise en place. This creates a seamless transition from preparation to active cooking without downtime.
- Set Timers: Use a kitchen timer or smartphone to alert you every 30 minutes for water changes to ensure the process never stalls.
- Batch Processing: If thawing multiple items, use separate basins to ensure adequate water circulation around each piece.
- Prep Concurrently: Use the thawing time to chop vegetables, prepare marinades, or preheat your oven.
- Clean as You Go: Use the gaps between water changes to sanitize your workspace, ensuring that the sink area is ready for the final transition.
By treating the thawing process as a synchronized part of your cooking routine rather than a delay, you can reduce the total time from freezer to table by hours, making it an invaluable skill for the modern home cook.

Comments