The Appeal of Rustic Kitchen Organization
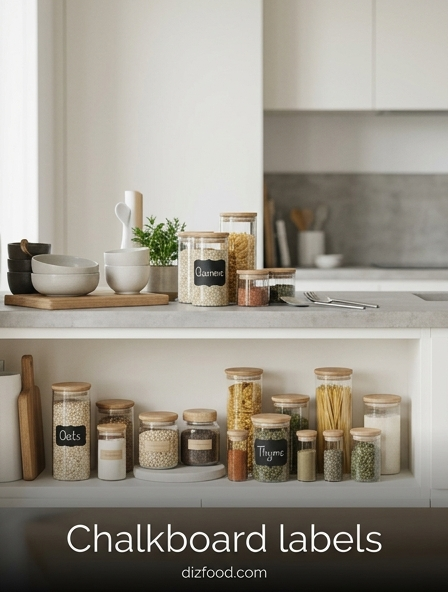
There is a timeless charm found in a kitchen that balances utility with aesthetic warmth. Rustic kitchen organization emphasizes the use of natural materials, tactile textures, and a sense of history. Chalkboard labels are a cornerstone of this design philosophy, offering a vintage, farmhouse feel that bridges the gap between old-world charm and modern efficiency. When you replace mismatched store packaging with uniform jars adorned with handwritten labels, the visual clutter vanishes, replaced by a soothing sense of order. This approach celebrates the "perfectly imperfect" nature of a busy home, where the focus is on comfort and accessibility.
Beyond the visual appeal, a rustic setup encourages a slower, more intentional way of living. It invites you to touch the materials-glass, wood, and stone-and appreciate the contents within. This style is not just about looking organized; it is about creating a workspace that feels welcoming to both the cook and the guest. By using chalkboard elements, you inject a personalized touch that mass-produced labels simply cannot replicate, ensuring your kitchen remains the soul of the home.
Benefits of Reusable Chalkboard Labels
Reusable chalkboard labels provide a unique combination of versatility and sustainability that is hard to find in traditional adhesive stickers. One of the most significant advantages is the ability to change the label text whenever the contents of a container are swapped. This makes them ideal for bulk shoppers who may buy quinoa one week and lentils the next. Instead of scraping off sticky residue or wasting plastic markers, a simple wipe with a damp cloth prepares the surface for a fresh description.
- Eco-Friendly Design: Reduces the need for single-use paper labels and plastic tape.
- Cost-Effective: A single set of durable vinyl labels can last for several years of constant use.
- High Visibility: The high contrast of white or neon chalk on a matte black background makes identifying items easy even from a distance.
- Waterproof Durability: Most modern chalkboard stickers are made of high-quality vinyl that can withstand refrigerator moisture and light hand-washing.
These labels offer a dynamic solution for the ever-evolving kitchen, allowing for mistakes to be corrected instantly and for categories to be redefined without additional cost.
Essential Supplies for Your Labeling Project
Starting a labeling project requires more than just the labels themselves. To achieve a professional and lasting result, you must gather a few specific tools that ensure precision and longevity. The quality of your markers, in particular, will determine how clean and legible your pantry looks. While traditional slate chalk offers a very authentic rustic look, liquid chalk markers are generally preferred for kitchen environments because they do not smudge as easily once they have dried.
- Vinyl Chalkboard Stickers: Choose various shapes like rectangles, ovals, or fancy frames to suit different jar sizes.
- Liquid Chalk Markers: Look for fine-tip markers for small spice jars and broad-tip markers for large canisters.
- Microfiber Cloth: Necessary for erasing mistakes and cleaning the labels during maintenance.
- Isopropyl Alcohol: Essential for prepping the surface of glass or plastic containers to ensure a strong adhesive bond.
- Ruler or Level: Helps in aligning labels perfectly across a row of identical jars for a polished look.
Having these supplies ready before you begin will prevent frustration and help you maintain a consistent style across all your kitchen storage units.
Selecting the Best Containers for Labels
Not every container is a suitable candidate for chalkboard labels. To ensure the labels stick properly and look their best, you must consider the texture and shape of the storage vessel. Smooth, non-porous surfaces are the gold standard, as they provide the best grip for the adhesive backing. While wicker and wood are staples of rustic design, labels are best applied to the lids or tags attached to these items rather than the textured surfaces themselves.
| Container Material | Suitability | Best Use Case |
|---|---|---|
| Glass (Mason Jars) | Excellent | Dry goods, grains, and spices. |
| BPA-Free Plastic | Good | Flour, sugar, and cereal bins. |
| Powder-Coated Metal | Fair | Coffee, tea, and bread boxes. |
| Ceramic (Glazed) | Excellent | Oil bottles and salt cellars. |
Choosing containers with flat or slightly curved faces rather than complex ridges will prevent the label from peeling at the edges or bubbling over time.
How to Apply Chalkboard Labels Properly
The longevity of your kitchen organization system depends heavily on the initial application of the labels. If the surface is not prepared correctly, even the highest-quality adhesive will eventually fail. Follow a systematic approach to ensure your pantry remains beautiful for years to come. The goal is to create a seamless bond that resists the heat and humidity common in cooking environments.
- Clean the Surface: Use soap and water to remove grease, followed by a wipe of rubbing alcohol to remove any invisible residues.
- Dry Completely: Ensure the container is bone-dry; even a microscopic layer of moisture can ruin the adhesive.
- Position Carefully: Use a ruler to mark the desired height. Lightly place the label without pressing down until you are sure it is level.
- Press from the Center: Once aligned, press firmly in the middle and smooth outward to the edges to eliminate air bubbles.
- Cure the Adhesive: Let the label sit for 24 hours before filling the container or exposing it to moisture.
Taking these extra few minutes during the setup phase prevents the "curling edge" look that often plagues poorly applied stickers.
Mastering the Art of Chalk Lettering
Beautiful lettering is what transforms a simple storage jar into a piece of kitchen decor. Many people feel intimidated by the prospect of handwriting their labels, but chalkboard markers are incredibly forgiving. The key to professional-looking results is consistency in font and spacing. Before touching the actual label, it is wise to practice your script on a piece of paper or a spare sticker. This helps you determine the correct letter size for the available space.
To achieve a "faux calligraphy" look, write the word in simple cursive and then go back to thicken the downward strokes of every letter. This adds weight and elegance to the text. If you prefer a modern aesthetic, use all-caps block lettering with slightly exaggerated spacing between characters. If you make a mistake, do not panic; simply wait for the ink to dry, wipe it away with a damp Q-tip, and try again. The beauty of liquid chalk is that it allows for endless revisions until every jar in your pantry looks exactly how you envisioned it.
Organizing Your Pantry with Rustic Flair
A rustic pantry is more than just a place to store food; it is a curated display that reflects a love for cooking and home life. To achieve this look, group your labeled containers by size and frequency of use. Placing larger glass jars filled with staples like flour and pasta on lower shelves provides a grounded, stable appearance. Meanwhile, smaller spice jars can be arranged on tiered risers or magnetic strips to maximize vertical space. This creates a layered visual effect that is both functional and beautiful.
Incorporate other rustic elements like wooden crates or wire baskets to hold items that don't fit well in jars, such as root vegetables or bagged snacks. Chalkboard labels can be clipped onto these baskets to maintain the organizational theme. By ensuring all labels face forward and are aligned at the same height on each shelf, you create a "rhythm" that leads the eye across the pantry. This systematic approach reduces the time spent searching for ingredients and makes the process of unloading groceries a satisfying ritual rather than a chore.
Categorizing Dry Goods and Spice Jars
Effective categorization is the secret to a high-functioning kitchen. Without a logic to your labeling, you may still find yourself hunting for hidden items. When using chalkboard labels, consider categorizing by the "function" of the ingredient. This helps group items that are often used together, streamlining the cooking process and making inventory checks much faster during meal planning.
- The Baking Station: All-purpose flour, sugar, baking soda, cocoa powder, and yeast.
- Grains and Legumes: White rice, quinoa, lentils, chickpeas, and various pasta shapes.
- Breakfast Corner: Rolled oats, chia seeds, granola, and coffee beans.
- The Spice Rack: Group by flavor profile, such as "Sweet" (cinnamon, nutmeg) or "Savory" (cumin, paprika, oregano).
- Snack Bins: Nuts, dried fruits, pretzels, and crackers.
By using consistent terminology on your labels, such as "Self-Rising" vs "Whole Wheat," you eliminate confusion for other family members. This clear communication ensures that everyone knows exactly where items belong, helping to maintain the organization long-term.
Maintaining and Cleaning Your Reusable Labels
While chalkboard labels are designed for longevity, they do require occasional maintenance to keep them looking sharp. In a kitchen environment, grease and steam can eventually dull the finish of the vinyl or cause the chalk ink to fade. Regular cleaning ensures the labels remain readable and hygienic. To update the text, use a damp cloth to wipe away the old ink. For stubborn "ghosting"-where a faint outline of the previous text remains-a small amount of glass cleaner or a magic eraser will usually restore the matte black surface.
- Wipe Periodically: Dust the labels with a dry cloth weekly to prevent buildup.
- Spot Clean: Use a damp Q-tip to fix minor smudges without erasing the whole word.
- Deep Clean: When emptying a jar for washing, remove the ink first so the label can be hand-washed along with the glass.
- Re-ink: Occasionally go over faded letters to keep the contrast high.
Proper care prevents the labels from becoming permanent fixtures of grime, allowing them to remain a versatile part of your kitchen's organizational system for years.
Enhancing Kitchen Functionality with Smart Systems
The ultimate goal of using chalkboard labels is to create a smart system that adapts to your lifestyle. A truly functional kitchen is one where the system does the work for you. By labeling everything from the spice rack to the "leftover" containers in the fridge, you reduce the mental load of managing a household. You can quickly see what needs to be replenished on your next shopping trip, preventing both overbuying and the frustration of running out of a key ingredient mid-recipe.
Smart systems also involve the placement of these labeled items. Store high-frequency items like coffee and salt at eye level, while keeping seasonal items like holiday cookie cutters on higher shelves. The beauty of the chalkboard system is its flexibility; as your diet or cooking habits change, your labels can change with them. Whether you are transitioning to a gluten-free pantry or starting a collection of exotic spices, your labeling system provides a consistent framework. This level of organization fosters a more peaceful cooking environment, allowing you to focus on the creativity of the meal rather than the chaos of the cupboards.

Comments