
Understanding Honing versus Sharpening
In the culinary world, distinguishing between honing and sharpening is fundamental to knife maintenance. While many use these terms interchangeably, they represent two distinct mechanical processes. Sharpening is a subtractive method where a whetstone or abrasive machine removes metal from the blade to create a new, sharp edge. This is typically reserved for dull or damaged knives and should only be performed a few times a year. In contrast, honing focuses on realigning the existing edge of the blade without removing significant amounts of steel.
Over regular use, the microscopic teeth on a knife's edge begin to fold over or "roll," resulting in a blade that feels dull even though the metal is still relatively sharp. A honing rod works to push these microscopic fibers back into a straight line. This process extends the time between professional sharpenings and ensures the knife performs with peak efficiency during daily tasks. Understanding this difference is key to preserving the lifespan of high-quality kitchen cutlery.
- Honing: Realigns the edge; performed daily or weekly.
- Sharpening: Grinds a new edge; performed every 6-12 months.
- Mechanism: Honing uses friction; sharpening uses abrasion.
Choosing Your Honing Rod Material
Selecting the right material for your honing rod depends largely on the hardness of your knives and your specific maintenance goals. The most common materials found in professional kitchens are stainless steel, ceramic, and diamond-coated surfaces. Stainless steel rods are the traditional choice, often featuring longitudinal ridges that help catch the edge and pull it back into alignment. They are durable and nearly impossible to break, making them ideal for heavy-duty environments.
Ceramic rods offer a hybrid approach, as they are harder than steel and possess a slight abrasive quality. This allows them to perform a very mild sharpen while they hone, making them excellent for harder Japanese steels. Diamond-coated rods are the most aggressive, capable of quickly restoring an edge, but they should be used sparingly to avoid excessive wear. Consider the following comparison when making your choice:
| Material | Abrasiveness | Durability | Best Use |
|---|---|---|---|
| Stainless Steel | Low | High | Daily Maintenance |
| Ceramic | Medium | Low | Harder Steel Knives |
| Diamond | High | Medium | Quick Edge Repair |
Proper Hand Placement and Safety
Safety is the primary concern when working with sharp blades and metal rods. The most stable method for beginners involves placing the tip of the honing rod vertically downward onto a damp towel or a non-slip cutting board. This anchor point prevents the rod from sliding during the stroke. Your non-dominant hand should firmly grip the handle of the rod, ensuring that your fingers are tucked safely behind the hilt or guard. Most quality rods feature a wide bolster specifically designed to protect your hand from a redirected blade.
Your dominant hand should hold the knife with a standard pinch grip, providing maximum control over the angle and pressure. It is essential to maintain a relaxed but firm grip; tension in the wrist can lead to inconsistent angles or accidental slips. Never rush the process; speed comes with experience, but accuracy is what ensures safety. By keeping the rod stationary and controlled, you minimize the risk of the knife jumping off the steel and causing injury.
- Place rod tip on a non-slip surface.
- Grip handle with fingers behind the guard.
- Hold knife comfortably in your dominant hand.
- Keep movements slow and deliberate.
Finding the Perfect Honing Angle
The efficiency of a honing rod is entirely dependent on maintaining a consistent angle between the knife blade and the rod. For most Western-style kitchen knives, an angle of 20 degrees is the standard recommendation. For thinner, harder Japanese-style blades, a shallower angle of 15 degrees is usually required. If the angle is too steep, you risk dulling the edge further or even chipping the steel. If the angle is too shallow, you will simply rub the side of the blade without touching the cutting edge.
To find the correct angle visually, start by holding the knife at a 90-degree angle to the rod. Tilt it to 45 degrees, and then halve that distance once more to reach approximately 22.5 degrees. This serves as a reliable starting point for most home cooks. Consistency is more important than achieving a perfect mathematical degree; as long as the angle remains steady throughout the entire sweep of the blade, the microscopic burr will be straightened effectively across the length of the knife.
- Western Knives: 20-degree angle per side.
- Asian Knives: 15-degree angle per side.
- Cleavers: 25-degree angle per side.
Step by Step Honing Technique
Once you have secured your position and established the correct angle, the honing process begins at the heel of the knife. Place the heel of the blade against the top of the rod. In a fluid, sweeping motion, pull the knife toward your body while simultaneously sliding it down the length of the rod. By the time you reach the bottom of the rod, the tip of the knife should be the final point of contact. This ensures that the entire edge, from heel to tip, receives equal attention.
Repeat this motion on the opposite side of the rod to address the other side of the blade. It is standard practice to perform approximately five to ten strokes per side, alternating between them to ensure a centered edge. Do not apply heavy pressure; the weight of the knife and a light guiding touch are sufficient to realign the steel. Following this sequence prevents lopsided wear and keeps the geometry of the knife intact.
- Start with the heel of the blade at the top of the rod.
- Sweep the blade downward and inward toward the tip.
- Maintain a consistent angle throughout the stroke.
- Alternate sides of the blade with each stroke.
- Clean the blade with a cloth after honing.
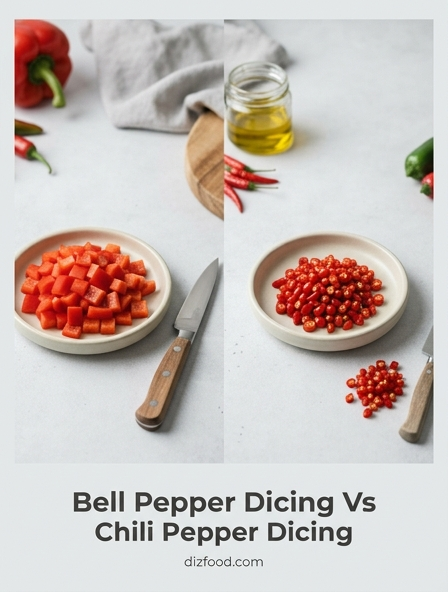
Why Honed Blades Improve Dicing
A perfectly honed blade is the secret to professional-level dicing and chopping. When a knife is properly aligned, it passes through the cell walls of vegetables like onions or tomatoes with minimal resistance. This precision prevents the "crushing" effect that occurs when a dull blade encounters the skin of a vegetable. When cells are crushed rather than sliced, they release more enzymes and moisture, which can lead to faster oxidation and, in the case of onions, more of the vapors that cause eyes to water.
Furthermore, a honed edge provides the chef with better tactile feedback and control. If a blade is slightly rolled, it has a tendency to slide or "skate" off the surface of slippery ingredients, which is a frequent cause of kitchen accidents. By ensuring the edge is perfectly vertical and centered, the knife bites into the food exactly where intended. This results in uniform dice, which not only looks more aesthetically pleasing but also ensures that the food cooks evenly across the entire dish.
- Precision: Cleaner cuts through delicate skins.
- Safety: Reduced risk of the blade slipping.
- Flavor: Less bruising of herbs and vegetables.
Daily Maintenance for Professional Knives
For culinary professionals and serious home cooks, honing is a daily ritual rather than an occasional chore. The goal of daily maintenance is to address the minor deformations that occur during every prep session. A high-carbon steel knife may require honing several times throughout a busy shift, whereas a stainless steel knife might only need it once before starting work. This constant attention prevents the edge from becoming so rounded that only a whetstone can fix it.
In addition to using the honing rod, daily maintenance involves keeping the rod itself clean. Over time, metal particles and food oils can accumulate on the surface of the steel or ceramic, reducing its effectiveness. Wiping the rod with a dry or slightly damp cloth after each use is essential. Proper storage is also vital; a honing rod should be kept in a knife block or hung on a magnetic strip to prevent it from clanking against other tools, which could mar its surface or damage your knives.
| Frequency | Action Required |
|---|---|
| Before Every Use | Quick 3-stroke hone for alignment |
| After Heavy Use | Full 10-stroke hone and wipe down |
| Weekly | Deep clean rod with soapy water |
Ceramic versus Steel Honing Rods
The debate between ceramic and steel honing rods often comes down to the specific metallurgy of the knives being maintained. Steel rods are primarily designed for Western knives, which are typically made of softer, more ductile steel. These knives roll their edges easily, and a steel rod is the perfect tool to push that soft metal back into place without removing material. Steel rods are also magnetic, which helps trap the tiny metal filings that might otherwise end up on your cutting board.
Ceramic rods, on the other hand, are the preferred choice for modern high-carbon and Japanese knives. These blades are much harder and more brittle; their edges don't just roll, they can also become microscopically jagged. Because ceramic is harder than steel, it can actually shave off a tiny amount of metal, effectively "refreshing" the edge. However, ceramic is fragile; if dropped on a kitchen floor, it will likely shatter. Users must weigh the benefit of a sharper edge against the physical vulnerability of the tool.
- Steel: Best for German/Western knives and durability.
- Ceramic: Best for Japanese/Hard steel and light sharpening.
- Steel: Non-abrasive, strictly for realignment.
- Ceramic: Slightly abrasive, removes minimal metal.
Testing Your Blade Edge Sharpness
After a honing session, it is important to verify the success of your work. There are several reliable methods to test a blade's edge without risking injury. The most common is the "paper test," where you hold a single sheet of printer paper vertically and attempt to slice through it using only the weight of the knife. A properly honed blade will glide through the paper smoothly from heel to tip without snagging or tearing. If the knife catches, it indicates a specific spot on the blade that still requires alignment.
Another culinary favorite is the "tomato test." Because tomatoes have a slick, tough skin and a soft interior, they are the ultimate challenge for a honed edge. A well-maintained knife should be able to slice into the tomato skin with zero downward pressure, relying only on the drawing motion of the blade. If you find yourself having to "saw" into the tomato or if the blade slides off the surface, your honing angle was likely incorrect, or the knife has reached a point where it requires a full sharpening on a stone.
- Perform the paper slice test for snags.
- Try the tomato skin test for "bite."
- Visually inspect the edge under a bright light for reflections.
Long Term Knife Performance Care
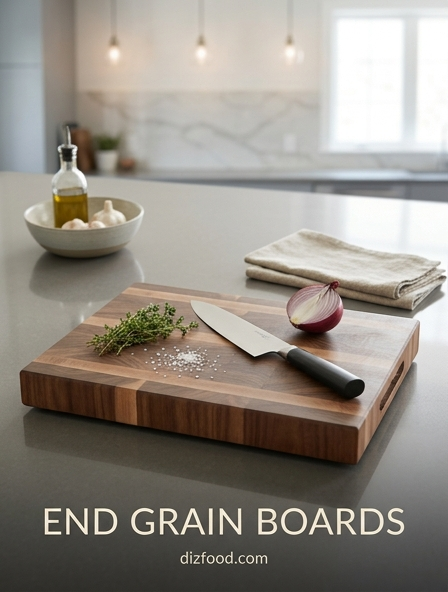
Maintaining a knife's performance over many years requires a holistic approach that goes beyond the simple act of honing. While the honing rod is your most frequent companion, it must be supported by proper cutting surfaces and storage solutions. Using glass, marble, or stone cutting boards will ruin a honed edge almost instantly, as these surfaces are harder than the steel itself. Stick to wood or high-quality plastic boards to preserve the integrity of the edge between honing sessions.
Furthermore, know when to retire the honing rod and move to the whetstone. Honing can only realign an edge so many times before the metal becomes "fatigued" or too rounded to be pushed back. If you find that honing no longer restores the knife's "bite," it is time for a professional sharpening. By combining regular honing with infrequent, high-quality sharpening and proper storage, a premium kitchen knife can easily last a lifetime, maintaining the same precision it had on the day it was forged.
- Avoid hard cutting surfaces like glass or granite.
- Store knives in blocks or on magnetic strips.
- Recognize when honing is no longer effective.
- Hand-wash and dry knives immediately after use.

Comments