Understanding Primary Fermentation Basics
Primary fermentation serves as the critical foundational phase for any kitchen-based ferment, such as kombucha, kefir, or ginger beer. During this initial stage, a symbiotic culture of bacteria and yeast (SCOBY) or a specific starter culture is introduced to a sweetened base liquid. The primary objective is to allow the microorganisms to consume the majority of the available sugars, converting them into organic acids, gases, and trace amounts of ethanol. This process typically occurs in a wide-mouth vessel covered with a breathable cloth to allow oxygen exchange, which is essential for aerobic bacterial growth.
- Duration usually spans from 5 to 21 days depending on ambient temperature.
- The liquid transitions from a sweet profile to a balanced, tart complexity.
- Active bubbling or the formation of a new pellicle indicates a healthy culture.
- Proper pH levels at this stage ensure the environment is hostile to pathogens.
Achieving the right balance during primary fermentation is vital, as it dictates the chemical makeup of the liquid before it is sealed for the secondary stage. If the primary ferment is too sweet, the secondary stage may become over-pressurized and dangerous.
The Importance of Secondary Conditioning
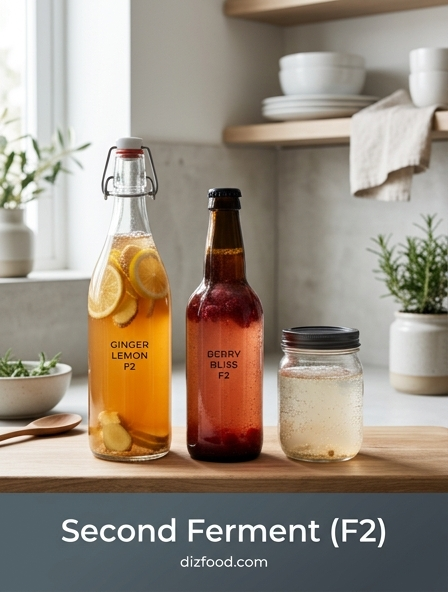
Secondary conditioning, often referred to as F2, is the stage where the beverage is bottled and sealed to refine its flavor profile and physical properties. Unlike the primary phase, this step is anaerobic, meaning it occurs in the absence of oxygen. This shift in environment forces the yeast to produce carbon dioxide that cannot escape, resulting in the desired effervescence. Beyond carbonation, secondary conditioning allows for the integration of complex adjuncts such as fruits, herbs, and spices.
- Carbonation: Trapping CO2 creates a professional, sparkling mouthfeel.
- Flavor Infusion: The closed environment extracts essential oils and juices from added ingredients.
- Probiotic Density: Controlled stress in the bottle can shift the microbial balance.
- Acid Mellowing: Extended conditioning can soften harsh vinegary notes into smoother profiles.
Without this phase, home-fermented drinks often remain flat and unidimensional. The secondary stage transforms a simple fermented tea or water into a sophisticated, artisanal beverage that rivals commercial quality in both texture and depth of flavor.
Optimizing Yeast Performance for Flavor
Yeast health is the primary driver of flavor development during the bottling stage. When the liquid is transferred for F2, the yeast must remain active enough to process the new sugars introduced for carbonation. Managing the yeast population prevents the production of "off-flavors," such as sulfurous or yeasty aromas that can ruin the delicate balance of the drink. Temperature and nutrient availability are the two most significant factors influencing how yeast behaves under pressure.
| Factor | Ideal Condition | Impact on Flavor |
|---|---|---|
| Sugar Source | Glucose/Fructose | Clean, rapid fermentation |
| Temperature | 72°F - 78°F | Balanced ester production |
| Yeast Count | Moderate sediment | Avoids bready aftertaste |
To optimize performance, ensure that the liquid contains a small amount of yeast sediment from the bottom of the primary vessel. This ensures a robust start to the carbonation process without overwhelming the bottle with excessive sludge, which can lead to "volcanoing" upon opening.
Techniques for Achieving Perfect Carbonation
Perfect carbonation is a balance between sugar concentration, temperature, and time. Because every fruit and juice has a varying glycemic index, the amount of priming agent added must be calculated carefully. Utilizing high-quality, pressure-rated flip-top bottles is the industry standard for home fermenters, as these provide a reliable seal while offering a safety margin against explosions. The headspace left at the top of the bottle also plays a crucial role in gas dissolution.
- Leave approximately 1 to 2 inches of headspace to allow gas expansion.
- Use finely pureed fruit to increase the surface area for yeast interaction.
- Burp bottles only if using high-sugar ingredients to prevent excessive pressure.
- Agitate bottles gently once a day to redistribute yeast cells.
The transition from gas in the headspace to dissolved CO2 in the liquid happens most effectively under pressure and at lower temperatures. This is why chilling the bottles after the room-temperature F2 period is essential for achieving those fine, persistent bubbles rather than a singular, aggressive foam-up.
Kitchen Hygiene and Sanitation Protocols
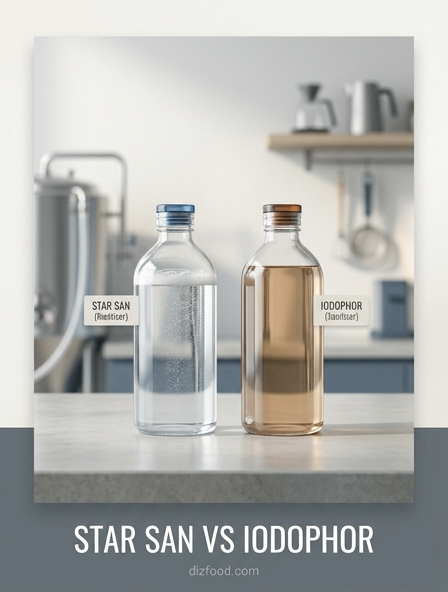
In the world of fermentation, cleanliness is the line between a successful batch and a hazardous mold colony. While primary fermentation is somewhat protected by the sheer volume of starter culture, the secondary stage is vulnerable because the liquid is often diluted with fresh, unfermented sugars. All equipment, including bottles, funnels, and stirring spoons, must be thoroughly cleaned and sanitized. It is important to distinguish between "clean" (free of visible dirt) and "sanitized" (free of microscopic pathogens).
- Use food-grade sanitizers like Star San for a no-rinse, efficient kill rate.
- Avoid using antibacterial dish soaps, which can leave residues that kill your ferment.
- Boil any whole spices or hard roots briefly to eliminate wild molds.
- Inspect bottle gaskets for cracks where bacteria might hide.
Strict adherence to hygiene protocols prevents the growth of Kahm yeast or, worse, botulism and mold. By maintaining a sterile environment during the bottling process, you ensure that only the desired microbes from your primary culture are the ones populating the secondary ferment.
Controlling Temperature for Quality Results
Temperature is the "throttle" of the fermentation process. During F2, the ambient environment of your kitchen dictates the speed of sugar consumption and the resulting flavor profile. High temperatures can lead to "hot" or fusel flavors, which taste like rubbing alcohol, while temperatures that are too low will cause the yeast to go dormant, resulting in flat, overly sweet drinks. Consistency is more important than achieving a specific peak temperature.
| Range | Process Speed | Outcome |
|---|---|---|
| Below 65°F | Very Slow | Minimal fizz; potential dormancy |
| 68°F - 75°F | Ideal | Clean flavor; steady carbonation |
| Above 80°F | Rapid | Yeasty flavors; risk of bottle bursts |
Using a fermentation heat mat or a warm cupboard can help maintain the ideal range during winter months. Conversely, in the summer, placing bottles in a cooler area of the kitchen or a darkened pantry prevents the temperature from spiking and creating inconsistent, over-carbonated batches.
Timing the Transition Between Stages
Deciding exactly when to move from primary fermentation to F2 bottling is an acquired skill that relies on both objective testing and sensory intuition. If you bottle too early, the high sugar content and active yeast can lead to dangerous pressure levels. If you bottle too late, the yeast may be exhausted, and the high acidity will prevent a pleasant flavor profile from developing. Most brewers use a combination of methods to find the "sweet spot" for bottling.
- The Straw Test: Sample the brew daily to check the sugar-to-acid balance.
- pH Testing: Use digital meters to ensure the liquid is between 2.5 and 3.5.
- Visual Cues: Observe the clarity and the activity of the bubbles when the vessel is moved.
- Aromatics: Transition when the sharp "vinegar" smell begins to emerge but sweetness remains.
Once the transition occurs, the clock starts for the secondary phase. Typically, two to four days at room temperature is sufficient for most kitchen environments before the bottles must be moved to cold storage to stabilize.
Selecting Priming Agents for Fizz
The priming agent is the fuel for the secondary ferment. It provides the fermentable sugars that the yeast will convert into carbonation. While plain cane sugar works, kitchen fermenters often use this opportunity to introduce flavor through natural sources. The chemical composition of the priming agent affects the speed of carbonation and the texture of the bubbles. For example, the high fructose content in honey ferments differently than the sucrose in white sugar.
- Fresh Fruit Purees: Provide the fastest carbonation due to high surface area.
- Whole Fruit Slices: Offer a more subtle, slow-release flavor and clearer liquid.
- Fruit Juices: Easiest to measure for consistent, repeatable results.
- Crystallized Ginger: Adds both sugar and natural wild yeast for an extra "kick."
When selecting agents, consider the "explosiveness" of the ingredient. Pineapple and mango are notoriously active and require shorter F2 times, while berries like blueberries or raspberries are more predictable and provide a vibrant color to the final bottled product.
Avoiding Oxidation in Homebrewing
Oxidation is the enemy of a fresh-tasting ferment. When oxygen is introduced to the liquid during the bottling process, it can lead to stale, cardboard-like flavors and the browning of vibrant fruit colors. While oxygen is helpful during the early days of primary fermentation, it must be strictly avoided during the transition to F2. The goal is to move the liquid from the primary vessel to the bottles as gently as possible to minimize splashing and air incorporation.
- Use a Siphon: Racking the liquid with a tube prevents the aeration caused by pouring.
- Fill from the Bottom: Place the filling wand at the base of the bottle to minimize bubbles.
- Minimize Headspace: Do not leave excessive air at the top of the bottle.
- Seal Immediately: Cap or close the flip-top as soon as the bottle is filled.
Protecting the brew from oxygen also helps preserve the delicate antioxidants and vitamins produced during fermentation. A well-sealed, low-oxygen environment ensures that the flavors remain crisp and the colors stay bright throughout the conditioning process.
Final Conditioning for Flavor Development
The final step in the F2 process is refrigeration, which serves as a cold-crashing period. This stage is not merely about chilling the drink for consumption; it is a critical part of flavor development and stabilization. Cold temperatures force the CO2 gas from the headspace into the liquid, ensuring a fine, integrated sparkle rather than a violent eruption of foam. It also causes yeast and fruit solids to settle at the bottom, clarifying the beverage.
- Minimum Chill Time: At least 12-24 hours before opening.
- Flavor Mellowing: A week in the fridge can soften the bite of ginger or citrus.
- Enzymatic Activity: Slow-motion changes continue even in the cold, increasing complexity.
- Safety: Refrigeration effectively halts the fermentation, preventing over-pressurization.
A beverage that has been conditioned in the cold for several days will always taste more refined than one opened immediately after the room-temperature phase. This patience results in a professional-grade kitchen ferment that is balanced, clear, and perfectly effervescent.

Comments