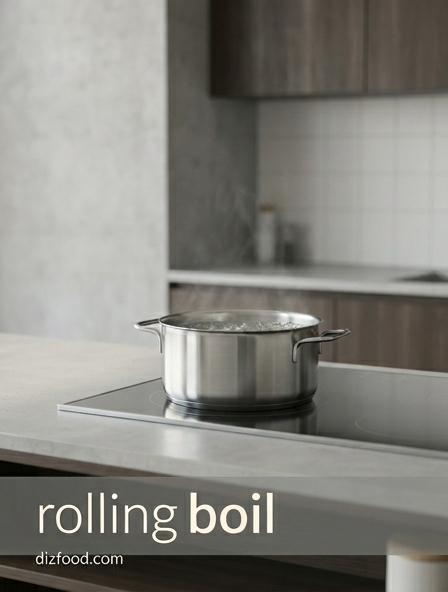
Defining the True Rolling Boil
A true rolling boil is a critical state in culinary physics where water reaches a point of vigorous, turbulent agitation. Unlike a gentle simmer or a slow boil, a rolling boil is characterized by large, aggressive bubbles that originate from the bottom of the pot and break the surface rapidly. The defining characteristic of this state is its resilience; the bubbling action must be so intense that it cannot be disrupted or "quelled" by stirring the liquid with a spoon. This stage occurs at 212 degrees Fahrenheit (100 degrees Celsius) at sea level and is essential for tasks that require high kinetic energy and constant temperature maintenance.
Achieving this state is vital for various cooking processes, particularly when the movement of the water is as important as the heat itself. The mechanical action of the rising bubbles keeps ingredients like pasta or dumplings in constant motion, preventing them from settling and sticking together. Understanding the visual and audible cues of a rolling boil ensures that the cook is working with the maximum thermal energy available in a liquid-based environment.
Essential Equipment for High Heat Boiling
The efficiency of achieving and maintaining a rolling boil is heavily dependent on the quality and specifications of your cookware. A heavy-bottomed stock pot is the industry standard for high-heat applications, as the thick base facilitates even heat distribution and prevents localized hot spots. Materials play a significant role in performance; for instance, stainless steel with an aluminum or copper core provides the best balance of heat retention and rapid conductivity.
To optimize your boiling process, consider the following essential items:
- Large Stock Pot: Typically 6 to 12 quarts to ensure enough thermal mass.
- Tight-Fitting Lid: Essential for trapping steam and pressure to reach the boiling point faster.
- High-BTU Burner: A powerful heat source that can overcome the cooling effect of adding ingredients.
- Long-Handled Spider or Skimmer: For safe ingredient retrieval from turbulent water.
Using the correct equipment not only speeds up the time to reach a boil but also ensures that the temperature remains stable once the lid is removed and the cooking begins.
The Science of Salting Your Water
There is a persistent culinary myth that salting water significantly raises its boiling point to decrease cooking time. While technically true via boiling-point elevation, the amount of salt required to make a meaningful temperature difference is far beyond what would be palatable. The primary purpose of salting water is flavor. When food, such as pasta or vegetables, is submerged in a rolling boil, the salt seasons the ingredient from the inside out, a process that cannot be replicated by seasoning after the food is plated.
| Salt Concentration | Culinary Application |
|---|---|
| 1% Salinity | Standard for pasta and most blanched vegetables. |
| 2% Salinity | Used for "seawater" taste in certain seafood boils. |
| 0.5% Salinity | Appropriate for delicate starches or reduced sauces. |
For the best results, add the salt only after the water has reached its boil. This prevents the salt from sitting at the bottom of a cold pot, which can lead to pitting in stainless steel cookware over time.
Optimal Water Volume for Pasta Texture
One of the most common mistakes in the kitchen is using a pot that is too small for the amount of pasta being cooked. Proper water volume is essential for achieving the desired "al dente" texture. When pasta is added to a rolling boil, it immediately begins to release starches into the surrounding liquid. If the volume of water is too low, the concentration of starch becomes too high, resulting in a gummy, sticky texture on the surface of the noodles.
A general rule of thumb is to use at least four to six quarts of water for every pound of dry pasta. This large volume serves two purposes: it dilutes the released starches and provides enough thermal mass to return to a rolling boil quickly after the pasta is added. Without sufficient water, the temperature will drop significantly, causing the pasta to soak in lukewarm water and become mushy rather than firm. Maintaining a high ratio of water to solids is the simplest way to ensure each strand remains separate and perfectly cooked.
Maintaining Heat When Adding Ingredients
When cold ingredients are introduced to a boiling pot, they act as a heat sink, absorbing energy and dropping the water's temperature. This pause in boiling can ruin the timing of a recipe and affect the final texture of the food. To counteract this, it is essential to use maximum heat settings before and during the introduction of food. For larger batches of ingredients, consider adding them in smaller increments to allow the water to recover its rolling boil between additions.
Another effective technique is to keep the lid on the pot until the very moment you are ready to drop in the ingredients. Once the food is submerged, briefly replacing the lid can trap escaping steam and help the liquid return to 212 degrees Fahrenheit more rapidly. This "recovery time" is the most vulnerable period for the dish; the faster the water returns to its vigorous movement, the more consistent the cook will be across all items in the pot, preventing the sogginess associated with prolonged immersion in sub-boiling water.
Timing Secrets for Perfect Al Dente
Achieving the perfect "al dente" texture-which translates to "to the tooth"-requires precise timing and an understanding of carryover cooking. The window for perfect texture is often as narrow as 60 seconds. Because food continues to cook for a short period after being removed from the heat, it is vital to test the pasta or vegetables approximately two minutes before the package directions suggest they will be finished.
- Start the timer as soon as the water returns to a full rolling boil.
- Sample a piece of pasta or a vegetable bit early to check the internal core.
- Look for a tiny white dot in the center of pasta, indicating it is nearly done.
- Drain the food while it still has a slight resistance to the bite.
If the pasta is going to be tossed in a hot sauce later, it should be removed even earlier. The heat from the sauce will finish the cooking process, ensuring that by the time it reaches the table, it has not transitioned from firm to overcooked.
Preserving Chlorophyll in Vibrant Greens
Boiling green vegetables like broccoli, asparagus, or green beans presents a unique chemical challenge. Chlorophyll, the pigment responsible for the green color, is sensitive to both heat and acid. To keep vegetables looking vibrant, they must be cooked quickly in a large volume of water. When the water is at a rolling boil, the high heat deactivates enzymes that would otherwise cause the color to dull into an unappetizing olive brown.
Short cooking times are the secret to preserving both color and nutrients. By using a rolling boil, you minimize the duration the cell walls are exposed to heat, keeping the vegetable crisp. Furthermore, leaving the lid off during the boiling process allows volatile organic acids to escape with the steam. If these acids are trapped by a lid, they fall back into the water and react with the chlorophyll, causing the greens to turn gray. Therefore, for the brightest results, boil uncovered and work in small batches to keep the water temperature at its maximum peak.
The Critical Blanch and Shock Method
The blanch and shock method is a foundational culinary technique used to lock in the color and texture of vegetables after they have been boiled. Blanching involves submerging the food in a rolling boil for a very brief period-usually between thirty seconds and three minutes. However, the process is only half complete until the "shock" occurs. Once the desired color is reached, the ingredients must be immediately plunged into an ice bath to halt the cooking process instantly.
This technique is essential for meal prep and for dishes like salads or crudité platters where a crisp-tender texture is required. To perform this correctly:
- Prepare a large bowl filled with 50% ice and 50% cold water.
- Boil the vegetables until they are brightly colored but still firm.
- Use a slotted spoon to transfer them directly into the ice water.
- Leave them in the cold water only until they are completely chilled.
Removing them promptly from the ice bath is important; if they soak too long, they can become waterlogged and lose their natural flavor.
Common Boiling Pitfalls to Avoid
Despite being a fundamental skill, boiling is often executed with several common errors that can compromise the quality of a meal. One major mistake is adding oil to pasta water. While many believe this prevents sticking, it actually creates a slick coating on the pasta that prevents sauces from adhering properly. Instead, rely on a high volume of water and frequent stirring during the first two minutes of cooking to prevent clumps.
Another pitfall is starting with hot tap water to save time. Hot water from a heater often contains more dissolved minerals and potential contaminants from household pipes than cold water. It is always better to start with cold, filtered water and use a lid to speed up the heating process. Additionally, cooks often underestimate the importance of the "recovery boil." If you do not wait for the water to return to a full rolling boil after adding food, you are essentially poaching rather than boiling, which leads to unevenly cooked results and a loss of structural integrity in starches.
Mastering the Recovery Boil Time
Recovery boil time is the duration it takes for your liquid to return to a rolling boil after ingredients have been introduced. Mastering this phase is what separates professional chefs from home cooks. A long recovery time is the enemy of texture; the longer the food sits in sub-boiling water, the more it degrades. To minimize this window, ensure your pot is not overcrowded. Ideally, the water should return to a boil within 60 to 90 seconds of adding your ingredients.
To optimize recovery times, you can employ several strategies:
- Room Temperature Ingredients: Take ingredients out of the refrigerator 15 minutes before boiling to reduce the thermal shock.
- High Volume-to-Food Ratio: Use more water than you think you need; the more boiling water there is, the less the temperature will drop.
- Lid Replacement: Briefly cover the pot immediately after adding ingredients to trap heat.
By monitoring and reducing the recovery time, you ensure that the cooking environment remains consistent, leading to better flavor retention and the precise textures required for high-quality cuisine.


Comments