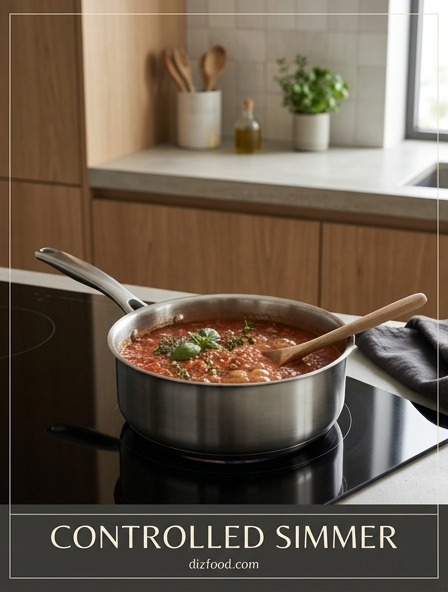
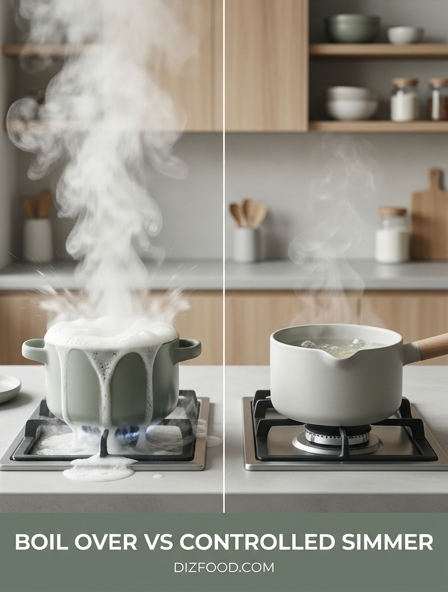
Achieving restaurant-quality depth in your cooking often comes down to mastering the art of the controlled simmer. This gentle culinary technique is the secret to unlocking tender textures and complex flavor profiles, as it allows proteins to break down slowly while preventing delicate ingredients from disintegrating. By maintaining a steady, low heat where only a few bubbles lazily break the surface, you ensure your sauces remain velvety and your meats stay incredibly succulent. Refining this skill transforms basic recipes into professional-grade meals. To perfect your stovetop technique and prevent kitchen messes, it is essential to understand the critical distinctions between a Boil Over vs Controlled Simmer.
The Science of Simmering vs Boiling
Understanding the thermodynamic distinction between simmering and boiling is fundamental to culinary precision. While both involve heating liquid, the kinetic energy involved differs significantly. Boiling occurs at 212°F (100°C) at sea level, characterized by vigorous agitation and large, aggressive bubbles caused by rapid steam escape. This turbulence can be physically destructive to delicate ingredients, causing proteins to toughen and starches to shatter.
Simmering, conversely, typically takes place between 185°F and 205°F. At this stage, small bubbles break the surface gently and infrequently. The science behind this controlled heat involves:
- Lower convection currents, which prevent the mechanical breakdown of food.
- Reduced evaporation rates compared to a full boil, allowing for more consistent liquid ratios.
- Controlled protein denaturation, ensuring that muscle fibers do not contract too rapidly and squeeze out moisture.
Optimal Temperatures for Flavor Extraction
Flavor extraction is a temperature-sensitive process where the goal is to dissolve aromatic compounds and soluble solids into a liquid medium. High heat can often be counterproductive, as extreme temperatures may burn delicate volatile oils or extract bitter tannins from herbs and spices. A controlled simmer provides the ideal environment for a "low and slow" extraction, ensuring the depth of flavor is maximized without degradation.
| Simmer Type | Temperature Range | Best Use Case |
|---|---|---|
| Poach | 160°F - 180°F | Delicate fish, eggs, and fruit. |
| Slow Simmer | 185°F - 195°F | Stocks, broths, and tough meats. |
| Full Simmer | 195°F - 205°F | Reducing sauces and cooking grains. |
By staying within these specific ranges, the solvent properties of water or stock work efficiently. This temperature window allows cell walls in aromatics like mirepoix to soften gradually, releasing sugars and esters into the surrounding liquid. This results in a more nuanced and layered flavor profile that a rapid boil simply cannot achieve due to the over-extraction of harsh secondary metabolites.
Techniques for Tenderizing Tough Meats
Tough cuts of meat, such as brisket, shank, or shoulder, are rich in collagen-a structural protein that is chewable and firm. To transform this into silky, mouth-coating gelatin, one must utilize the controlled simmer. Rapid boiling causes muscle fibers to tighten and dry out, whereas a steady, low temperature allows the collagen to melt without overcooking the surrounding protein fibers. This process is the cornerstone of braising and stewing.
- Initial Sear: Brown the meat to develop Maillard reaction flavors before adding liquid.
- Liquid Management: Submerge the meat halfway (braising) or fully (stewing) in a flavorful liquid.
- Steady State: Maintain a "lazy bubble" where only a few bubbles rise to the surface every few seconds.
- Patience: Allow several hours for the chemical conversion of connective tissue to occur.
The transition from collagen to gelatin typically begins at 160°F but accelerates significantly near 190°F. Keeping the pot at a controlled simmer ensures the internal temperature of the meat stays within the "sweet spot" for tenderization without reaching the point where the fibers become stringy and parched.
The Role of Surface Agitation
Surface agitation, or the lack thereof, is a primary indicator of heat management in the kitchen. In a controlled simmer, the surface of the liquid should barely move, a state often referred to by French chefs as "fremir" (to tremble). This minimal movement is crucial for several reasons. First, excessive agitation introduces oxygen and promotes the emulsification of fats and impurities into the liquid, which can ruin the clarity and flavor of a sauce or stock. Second, the movement of the liquid dictates the rate of evaporation.
When the surface is calm, the heat transfer is primarily through gentle convection. This prevents ingredients from bumping into one another, which is essential for maintaining the visual appeal of whole vegetables or delicate dumplings. If the agitation increases, the physical impact of the water can bruise ingredients. Monitoring the surface allows a cook to make micro-adjustments to the burner, ensuring the energy output matches the thermal requirements of the dish. A truly controlled simmer is one where the liquid appears to be alive and moving, yet never breaks into a chaotic surge.
Preserving Ingredient Integrity and Texture
The visual and textural appeal of a dish is often sacrificed when heat is not properly regulated. Boiling is the enemy of structural integrity; it causes vegetables to become mushy and proteins to become rubbery. A controlled simmer, however, respects the cellular structure of ingredients. For instance, when simmering legumes or grains, the gentle heat allows the starch granules to hydrate and swell slowly, preventing the outer skins from bursting prematurely.
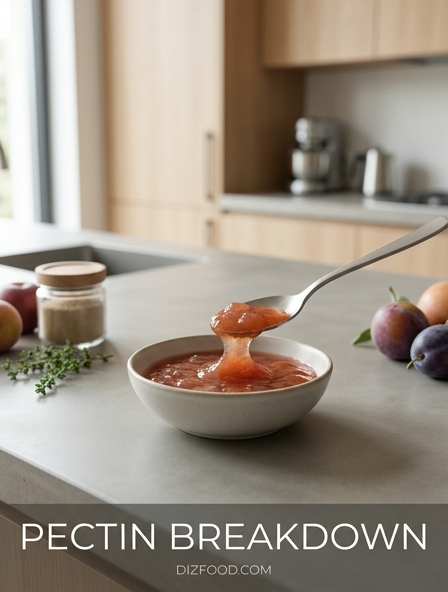
- Vegetables: Maintains the pectin structure, keeping a "tender-crisp" bite.
- Seafood: Prevents the rapid contraction of actin and myosin, ensuring the flesh stays moist.
- Pasta: Reduces the loss of surface starch, which can lead to a gummy texture in the final dish.
By keeping the temperature below the boiling point, you minimize the mechanical stress on the food. This is particularly important in decorative cooking where the shape of the ingredient is as important as the taste. The gentle environment of a simmer allows for even heat penetration, ensuring the center of the food is cooked at the same rate as the exterior, leading to a uniform and professional texture.
Mastering Heat Control on Different Ranges
Different stove technologies require different approaches to achieve a perfect simmer. Gas ranges provide immediate visual feedback through the flame height, but they can suffer from "hot spots" where the flame touches the pan. Electric coil ranges hold significant residual heat, making it difficult to drop from a boil to a simmer quickly. Induction cooktops offer the most precision, allowing for exact wattage control, but they require magnetic cookware and can sometimes cycle on and off, creating a pulsing simmer rather than a steady one.
| Range Type | Simmer Challenge | Pro-Tip for Control |
|---|---|---|
| Gas | Flame blow-out at low settings. | Use a flame tamer or heat diffuser plate. |
| Electric | Slow response to temp changes. | Move the pot to a second, cooler burner. |
| Induction | Cycling or "pulsing" heat. | Use heavy-bottomed pans to buffer heat. |
Regardless of the heat source, the use of a lid can drastically change the dynamics. A lid traps steam and increases the internal temperature, which can turn a simmer into a boil in seconds. Mastering your specific range involves learning exactly where the dial needs to sit to maintain that "trembling" surface without intervention.
Slow Reduction for Concentrated Umami
Reduction is the process of thickening a liquid and intensifying its flavors through controlled evaporation. When aiming for a rich, umami-heavy result like a demi-glace or a balsamic glaze, a rapid boil is detrimental. Boiling can cause the sugars in the liquid to scorch against the sides of the pan as the level drops, introducing a bitter, burnt aftertaste. A controlled simmer allows the water to exit as steam while the savory compounds, salts, and proteins remain and concentrate gradually.
- Select a wide, shallow pan to increase surface area for faster, even evaporation.
- Maintain a constant, low simmer to allow flavors to meld as they concentrate.
- Skim the surface frequently to remove any foam or fat that rises.
- Monitor the viscosity; the liquid should eventually coat the back of a spoon (nappe).
This slow concentration process also facilitates the Maillard reaction to a small degree within the liquid itself, deepening the color and complexity of the sauce. The result is a syrupy, flavorful essence that possesses a balance and clarity unattainable through high-heat reduction.
Essential Cookware for Even Heat Distribution
The vessel used for simmering is just as important as the heat source. Thin-bottomed pots are prone to "hot spots," where the liquid at the bottom reaches boiling temperatures while the rest of the pot remains cool. This leads to uneven cooking and sticking. For a successful controlled simmer, cookware with high thermal mass and excellent conductivity is essential. These materials distribute energy across the entire surface of the pan, ensuring the liquid simmers uniformly from the center to the edges.
- Enameled Cast Iron: Excellent heat retention; perfect for long, slow braises.
- Copper: The gold standard for responsiveness, allowing for instant adjustments.
- Tri-Ply Stainless Steel: An aluminum or copper core sandwiched between steel provides a balance of durability and conductivity.
- Clay Pots: Provide incredibly gentle, infrared-like heat for traditional slow-cooking.
Using a heavy-bottomed pot acts as a thermal buffer, smoothing out the fluctuations from the burner. This stability is what allows a cook to leave a pot unattended for long periods, confident that the temperature will remain consistent and the food will not scorch.
Preventing Cloudy Stocks and Broths
A crystal-clear consommé or stock is a mark of technical proficiency, and it is achieved almost entirely through temperature control. Cloudiness in a stock is caused by the emulsification of fats and the suspension of tiny particles of protein and bone. When a stock is allowed to boil, the violent movement acts like a blender, whisking these impurities into the liquid. Once they are emulsified, it is nearly impossible to remove them without complex clarification techniques like a "raft."
By maintaining a very low simmer-where the bubbles are barely visible-the impurities stay "large" enough to eventually float to the surface. This allows the cook to skim off the grey foam (scum) and fat easily. The low temperature also prevents the rapid breakdown of bone marrow, which contributes to turbidity. Furthermore, avoiding a stir is essential; any mechanical agitation can disturb the natural settling of solids at the bottom of the pot. Patience and a steady, low heat are the only true secrets to a transparent, amber-colored broth with a clean, focused flavor profile.
Timing Your Simmer for Maximum Depth
While simmering is a "slow" technique, it is not an infinite one. There is a point of diminishing returns where ingredients begin to lose their character and the liquid becomes over-concentrated or "muddy." Timing a simmer requires an understanding of the specific ingredients involved. For instance, a fish stock might only require a 20-minute simmer before the bones begin to release unpleasant calcium flavors, whereas a beef stock might need 12 to 24 hours to fully extract the marrow and collagen.
- Vegetable Stocks: 30 to 45 minutes; longer simmers can lead to bitter, overcooked flavors.
- Chicken Stocks: 3 to 6 hours for a balance of body and clarity.
- Red Meat Stews: 2 to 4 hours, depending on the size of the meat chunks.
- Dried Beans: 1 to 2 hours, until the interior is creamy but the skin is intact.
Maximum depth is achieved when the primary flavors have fully integrated, the texture of the solids is optimal, and the liquid has reached the desired concentration. Monitoring the dish periodically by tasting is the best way to determine when the "peak" flavor has been reached, ensuring the simmer is stopped before the nuances are lost to over-extraction.

Comments