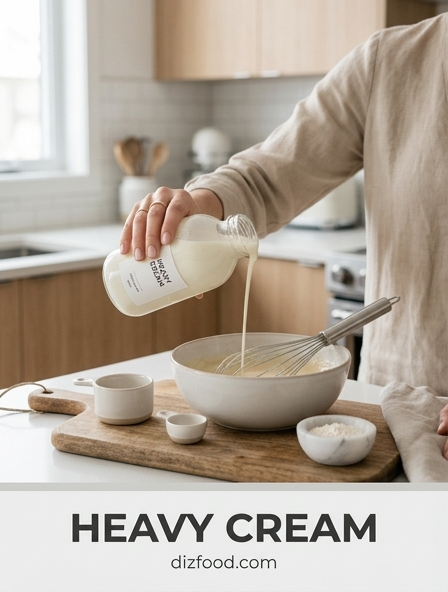
Understanding Heavy Cream Fat Percentages
In the culinary world, the success of your whipped toppings and sauces depends heavily on the butterfat content of your dairy. Heavy cream, often labeled as heavy whipping cream, must contain at least 36 percent milk fat according to standard regulations. This high concentration of fat is what allows the liquid to trap air bubbles and maintain a rigid structure when agitated. If you choose a product with lower fat, such as light whipping cream which typically ranges between 30 and 35 percent, you may find that your peaks are softer and prone to collapsing more quickly.
| Product Type | Fat Content | Best Use |
|---|---|---|
| Heavy Cream | 36% - 40% | Stiff peaks, stable decor |
| Whipping Cream | 30% - 35% | Mousses, light dollops |
| Half and Half | 10.5% - 18% | Coffee, light sauces |
The extra fat in heavy cream provides a richer mouthfeel and better coating ability for pasta sauces. When reducing heavy cream on the stove, the higher fat content prevents the sauce from curdling when introduced to acidic ingredients like lemon or wine. Understanding these percentages ensures you select the right bottle for your specific kitchen needs.
Selecting the Right Tools for Aeration
The equipment you choose plays a vital role in how efficiently you can incorporate air into heavy cream. While a simple hand whisk can achieve great results, it requires significant physical effort and time. For most home bakers, electric tools provide the consistency and speed necessary for perfect aeration. The material of your mixing bowl also matters; metal and glass are preferred over plastic because they retain cold temperatures better and are easier to clean of any residual fats that might hinder the whipping process.
- Balloon Whisk: Ideal for small batches and fine control over texture.
- Hand Mixer: Portable and effective for most household dessert projects.
- Stand Mixer: Best for large quantities, allowing for hands-free operation and high-speed aeration.
- Immersion Blender: Useful for quick, dense whipped cream, though it can over-whip very easily.
Beyond the power source, the shape of the attachment is critical. A wire whisk attachment with many thin tines is superior to a standard flat beater because it creates more surface area contact, cutting through the fat globules and forcing air into the liquid more rapidly. Always ensure your tools are impeccably clean before beginning.
The Critical Role of Temperature Control
Temperature is perhaps the most influential factor when working with heavy cream. For the fat globules to surround and stabilize air bubbles effectively, the cream must be as cold as possible. If the cream is too warm, the fat becomes soft or liquid, failing to form the necessary structure to hold air. This usually results in a thin, grainy liquid that refuses to thicken regardless of how long you whisk. Professionals often take temperature control a step further by chilling not just the cream, but also the mixing bowl and the beaters.
Placing your equipment in the freezer for fifteen minutes prior to use can significantly decrease whipping time and increase the final volume of the product. In especially warm kitchens, it may even be helpful to set your mixing bowl inside a larger bowl filled with ice water. This "ice bath" technique ensures the cream remains well below 40 degrees Fahrenheit throughout the process. Avoid leaving the cream on the counter while preparing other ingredients; keep it in the coldest part of the refrigerator until the very second you are ready to begin aeration for the best structural integrity.
Mastering Soft Firm and Stiff Peaks
Recognizing the visual cues of different whipping stages is essential for matching the cream's texture to its intended use. As you whip, the cream will transition through three primary stages of thickness. Mastering these stages prevents the common mistake of stopping too early or going too far and turning the cream into butter. You should periodically stop the mixer and lift the whisk to observe how the cream behaves under the pull of gravity.
- Soft Peaks: The cream is thick enough to hold some shape, but when the whisk is lifted, the peak curls over softly and eventually melts back into the base.
- Firm Peaks: The cream holds its shape well, and the peak stands mostly upright with just a slight droop at the very tip.
- Stiff Peaks: The peak stands straight up without collapsing or drooping. The cream will look matte rather than glossy and feels very stable.
Soft peaks are perfect for folding into mousses or topping puddings, while firm peaks are the standard for most pie toppings. Stiff peaks are required for piping decorative borders or layering between heavy cake tiers where structural support is a primary concern.
Sweetening and Flavoring Your Whipped Base
While plain whipped heavy cream has a delightful, rich flavor, most desserts benefit from added sweetness and aromatics. The timing of these additions is critical to the final texture. If you add sugar too early, it can dissolve and weigh down the cream, making it harder to achieve volume. It is generally recommended to wait until the cream has reached the "soft peak" stage before gradually streaming in your sweeteners and flavorings while continuing to whisk.
- Confectioners' Sugar: Contains a small amount of cornstarch which helps stabilize the cream.
- Granulated Sugar: Provides a clean sweetness but needs time to dissolve to avoid a gritty texture.
- Vanilla Extract: The most common aromatic; use high-quality bean paste for visible flecks.
- Cocoa Powder: Should be sifted to prevent lumps and added near the end for a chocolate finish.
- Liqueurs: Ingredients like Bourbon or Grand Marnier add depth but should be used sparingly to avoid thinning the mixture.
Always remember that flavors will become slightly muted once the cream is fully aerated and chilled. Taste your mixture at the firm peak stage and adjust accordingly, keeping in mind that over-mixing after adding ingredients can lead to curdling.
Stabilization Methods for Long Lasting Texture
Standard whipped cream begins to weep and deflate after a few hours, which can ruin the appearance of a prepared cake or tart. To combat this, stabilizers are used to reinforce the protein and fat network. This is particularly important for events where the dessert must sit at room temperature for an extended period. Depending on the desired flavor and texture, several pantry staples can serve as effective stabilizing agents.
| Stabilizer | Quantity per Cup | Effect |
|---|---|---|
| Gelatin | 1 tsp (bloomed) | Very firm, mousse-like hold |
| Mascarpone | 2-3 tbsp | Rich flavor, thick texture |
| Instant Pudding | 1 tbsp | Adds flavor and quick set |
| Cornstarch | 1/2 tsp | Subtle hold, easy to use |
Gelatin is the gold standard for professional results, providing a clean finish that allows the cream to be sliced with a knife. For a simpler approach, adding a small amount of Greek yogurt or crème fraîche not only stabilizes the peaks but also adds a sophisticated tang that cuts through the richness of the heavy cream.
How to Rescue Over Whipped Cream
It happens in a matter of seconds: you are aiming for stiff peaks, but suddenly the cream looks grainy, yellowed, and starts to separate. This is the beginning of the butter-making process, where the fat globules have been agitated so much that they are clumping together and pushing out the water content. If you see these signs of over-whipping, do not panic and throw the batch away. As long as the cream has not fully turned into a solid yellow lump of butter and a pool of buttermilk, it can usually be rescued.
To fix over-whipped cream, reduce your mixer speed to the lowest setting or switch to a hand spatula. Slowly pour in a few tablespoons of fresh, cold, unwhipped heavy cream. Gently fold or whisk the liquid into the grainy mixture. The fresh cream will help redistribute the fat and smooth out the texture. Continue adding liquid cream one tablespoon at a time until the mixture regains its glossy, smooth appearance. If the cream has already turned into actual butter, however, the process is irreversible; in that case, simply finish the process, salt the butter, and use it for your morning toast.
Expert Piping Techniques for Elegant Finishes
Piping whipped cream requires a combination of speed and a light touch. Because the heat from your hands can melt the fat in the cream, it is best to use a canvas piping bag or double-bag your plastic sleeves to provide an insulation layer. Fill the bag only halfway to minimize the time your hand is in contact with the cream. If the cream starts to feel soft or looks runny while you are working, stop immediately and place the entire piping bag in the refrigerator for ten minutes to firm back up.
- Star Tips: Create classic rosettes and shells by using consistent pressure and a quick "flick" to finish.
- Round Tips: Perfect for modern, clean spheres or minimalist borders.
- St. Honoré Tip: Creates a sophisticated, ruffled aesthetic used in high-end French pastry.
When piping, hold the bag at a 90-degree angle for stars and dots, or a 45-degree angle for borders. Consistency is key, so practice your pressure on a piece of parchment paper before moving to your final dessert. Proper stabilization is highly recommended if your piped designs need to hold their sharp edges for more than an hour.
Proper Storage to Prevent Deflation
Heavy cream is highly susceptible to absorbing odors from the refrigerator, so proper storage is paramount for maintaining both its flavor and its airy texture. If you have leftover whipped cream, store it in an airtight container immediately. Glass containers with silicone seals are ideal as they do not retain past food smells like plastic can. Place the container in the coldest part of your refrigerator, typically the back of the bottom shelf, rather than the door where temperature fluctuations occur every time the fridge is opened.
Even with perfect storage, unstabilized whipped cream will begin to lose its volume after 24 hours. If you notice a small amount of liquid at the bottom of the container, this is "weeping." You can often revive the cream by giving it a few quick whisks by hand to re-incorporate the air, though it may never be as fluffy as the first day. For longer storage, consider freezing dollops of whipped cream on a parchment-lined tray. Once frozen solid, transfer them to a freezer bag; these can be placed directly onto hot cocoa or coffee, where they will melt slowly and maintain a creamy cap.
Creative Ways to Serve Airy Toppings
While heavy whipped cream is a staple for pies and cakes, its versatility extends far beyond standard desserts. The neutral, rich profile of the cream makes it an excellent canvas for both sweet and savory experimentation. By adjusting the fat content or the infusion method, you can transform a simple dollop into a gourmet highlight of any meal. Consider the following creative applications for your next kitchen project:
- Infused Creams: Steep herbs like basil or rosemary in the liquid cream overnight before straining and whipping for a sophisticated fruit pairing.
- Savory Clouds: Whip heavy cream with a pinch of salt and folded-in horseradish or chives to serve alongside prime rib or smoked salmon.
- Coffee Enhancements: Create a "cold foam" by lightly whipping cream with maple syrup and pouring it over iced cold brew.
- Layered Parfaits: Alternate layers of stiffly whipped cream with lemon curd and crushed gingersnaps for a quick, elegant trifle.
Using whipped cream as a base for dips or as a folding agent in waffles can also elevate the texture of your breakfast. The goal is to use the aeration to provide a lightness that balances heavier, denser ingredients in your dish.


Comments