Elevate your morning routine by mastering the simple yet transformative technique of stovetop toasting. Unlike the uniform heat of a standard appliance, using a skillet or griddle allows you to achieve a perfect, golden-brown crunch while maintaining a soft, pillowy interior. This artisanal approach infuses your bread with a rich, buttery depth and an unmatched gourmet flavor that standard machines simply cannot replicate. By controlling the flame and surface contact, you unlock hidden textures and complex aromas in every slice, turning a basic staple into a culinary highlight. To see how this manual method stacks up against modern convenience, explore the key differences between Stovetop Toasting Vs Electric Toasting.
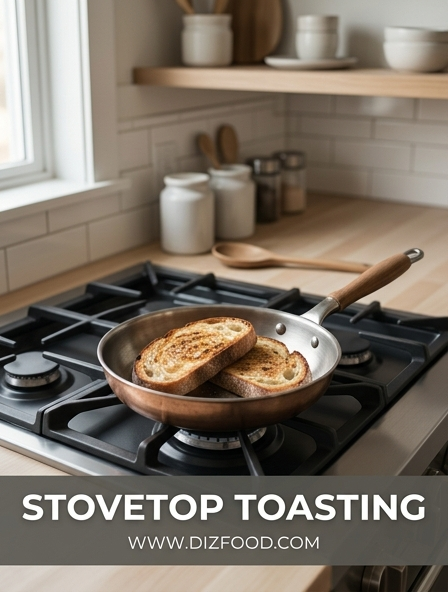
The Magic of Stovetop Toasting
While the electric toaster offers convenience, the stovetop method elevates bread from a mere side dish to a culinary centerpiece. Toasting bread in a skillet allows for a unique textural contrast that a vertical toaster simply cannot replicate. On the stove, you achieve a "fried" exterior that remains tender and soft in the center, a phenomenon known as the dual-texture effect. This method provides the cook with total control over the level of caramelization, enabling a gradient of color from pale gold to deep mahogany.
The magic lies in the interaction between the hot metal surface, the fat medium, and the starches in the grain. As the bread sears, the natural sugars undergo complex changes, releasing nutty and savory aromas that fill the kitchen. Unlike the dry heat of a toaster which often dehydrates the entire slice, stovetop toasting uses conductive heat to crisp the surface while locking moisture inside. This artisanal approach transforms basic sandwich bread into a gourmet vessel suitable for the finest toppings, making every bite a sensory experience of crunch and pillowy softness.
Choosing the Best Skillet for Golden Crusts
The vessel you choose for toasting significantly impacts the final texture and evenness of the browning. Heat retention and distribution are the two primary factors to consider when selecting your pan. A heavy-bottomed skillet ensures that the heat remains constant even when the cool bread makes contact with the surface, preventing cold spots that lead to uneven coloring.
| Material | Benefits | Best For |
|---|---|---|
| Cast Iron | Superior heat retention; creates a rugged, rustic crust. | Thick sourdough slices. |
| Stainless Steel | Excellent responsiveness; allows for precise browning control. | Delicate brioche or challah. |
| Carbon Steel | Naturally non-stick over time; heats up very quickly. | Daily breakfast toast. |
Cast iron is often considered the gold standard for stovetop toasting because of its ability to produce an incredibly crisp, almost charred exterior. However, a high-quality multi-clad stainless steel pan is also an excellent choice, as it provides a smooth surface that encourages even contact. Non-stick pans can be used for convenience, but they often lack the intense radiant heat required for a truly professional-grade crust.
Best Breads for Superior Stovetop Results
Not all loaves are created equal when it comes to the skillet. The internal structure, or "crumb," determines how the bread will respond to heat and fat. Dense, artisanal breads with a high moisture content generally perform best because they can withstand the weight of a pan and the intensity of direct heat without turning into a dry rusk. A sourdough with a wild fermentation profile offers a complex flavor that is amplified by the heat of the stove.
Consider these varieties for your next toasting session:
- Sourdough: Its sturdy structure and acidic notes pair perfectly with salted butter.
- Brioche: High fat and sugar content lead to rapid, deep caramelization and a cake-like interior.
- Ciabatta: The large air pockets create a varied texture with peaks of crunch and valleys of softness.
- Shokupan: This Japanese milk bread toasts into a delicate, golden lace pattern with a misty, sweet center.
Avoid overly airy, pre-sliced commercial breads if you are looking for a gourmet result; these often lack the structural integrity to handle the pan-searing process. Instead, opt for hand-sliced portions, which allow you to control the thickness-ideally between three-quarters of an inch to a full inch.
Butter Versus Oil for Optimal Flavor
The choice of fat is perhaps the most debated aspect of stovetop toasting. Each medium brings a different profile to the bread. Butter is the traditional choice, favored for its milk solids which brown into a nutty, toasted flavor. This adds a rich, savory depth that enhances the natural sweetness of the wheat. However, butter has a lower smoke point, meaning it can burn quickly if the flame is too high.
Alternatively, extra virgin olive oil offers a sophisticated, fruity profile and a slightly higher smoke point. Toasting in oil tends to result in a crunchier, more "fried" texture that is less heavy than butter. For those seeking the best of both worlds, a combination of a small amount of neutral oil and a pat of butter can provide the flavor of the dairy with the heat resilience of the oil. Some chefs also experiment with animal fats, such as duck fat or tallow, which introduce an intense savory element perfect for lunch or dinner applications. Regardless of the choice, ensuring the fat is evenly distributed across the pan before placing the bread is crucial for a professional finish.
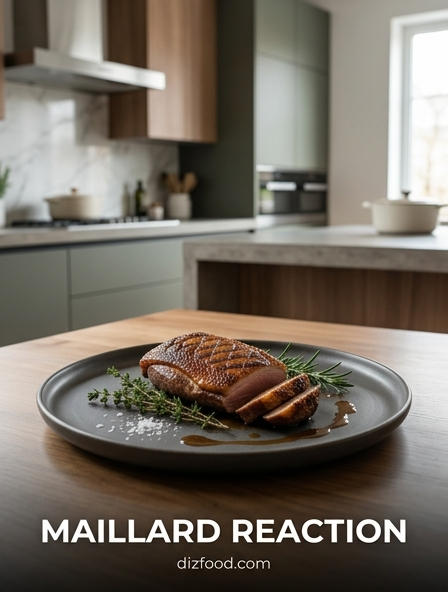
Temperature Control for the Perfect Maillard Reaction
Success on the stovetop is dictated by the Maillard reaction-the chemical reaction between amino acids and reducing sugars that gives browned food its distinctive flavor. This process requires precision; if the pan is too cold, the bread will simply soak up the fat and become soggy. If the pan is too hot, the exterior will carbonize and turn bitter before the heat can penetrate the center. The "sweet spot" is typically found at a medium-low to medium setting.
A preheated pan is essential. You should hear a gentle sizzle the moment the bread touches the surface. If the sizzle is violent and loud, your heat is too high. Throughout the process, the bread should be moved slightly to ensure it doesn't stick and to distribute the heat evenly. This gradual browning allows the starches to transform into a golden, flavorful crust while the interior remains hydrated. Patience is key; a perfect stovetop toast usually takes between two to four minutes per side. By maintaining a steady, moderate temperature, you ensure that the entire surface reaches that coveted mahogany hue without any localized burning.
Techniques for Achieving Uniform Golden Browning
Uniformity is the hallmark of a skilled cook. To achieve a perfectly even color across the entire surface of the bread, one must employ specific physical techniques. Because bread is rarely perfectly flat, certain areas may hover just above the heat, remaining pale while other parts burn. To combat this, follow these specific steps:
- The Press: Use a spatula or a heavy kitchen weight to gently press the bread into the pan. This ensures maximum contact between the crumb and the hot surface.
- The Rotation: Halfway through toasting each side, rotate the slice 180 degrees. Most burners have slight temperature variances, and rotating compensates for these.
- The Fat Swirl: Lift the bread occasionally and swirl the fat in the pan to ensure it isn't pooling in one corner, which could lead to greasy spots.
- The Peek: Use tongs to lift a corner every minute to monitor the progress of the browning.
Applying these methods transforms the process from passive waiting to active cooking. By managing the physical contact between the bread and the metal, you eliminate the frustration of "tiger-striping" and achieve a professional, edge-to-edge golden finish every time.
Infusing Aromatics and Herbed Fats
The stovetop method provides a unique opportunity to infuse flavor directly into the bread during the cooking process, something a toaster cannot do. By adding aromatics to the pan along with your fat, you create a flavored oil or butter that permeates the crust. This technique is common in high-end bistros and elevates a simple slice of bread into a complex side dish. Garlic is the most popular choice; a smashed clove tossed into the bubbling butter releases its essential oils without overpowering the grain.
Hard herbs like rosemary, thyme, and sage are also excellent candidates for this method. As they fry in the fat, they become crisp and impart a woody, earthy fragrance to the toast. For a more modern twist, consider using compound butters infused with lemon zest, chili flakes, or even miso paste. The key is to add these aromatics early enough to flavor the fat, but to keep an eye on them so they do not burn. If you are using delicate ingredients like minced garlic, add them toward the end of the toasting process to prevent bitterness. The result is a multi-dimensional flavor profile that makes the bread stand alone as a gourmet treat.
Common Mistakes to Avoid While Toasting
Even though the process seems straightforward, several common pitfalls can ruin a good slice of bread. The most frequent error is using a pan that has not been properly preheated. Placing bread in a cold pan with fat leads to an oily, heavy texture as the bread acts like a sponge, absorbing the liquid fat before the heat can sear the exterior. Another mistake is overcrowding the pan; if you try to toast too many slices at once, the temperature of the skillet drops, and the bread begins to steam rather than sear.
Furthermore, avoid using high heat in an attempt to speed up the process. High heat burns the surface while leaving the middle of the bread cold and spongy. It is also important to resist the urge to flip the bread too frequently. Constant flipping prevents the Maillard reaction from stabilizing, resulting in a lackluster color. Finally, ensure your bread is not too dry before it hits the pan. If using stale bread, a very light mist of water or a generous amount of fat is necessary to prevent it from becoming unpleasantly hard and brittle. By avoiding these errors, you ensure a consistent, restaurant-quality result.
Gourmet Topping Pairings for Pan Seared Bread
Once you have mastered the art of the perfect golden crust, the choice of toppings can further enhance the experience. Stovetop-toasted bread is sturdier and more flavorful than regular toast, allowing it to support heavier and more complex ingredients. The richness of the pan-seared crust pairs exceptionally well with creamy, acidic, or salty components that cut through the fat used during the toasting process.
- Burrata and Balsamic: The cold, creamy cheese melts slightly against the warm, buttery bread, topped with a sharp balsamic glaze.
- Smashed Avocado with Radish: The crunch of the radish and the creaminess of the avocado complement the "fried" texture of the sourdough.
- Ricotta and Hot Honey: A sweet and spicy combination that highlights the nutty notes of a well-browned crust.
- Marrow and Sea Salt: For a decadent savory experience, use the rendered fat to toast the bread, then top with roasted marrow.
These pairings leverage the structural integrity of the skillet-toasted slice. Whether you prefer sweet or savory, the key is to balance the richness of the bread with high-contrast flavors that make each bite dynamic and satisfying.
Maintaining Texture and Crunch for Service
The final challenge of stovetop toasting is maintaining that hard-earned crunch until the moment it is consumed. The biggest enemy of toasted bread is steam. If you place a hot, freshly seared slice directly onto a flat plate, the heat from the bottom of the bread will create condensation against the ceramic surface. Within minutes, the bottom of your perfectly crispy toast will become soggy and limp. This is a common disappointment that can be easily avoided with proper resting techniques.
To preserve the texture, place the finished toast on a wire cooling rack for about thirty seconds before plating. This allows air to circulate around the entire slice, letting the steam escape and the crust to "set." If you are serving a large group, you can keep the slices in a low-temperature oven (around 200°F) directly on the oven rack. Never stack hot slices of toast on top of one another, as the trapped moisture will soften the crusts instantly. By respecting the physics of heat and moisture, you ensure that the first bite is just as crisp and satisfying as the cook intended during the searing process.


Comments