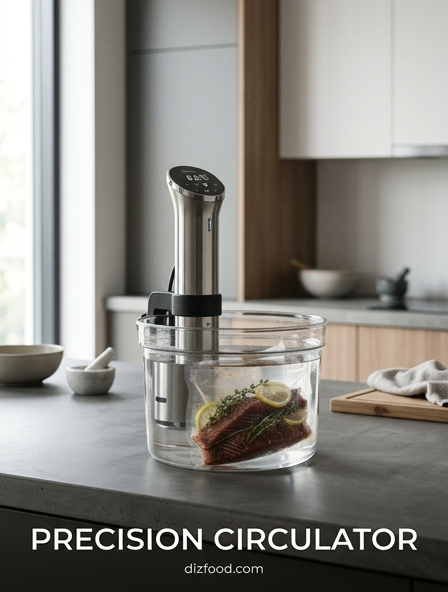
Precision Circulator Setup Basics
To begin your sous vide journey, you must first establish a stable environment for the precision circulator. Select a heat-safe vessel, such as a large polycarbonate container or a deep stockpot, and place it on a heat-resistant surface like a trivet or silicone mat to protect your countertops. Attach the circulator to the side of the vessel, ensuring the clamp is tight and the device is vertical. Pay close attention to the water levels marked on the device; the water must sit between the minimum and maximum lines to ensure the internal pump functions correctly and the heating element does not burn out.
- Fill the vessel with warm water to reach the target temperature faster.
- Ensure the intake and output vents of the circulator are not obstructed by bags.
- Allow the water to reach the set temperature before submerging your food.
- Use a lid or sous vide balls to prevent evaporation during long-duration cooks.
Once the device indicates it has reached the target temperature, it will maintain that heat within a fraction of a degree. This precision is what allows for perfectly edge-to-edge doneness that traditional cooking methods cannot replicate. Proper setup ensures the motor runs quietly and the water circulates evenly around the submerged ingredients.
Optimal Meat Temperature Guidelines
Temperature selection is the most critical decision in precision cooking, as it determines the final texture and doneness of the protein. Unlike traditional roasting, where you pull meat early to account for carryover cooking, sous vide meats are held exactly at the desired serving temperature. Beef steaks are typically cooked between 129°F and 137°F, with the latter becoming increasingly popular for ribeyes to properly render intramuscular fat. Poultry requires different approaches; chicken breast is often preferred at 145°F to 150°F for a juicy, tender profile, while thighs require higher heat to break down connective tissue.
| Protein Type | Rare / Tender | Medium / Firm |
|---|---|---|
| Beef Steak | 129°F (54°C) | 140°F (60°C) |
| Pork Chops | 135°F (57°C) | 145°F (63°C) |
| Chicken Breast | 140°F (60°C) | 150°F (66°C) |
| Salmon Filet | 115°F (46°C) | 125°F (52°C) |
For fish, the temperature range is much narrower. A slight 5-degree difference can move a salmon filet from a translucent, buttery texture to a flaky, traditional finish. Always calibrate your expectations based on the specific cut and fat content of the meat.
Vacuum Sealing for Best Results
Achieving a proper seal is vital for both heat transfer and food safety. The goal is to remove as much air as possible from the cooking bag to ensure the food remains fully submerged and in direct contact with the heated water. While a chamber vacuum sealer is the gold standard for professional kitchens, home cooks can achieve excellent results with a standard suction sealer or the water displacement method. If using a suction-style sealer, be wary of liquids being pulled into the motor; freezing liquids or using a folded paper towel inside the bag can mitigate this issue.
- Place the seasoned food in a single layer inside the bag to ensure even cooking.
- Wipe the internal edges of the bag to ensure no grease interferes with the heat seal.
- For the displacement method, slowly lower the open bag into the water to push air out before sealing.
- Check the seal integrity after a few minutes of cooking to ensure no leaks have formed.
Air pockets act as insulation, preventing the heat from reaching the food efficiently. Furthermore, trapped air causes the bag to float, which creates uneven temperature zones and potential safety hazards. Double-bagging is recommended for sharp-edged items like bone-in chops or shellfish to prevent punctures during the process.
Time and Texture Control Secrets
In the world of precision cooking, time is the variable that controls texture, while temperature controls doneness. This distinction is vital for understanding how to manipulate different cuts of meat. A tender filet mignon only needs enough time to reach the core temperature, usually one to two hours. However, a tough brisket or short rib requires a much longer duration-sometimes up to 48 or 72 hours-to allow the collagen to transform into gelatin without overcooking the meat. This slow breakdown creates a unique texture that is simultaneously fork-tender and perfectly pink.
Conversely, leaving tender proteins in the water bath for too long can be detrimental. While the meat will not "overcook" in the traditional sense of becoming gray or dry, the structural fibers will eventually break down too much, resulting in a mushy or mealy mouthfeel. This is especially true for delicate items like fish or chicken breasts. To master texture, you must match the duration of the cook to the specific connective tissue content of the cut. Generally, the tougher the meat, the longer it should stay in the bath, whereas lean, tender cuts should be removed as soon as they reach thermal equilibrium.
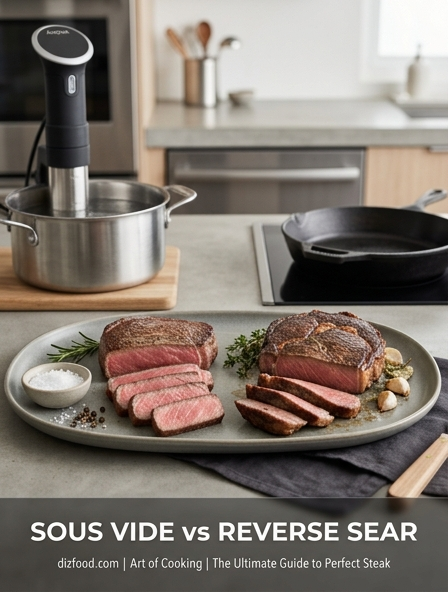
Mastering the Perfect Reverse Sear
Since sous vide involves cooking in a sealed bag at low temperatures, the Maillard reaction-the chemical process that creates the flavorful brown crust-cannot occur. To remedy this, a post-bath sear is required. This "reverse sear" is the final step that provides the visual appeal and aromatic complexity associated with high-end steakhouse results. Before searing, it is imperative to remove the meat from the bag and pat it completely dry with paper towels. Moisture is the enemy of a good sear, as any surface water must evaporate before the browning process can begin, which often leads to overcooking the interior.
- Use a heavy cast-iron skillet preheated until it is smoking hot.
- Apply a high-smoke-point oil, such as avocado or grapeseed oil.
- Sear for only 30 to 60 seconds per side to avoid raising the internal temperature.
- Consider using a kitchen torch for uneven surfaces or to melt fat caps.
- Butter basting with aromatics like thyme and garlic adds a final layer of luxury.
One of the greatest advantages of sous vide is that the meat does not require a long resting period. Because the temperature gradient is so small, the juices are already well-distributed. You can slice and serve almost immediately after the sear is complete.
Selecting Best Cuts for Sous Vide
Precision circulators are often called the "great equalizer" because they can transform inexpensive, tough cuts of meat into culinary masterpieces. While high-end cuts like ribeye and New York strip are delicious when cooked sous vide, the real value lies in cuts that usually require hours of braising. By using a circulator, you can cook a chuck roast for 24 hours at 131°F, resulting in a protein that has the texture of a prime rib but the deep, beefy flavor of a pot roast. This capability allows home cooks to save money while producing restaurant-quality results.
- Beef: Chuck roast, short ribs, flank steak, and tri-tip.
- Pork: Shoulder (butt), thick-cut chops, and belly.
- Game: Venison or duck breast, which are prone to drying out with dry heat.
- Vegetables: Carrots and beets, which become tender while retaining a distinct snap.
When selecting cuts, look for thickness. Sous vide excels with meats that are at least 1.5 to 2 inches thick. Thin steaks are difficult to sear without overcooking the center, whereas thick-cut chops and roasts allow for a perfect crust while maintaining the precise internal temperature you set on your circulator.
Seasoning Techniques for Precision Cooking
Seasoning for sous vide requires a different mindset than traditional grilling or roasting. Because the food is trapped in a bag with the seasonings, the flavors are intensified and have more time to penetrate the meat. However, certain ingredients behave differently in a low-temperature, anaerobic environment. For instance, raw garlic can take on a bitter, metallic, or even unpleasant sulfurous flavor because the temperature isn't high enough to soften its bite. Using garlic powder is a common professional workaround that yields a much better flavor profile in the bag.
- Apply salt and dry spices more sparingly than usual, as they will not wash off.
- Avoid adding too much butter or oil to the bag for beef, as it can actually leach fat-soluble flavors out of the meat.
- Use fresh herbs like rosemary or thyme, but be aware their flavor will be very concentrated.
- Consider "dry-brining" your meat with salt for several hours before bagging for better moisture retention.
Alcohol-based marinades should be reduced on the stove before being added to a sous vide bag. Since the alcohol cannot evaporate, it can create an unpleasant "boozy" flavor and may even interfere with the heat transfer if it boils at low temperatures under vacuum pressure. Simple, high-quality dry rubs often produce the cleanest results.
Water Bath Maintenance and Insulation
To keep your precision circulator running efficiently for years, regular maintenance is required. Over time, calcium and mineral deposits from tap water can build up on the heating element and the impeller, causing the device to work harder or making it noisier. A simple cleaning cycle involves running the circulator in a mixture of equal parts water and white vinegar at 140°F for an hour. This will dissolve scale and keep the sensors accurate. Always ensure the device is completely dry before storing it to prevent any electrical corrosion or mold growth in the intake vents.
For cooks lasting longer than six hours, insulation becomes a priority. Without a lid, evaporation can lower the water level below the safety threshold, causing the circulator to shut off mid-cook. You can use specialized silicone lids, or even a layer of floating ping-pong balls to trap heat and moisture. Insulating the sides of the vessel with a neoprene sleeve or a simple towel can also reduce energy consumption and help the circulator maintain a steady temperature in colder kitchens. These small steps ensure consistency and protect your investment in the hardware.
Food Safety and Pasteurization Charts
Food safety in sous vide cooking is based on the relationship between temperature and time. Many people are surprised to learn that food can be safely pasteurized at temperatures lower than the USDA-recommended 165°F, provided it is held at that temperature long enough to kill pathogens like Salmonella and Listeria. This is the fundamental principle that allows for juicy 145°F pork or tender 140°F chicken. However, you must consult pasteurization charts to ensure the core of the meat has been held at the target temperature for the required duration based on its thickness.
| Thickness | Temp | Time to Pasteurize |
|---|---|---|
| 1 inch (25mm) | 135°F | ~1.5 Hours |
| 1 inch (25mm) | 145°F | ~45 Minutes |
| 2 inches (50mm) | 135°F | ~4 Hours |
| 2 inches (50mm) | 145°F | ~2 Hours |
It is crucial to avoid the "Danger Zone" (40°F to 130°F) for extended periods. Most experts recommend that any cook lasting longer than four hours should be performed at a temperature of at least 131°F to prevent the growth of C. perfringens. Always chill food rapidly in an ice bath if you are not planning to consume it immediately after cooking.
Troubleshooting Texture and Doneness
Even with a precision circulator, issues can arise. The most common problem is a floating bag, which leads to uneven cooking. This is usually caused by air trapped in the bag or gas released by vegetables or fermented seasonings. To fix this, use sous vide weights or a heavy spoon inside the bag to keep the protein submerged. If the meat comes out tougher than expected, it likely needed more time for the connective tissue to break down; next time, extend the duration by several hours. Conversely, if the meat feels mushy, you may have cooked it too long or used a marinade with too much acid or enzyme (like pineapple).
- Bag Leaks: Always check for water inside the bag; if found, sear immediately and do not store.
- Smell: A strong, funky odor after long cooks can be caused by surface lactobacillus; a quick pre-sear or boiling water dip before bagging prevents this.
- Gray Color: This is often due to the lack of oxygen in the bag; the red color usually returns once the meat is sliced and exposed to air.
- Circulator Error: Check for low water levels or clogged impellers if the device stops unexpectedly.
By understanding these common pitfalls, you can adjust your technique for the next cook. Precision cooking is a repeatable science, and once you dial in the variables for your favorite cut, you can achieve the exact same result every single time.


Comments