Keeping your air fryer in top shape is the secret to consistently crunchy, healthy meals, but understanding the distinction between a quick daily wipe down and a periodic deep clean is vital for the appliance's lifespan. While a daily spruce-up prevents immediate grease buildup and eliminates lingering food odors, a scheduled deep clean targets the hidden heating elements and fan vents where carbonized oil can obstruct air circulation and create fire hazards. By balancing these two maintenance habits, you ensure peak heating efficiency and avoid the dreaded "burnt" flavor profile that plagues neglected units, effectively protecting your investment and ensuring every batch of fries is as crisp as the first.
| Feature | Daily Wipe Down | Periodic Deep Clean |
|---|---|---|
| Frequency | After every single use | Every 15-20 uses (or monthly) |
| Focus Area | Basket, tray, and outer casing | Heating coil, fan, and internal walls |
| Primary Tools | Dish soap and soft microfiber cloth | Baking soda paste and soft toothbrush |
| Main Benefit | Prevents sticky grease and odors | Restores airflow and thermal efficiency |
| Neglect Risk | Permanent stains and cross-contamination | Mechanical failure and smoke/fire risks |
| Time Required | 2-5 Minutes | 20-30 Minutes |
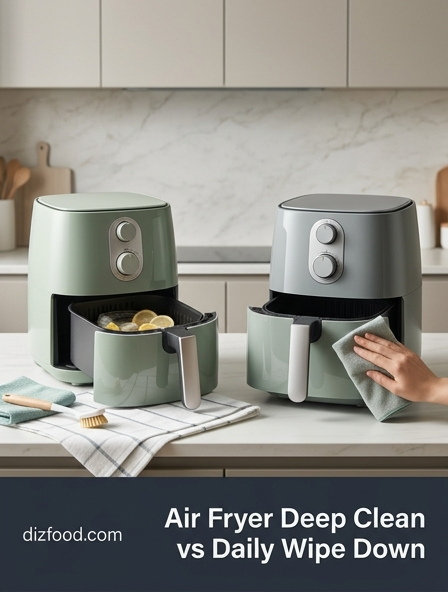
Air Fryer Deep Clean vs Daily Wipe Down Maintenance
Maintaining an air fryer requires a balanced approach that combines immediate care with periodic intensive labor. Understanding the distinction between a daily wipe down and a deep clean is essential for any home cook who wants to ensure their appliance remains efficient and safe. A daily wipe down focuses on the high-touch areas and the immediate food contact surfaces. This routine prevents the initial buildup of oils and crumbs that can quickly turn into a sticky, carbonized mess. It is the first line of defense against kitchen odors and bacterial growth, taking only a few minutes after the machine has cooled down.
In contrast, a deep clean is a more systemic process that addresses the internal components that are not easily accessible during a standard cleaning. This includes the heating element, the internal walls of the unit, and the crevices around the fan. While daily maintenance keeps the basket ready for the next meal, deep cleaning ensures that the mechanical parts of the air fryer are not compromised by vaporized grease. Neglecting either side of this maintenance coin can lead to decreased airflow, uneven cooking temperatures, and even fire hazards. By integrating both practices, you create a sustainable cycle that preserves the non-stick coating of your accessories while keeping the electrical components in peak condition for years of frequent use.
Daily Cleaning Routine for a Sparkling Air Fryer
To keep your air fryer in pristine condition, a daily cleaning routine should be performed after every single use. Once you have finished cooking, unplug the unit and allow it to cool for about ten to fifteen minutes. Cleaning the basket and tray while they are still slightly warm, but not hot, can actually make grease removal much easier as the oils have not yet solidified into a stubborn film.
- Empty the basket of any loose crumbs or excess oil into the trash or a grease container.
- Soak the basket and tray in warm, soapy water for five minutes to loosen any stuck-on food particles.
- Use a non-abrasive sponge or a soft microfiber cloth to wipe down the interior walls of the basket and the perforated tray.
- Wipe the exterior of the air fryer with a damp cloth to remove fingerprints and any oil splatters that may have escaped during the cooking process.
- Dry all components thoroughly with a clean towel before reassembling or storing the unit.
Consistency is the most important factor in daily maintenance. If you skip even one day, the residual oil from the previous meal will "bake on" during the next use, creating a polymerized layer that is significantly harder to remove. Taking these five minutes daily will save you hours of scrubbing during your monthly deep clean sessions.
How to Perform a Periodic Air Fryer Deep Clean
A periodic deep clean should occur every few weeks or whenever you notice a decline in performance. This process involves a more invasive look at the machine's interior. Start by removing all detachable parts, such as the basket, crisper plate, and any racks. These should be soaked in a powerful degreasing solution or a mixture of hot water and vinegar to strip away any accumulated layers of fat that daily washing might have missed.
- Inspect the Heating Element: Gently turn the cooled air fryer upside down to get a clear view of the heating coil. Use a soft brush or a damp cloth to wipe away any grease splatters.
- Internal Chamber Scrub: Use a paste of baking soda and water to spot-clean stubborn stains on the interior walls. Avoid getting moisture into the electrical vents.
- Detailing Crevices: Use a wooden skewer or an old toothbrush to remove debris from the seams where the plastic housing meets the metal interior.
- Filter Check: If your model has a removable air filter, clean or replace it according to the manufacturer's instructions.
The deep cleaning process is as much about safety as it is about hygiene. Grease that accumulates on the heating element can smoke or even ignite if left unchecked. By meticulously cleaning these hidden areas, you ensure that the air circulating around your food is clean and free of old, rancid oil particles, which ultimately protects the flavor profile of your meals.
Essential Differences Between Surface Wiping and Deep Scrubbing
The differences between surface wiping and deep scrubbing are defined by the tools used, the areas reached, and the ultimate goal of the cleaning session. Surface wiping is a preventative measure, whereas deep scrubbing is a restorative action. Understanding these differences helps in scheduling your kitchen maintenance effectively without overworking yourself or the appliance.
| Feature | Surface Wiping (Daily) | Deep Scrubbing (Periodic) |
|---|---|---|
| Primary Goal | Remove immediate food debris. | Remove carbonized grease and odors. |
| Tools Used | Soft sponge, dish soap, cloth. | Baking soda, soft brushes, degreasers. |
| Target Areas | Basket, tray, and exterior. | Heating coil, fan, and internal roof. |
| Time Required | 3 to 5 minutes. | 30 to 45 minutes. |
While surface wiping keeps the machine looking "clean" to the naked eye, deep scrubbing ensures the mechanical integrity of the device. Surface wiping focuses on the parts of the air fryer that touch the food, ensuring immediate food safety. Deep scrubbing, however, addresses the environment in which the food is cooked, ensuring that the air circulation remains powerful and the heat distribution remains even throughout the cooking cycle.
Eliminating Stubborn Grease with Deep Cleaning Techniques
Stubborn grease is the primary enemy of the air fryer, often manifesting as a sticky, brown residue that refuses to budge with standard dish soap. To tackle this, you must use chemistry to your advantage. A thick paste made from baking soda and a small amount of water is one of the most effective non-toxic ways to break down polymerized grease. Apply the paste to the affected areas and let it sit for at least fifteen to twenty minutes. The alkaline nature of the baking soda works to lift the acidic grease from the surface without scratching the metal or plastic.
For even more difficult spots, particularly on the heating element or the ceiling of the air fryer, a steam-based approach can be highly effective. Place a heat-safe bowl filled with water and lemon slices inside the basket and run the air fryer at a low temperature for five minutes. The steam will soften the grease, making it much easier to wipe away with a microfiber cloth. It is crucial to avoid using steel wool or harsh metal scrapers, as these will permanently damage the non-stick coating and can lead to rust. Always finish a deep grease-removal session by wiping the area with a clean, damp cloth to ensure no cleaning residue remains, which could otherwise create unpleasant fumes during the next cooking cycle.
Quick Daily Habits to Extend Air Fryer Life
Extending the life of your air fryer doesn't always require heavy scrubbing; it often comes down to the small habits you practice every time you cook. These quick actions prevent the need for aggressive cleaning and protect the sensitive components of the device from unnecessary wear and tear. By being mindful of how you use the machine, you can keep it running like new for many years.
- Use Liners Judiciously: Perforated parchment paper or silicone liners can catch most of the drippings, keeping the basket significantly cleaner.
- Avoid Excess Oil: Only use the amount of oil specified in recipes. Excessive oil contributes to smoking and creates a buildup that is difficult to remove.
- Shake the Basket: Regularly shaking the basket ensures food doesn't stick to the bottom and promotes even cooking without leaving charred bits behind.
- Cool Down Before Cleaning: Never plunge a hot basket into cold water, as the thermal shock can warp the metal or cause the non-stick coating to peel.
- Proper Storage: Store the air fryer in a dry place with the basket slightly ajar to allow for air circulation, preventing musty odors.
Implementing these habits reduces the friction and heat stress on the appliance. When you minimize the amount of burnt-on food and grease from the start, the daily wipe-down becomes a breeze, and the deep-clean intervals can be spaced further apart without compromising the unit's health.
When to Move from a Wipe Down to a Deep Clean
Knowing when your air fryer has crossed the line from "generally clean" to "needing a deep clean" is vital for maintaining food quality. The most obvious sign is the presence of smoke during operation. If you notice thin wisps of white smoke when cooking non-fatty foods, it is a clear indicator that old grease is burning on the heating element or the internal walls. Similarly, if your kitchen begins to smell like the previous meal as soon as the air fryer starts to warm up, it means there is organic residue trapped somewhere in the system that a standard wipe down hasn't reached.
Another sign to look for is a change in the texture of the internal surfaces. If the walls of the cooking chamber feel tacky or sticky to the touch even after a wash, you are dealing with polymerized oil. This layer will continue to grow and eventually flake off into your food if not addressed with a deep cleaning. You should also inspect the fan and heating coil periodically with a flashlight. If you see visible buildup or "gunk" clinging to the coils, it is time for a thorough scrubbing. Ignoring these signs not only ruins the flavor of your food but can also lead to the appliance overheating as the internal airflow becomes restricted by debris.
Best Tools for Routine and Heavy Duty Cleaning
The right tools make the difference between a frustrating chore and an efficient maintenance routine. For daily cleaning, the goal is gentleness to preserve the non-stick coating. For heavy-duty cleaning, the goal is effective agitation and grease breakdown. Using the wrong tool-like a metal scouring pad on a non-stick surface-can ruin the appliance in seconds. Below is a guide to the essential kit for air fryer owners.
| Tool Category | Routine Maintenance | Heavy Duty Cleaning |
|---|---|---|
| Scrubbers | Soft microfiber cloth. | Soft-bristled nylon brush. |
| Cleaning Agents | Mild liquid dish soap. | Baking soda or enzymatic degreaser. |
| Detailing | Damp paper towel. | Cotton swabs or toothbrushes. |
| Drying | Air dry or lint-free towel. | Clean microfiber for buffing. |
Having a dedicated set of cleaning tools for your air fryer is a smart move. An old toothbrush is perfect for getting into the holes of the air fryer basket, while a non-scratch scrub sponge can handle the main surfaces. For the exterior, a simple glass cleaner or a vinegar-water solution can keep the stainless steel or plastic housing looking professional and smudge-free without the use of harsh industrial chemicals.
Preventing Smoke and Odors with Proper Maintenance
Smoke and odors are the most common complaints among air fryer users, yet they are almost entirely preventable through proper maintenance. Smoke is typically caused by oil or food particles hitting the high-heat heating element. This happens when the basket is overfilled, or when light foods (like kale or bread) are blown upward by the powerful fan. To prevent this, ensure that there is at least an inch of clearance between the food and the heating element. If smoke does occur, it is an immediate signal that a deep clean of the heating coil is required once the unit cools.
Odors, on the other hand, are usually the result of trapped grease in the "hidden" parts of the machine, such as the area behind the fan or the seals of the drawer. These fats turn rancid over time and release unpleasant smells when heated. A simple way to combat this is to perform a monthly "neutralization cycle." After a deep clean, run the air fryer at 400 degrees Fahrenheit for five minutes with nothing inside but a small oven-safe dish containing a mixture of water, lemon juice, and a tablespoon of white vinegar. This helps to neutralize any remaining airborne particles and leaves the interior smelling fresh. Always ensure the unit is fully dry after this process to prevent any moisture from sitting in the internal components.
Complete Air Fryer Hygiene Checklist for Better Flavor
A clean air fryer directly translates to better-tasting food. When the air circulating inside is clean, your fries stay crisp and your chicken stays juicy without any "off" flavors from yesterday's fish or last week's bacon. Use this checklist to ensure every part of your appliance is hygienically sound and ready for high-performance cooking. By following these steps, you ensure that your air fryer remains a healthy tool for your kitchen.
- Daily: Wash basket and tray in warm soapy water after every use.
- Daily: Wipe the exterior touchpoints and handle to remove oils.
- Weekly: Inspect the heating element for any visible food splatter.
- Weekly: Wipe down the internal walls of the air fryer chamber.
- Monthly: Deep clean the heating coil with a soft brush and degreaser.
- Monthly: Soak the basket and tray in a baking soda solution to remove build-up.
- As Needed: Use a steam clean (lemon/water) to refresh the interior scent.
- Always: Ensure the unit is completely dry before plugging it back in.
Following this comprehensive checklist ensures that no part of the maintenance process is overlooked. It moves cleaning from a reactive task-something you do only when the machine smells or smokes-to a proactive habit that guarantees consistent results. A well-maintained air fryer is not just about aesthetics; it is about providing the best possible environment for your food to cook quickly, evenly, and healthily.


Comments