Transitioning from the boil to the fermenter is a critical race against time in homebrewing, making the choice between a dedicated wort chiller and a traditional ice bath a pivotal decision for the quality of your beer. While an ice bath is a budget-friendly starting point for small-batch brewers, it often struggles with speed and consistency, increasing the window for potential bacterial contamination and DMS production. In contrast, employing a wort chiller-whether immersion, plate, or counterflow-utilizes rapid heat exchange to drop temperatures in a fraction of the time, ensuring a professional-grade "cold break" that results in clearer beer and healthier yeast pitching. By weighing the efficiency, water consumption, and labor involved in each method, you can select the cooling strategy that best protects your flavor profile and streamlines your brew day workflow.
| Feature | Ice Bath | Wort Chiller (Immersion/Plate) |
|---|---|---|
| Cooling Speed | Slow (45-60+ minutes) | Rapid (10-20 minutes) |
| Batch Capacity | Limited; best for <3 gallons | Scalable; ideal for 5-20+ gallons |
| Upfront Cost | $0 - $10 (Cost of ice) | $50 - $150+ (Equipment investment) |
| Physical Effort | High (Stirring, lifting, hauling ice) | Low (Hose connection and monitoring) |
| Contamination Risk | Higher (Splashing, external bacteria) | Lower (Internalized cooling/boiled unit) |
| Water Efficiency | High (Static water/ice use) | Moderate (Continuous flow-through) |
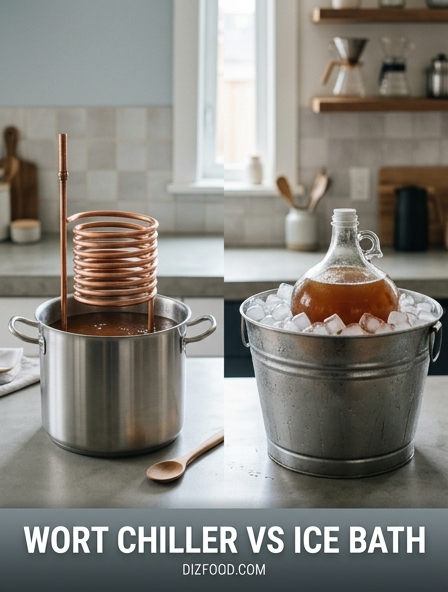
Wort Chiller vs Ice Bath Cooling Speed
In the world of homebrewing, the speed at which you cool your wort from boiling temperatures to yeast-pitching range is a critical factor for beer quality. Comparing an immersion wort chiller to a traditional kitchen ice bath reveals a significant disparity in thermal efficiency. An immersion chiller, typically made of copper or stainless steel, works by running cold tap water through coils submerged directly in the hot liquid. This creates a high-surface-area heat exchanger that can drop the temperature of a five-gallon batch from 212°F to 70°F in approximately 15 to 20 minutes, depending on the temperature of the source water.
Conversely, an ice bath relies on conduction through the walls of the brew kettle. Because the cooling medium is outside the vessel, the heat must travel through the metal pot and into the surrounding slush. Without constant agitation of both the wort and the ice water, thermal layers form, insulating the hot center of the pot. A standard ice bath often takes 45 to 60 minutes to reach the same target temperature. This duration can fluctuate wildly based on the volume of ice used and the size of the sink. For brewers moving beyond small one-gallon batches, the time saved by a dedicated chiller is often the most compelling reason to move away from the kitchen sink method.
Benefits of Using an Immersion Chiller
The primary advantage of an immersion chiller lies in its simplicity and direct contact with the wort. Unlike plate chillers or counterflow chillers, which require pumping the wort through external hoses, the immersion chiller is dropped directly into the kettle during the last fifteen minutes of the boil. This ensures the coil itself is sanitized by the boiling liquid, eliminating the need for separate chemical sanitization steps. Once the boil is over, the water flow is turned on, and the cooling process begins instantly.
Beyond speed, immersion chillers offer better control over the final temperature. By monitoring the outflow water or using a digital thermometer, a brewer can precisely hit the desired pitching temperature for specific yeast strains. They are also remarkably easy to maintain; since the wort only touches the outside of the coils, a simple rinse with a garden hose or a soak in a cleaning solution is usually sufficient to keep the equipment in top condition. Furthermore, copper models take advantage of the metal's superior thermal conductivity, which is significantly higher than that of stainless steel or the ambient air of a kitchen. Using a chiller reduces the physical labor involved in brewing, as there is no need to lift a heavy, boiling-hot kettle into a sink filled with water, thereby reducing the risk of spills or burns in the kitchen environment.
Homebrew Ice Bath Pros and Cons
The ice bath remains a staple for many beginning brewers because it requires zero specialized equipment beyond what is already found in a standard kitchen. However, as production scales, the limitations of this method become more apparent. Below is a comparison of the factors involved in using a kitchen sink ice bath.
| Factor | Pros | Cons |
|---|---|---|
| Initial Cost | Zero investment; utilizes existing sink and ice. | Recurring cost of purchasing bags of ice for every brew. |
| Space Requirements | No extra storage needed for bulky equipment. | Requires a large sink or tub and space for ice storage. |
| Physical Labor | Minimal setup of equipment. | High risk of back strain from lifting heavy, hot kettles. |
| Effectiveness | Works well for small 1-2 gallon batches. | Very slow for 5-gallon batches; prone to "warm spots." |
While the lack of upfront cost is appealing, the inefficiency often leads to frustration. Brewers often find that they need upwards of 20 to 30 pounds of ice to effectively cool a full batch, which can quickly exceed the cost of a basic copper chiller over the course of a single year. Additionally, the risk of getting sink water into the wort while maneuvering the kettle is a constant concern for sanitation.
Achieving a Fast Cold Break
The "cold break" is a crucial biochemical event that occurs when wort is cooled rapidly. It involves the precipitation of proteins, hop resins, and tannins out of the liquid. When the temperature drops quickly, these elements clump together and settle at the bottom of the kettle as trub. Achieving a vigorous cold break is essential for producing clear beer and ensuring long-term shelf stability. If the cooling process is too slow, as is often the case with a standard ice bath, these proteins remain suspended, leading to "chill haze" where the beer becomes cloudy when refrigerated.
A fast cold break also helps in the reduction of Dimethyl Sulfide (DMS) precursors. DMS is a compound that can impart flavors of cooked corn or cabbage to the finished beer. It is produced as long as the wort is hot, but it only boils off during the actual boil. Once the heat is turned off, DMS continues to be produced but is no longer being evaporated. By using a wort chiller to plummet the temperature through the 140°F to 180°F range as fast as possible, the brewer minimizes the window of time in which DMS can build up. This results in a cleaner, more professional-tasting profile that is difficult to achieve with the slower transition times of an ice bath.
Wort Cooling and Contamination Risks
The period between the end of the boil and the pitching of yeast is known as the "danger zone." At boiling temperatures, the wort is sterile, but as it cools below 140°F, it becomes a highly nutritious environment for wild yeast and bacteria. The longer the wort stays in this temperature range without the protection of a robust yeast colony, the higher the risk of infection. An immersion chiller minimizes this window of vulnerability by moving the wort through the danger zone in a fraction of the time required by an ice bath.
Sanitation risks also differ between the two methods. With an immersion chiller, the primary risk is the cleanliness of the coils, which is easily managed by the heat of the boil. With an ice bath, the risks are often external. Splashing kitchen tap water or melted ice water into the kettle can introduce contaminants. Furthermore, the need to stir the wort to speed up cooling in an ice bath increases the exposure to airborne microbes. If a brewer uses an unsanitized spoon to stir the cooling wort, the risk of "off-flavors" or a ruined batch increases significantly. Rapid cooling with a closed-system chiller or a sanitized immersion coil allows the brewer to keep the kettle lid partially on, providing a physical barrier against dust and fruit flies while the liquid reaches pitching temperature.
Comparing Cost of Chilling Methods
When analyzing the cost of chilling methods, brewers must look at both the initial capital expenditure and the long-term operational costs. An ice bath appears free at first glance, but for a standard 5-gallon batch, the cost of ice can be surprising. If you do not have a high-capacity home ice maker, you may need to purchase three to four 10-pound bags of ice per brew day. At an average of $3.00 per bag, a brewer might spend $12.00 per session. Over ten brew days, the cost of ice reaches $120.00, which is more than the price of a high-quality copper immersion chiller.
An immersion chiller typically costs between $50 for a basic 25-foot copper model to $150 for a large, high-efficiency stainless steel version. Once purchased, the only recurring cost is the price of tap water. In most municipalities, the cost of running water for 20 minutes is negligible, often amounting to pennies. While the initial investment for a chiller is higher, it generally pays for itself within the first year of frequent brewing. Additionally, the value of the brewer's time should be considered; saving 40 minutes per brew session allows for a more streamlined hobby experience, which many consider worth the upfront price of the hardware.
Water Efficiency in Wort Cooling
Water usage is a common concern for environmentally conscious homebrewers. Immersion chillers are often criticized for "wasting" water, as several gallons of tap water are sent down the drain during the process. However, the water coming out of a chiller is clean and hot, making it ideal for reclamation. Many brewers collect the first 5 to 10 gallons of discharge in a separate bucket to use for cleaning their brewing equipment, carboys, and kegs after the brew day is finished. It can also be used for watering a garden once it has cooled down.
In contrast, an ice bath uses a set volume of water and ice, which might seem more efficient. However, the cooling potential of an ice bath is limited. Once the ice melts and the bath water warms up, the cooling stops unless the water is drained and replaced with fresh ice. This "hidden" water usage can add up if the brewer has to refill the sink multiple times. To maximize efficiency with a chiller, brewers often use a "pre-chiller" or a small submersible pump in a bucket of ice water once the wort reaches about 100°F. This allows them to use a closed loop for the final, most difficult degrees of cooling, significantly reducing the total volume of water needed from the tap.
Step by Step Ice Bath Method
If you are brewing a small batch or have not yet invested in a chiller, following a disciplined process will maximize the efficiency of an ice bath. Success depends on maximizing the temperature differential and maintaining movement in the fluids.
- Prepare the Sink: Clear the kitchen sink and sanitize the area. Fill the sink about one-third full with cold water before the boil ends.
- Add Salt: Add a generous amount of rock salt to the water. This lowers the freezing point of the water, allowing the slush to stay colder than 32°F.
- Position the Kettle: Carefully lower the hot kettle into the water. Ensure the water level outside is higher than the wort level inside, but not so high that it spills into the pot.
- Add Ice: Dump at least 20 pounds of ice into the water surrounding the kettle.
- Agitate the Fluids: Use a sanitized spoon to gently stir the wort in a circular motion. Simultaneously, move the kettle slightly or stir the ice water. This prevents thermal pockets from forming.
- Monitor and Replace: Check the temperature every 10 minutes. If the ice has completely melted and the wort is still above 80°F, drain some of the warm water and add fresh ice.
By constantly moving the liquid, you facilitate better heat transfer through the kettle walls, which can shave 15 minutes off the total cooling time compared to a static bath.
When to Upgrade to a Wort Chiller
Deciding when to transition from a kitchen ice bath to a dedicated wort chiller usually depends on three factors: batch volume, frequency of brewing, and desire for beer clarity. For those brewing one-gallon "extract" batches on a stove, an ice bath is perfectly adequate. The small thermal mass is easily managed by a standard sink and a single bag of ice. However, once a brewer graduates to five-gallon batches, the thermal mass increases by fivefold, making the ice bath method labor-intensive and incredibly slow.
Another signal for an upgrade is the move to "all-grain" brewing. All-grain worts often contain more proteins and precursors for DMS than extract-based worts, making a rapid cold break essential for quality. If you find yourself consistently frustrated by cloudy beer or spend more than 45 minutes waiting for your wort to reach pitching temperature, it is time to upgrade. Additionally, if the physical act of lifting 40 pounds of boiling liquid into a sink is becoming a safety concern or a strain on your back, the convenience of an immersion chiller becomes a matter of safety rather than just a luxury. The upgrade marks the transition from a casual kitchen hobbyist to a more technical homebrewer focused on consistency and process control.
Final Verdict on Homebrew Cooling
Choosing between an immersion chiller and an ice bath ultimately depends on the brewer's goals and scale. The ice bath is the undisputed champion of the "entry-level" experience. It requires no specialized plumbing, no storage space for copper coils, and works sufficiently for small-scale experiments. For the occasional brewer making small batches once or twice a year, the simplicity of the kitchen sink is hard to beat. It teaches the fundamentals of temperature management without a significant financial hurdle.
However, for the serious hobbyist, the immersion chiller is a transformative piece of equipment. The speed of cooling directly impacts the clarity, flavor, and safety of the beer. It reduces the "danger zone" exposure, ensures a crisp cold break, and saves hours of time over the course of several brew days. While there is a moderate upfront cost and a need for water management, the benefits in beer quality and physical ease far outweigh these minor drawbacks. For anyone brewing five gallons or more, or anyone brewing more than once a month, the investment in a wort chiller is the single most effective way to level up the homebrewing process. The efficiency, repeatability, and safety it brings to the kitchen make it a staple of modern home production.

Comments