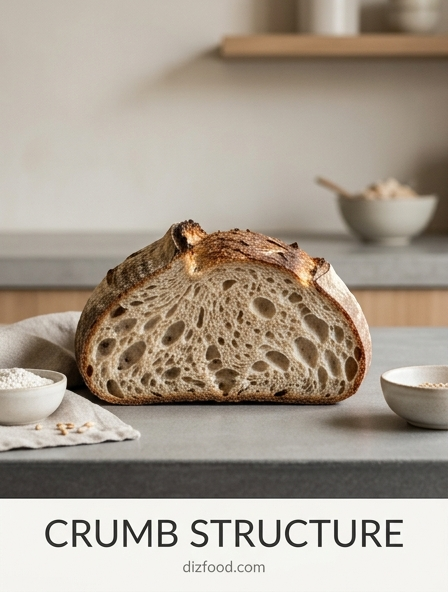
Understanding Bread Density and Crumb
The crumb structure of bread refers to the pattern of air cells trapped within the loaf after it has been baked. This internal architecture is primarily determined by the hydration level of the dough and the strength of the gluten network. A high-hydration dough, common in sourdough or ciabatta, often results in an open, airy crumb with large, irregular holes. Conversely, enriched doughs or those with lower hydration levels produce a tight, fine crumb that is ideal for sandwich breads. Understanding these differences is essential when considering how the bread will react to subsequent heating or toasting processes.
The density of the crumb dictates how heat travels through the slice. A dense crumb requires more energy to penetrate the center, whereas an open crumb allows hot air to circulate through the voids, creating a different sensory experience. The following table illustrates the typical characteristics of various crumb types:
| Crumb Type | Characteristics | Common Examples |
|---|---|---|
| Open | Large alveoli, chewy texture | Sourdough, Baguette |
| Closed/Tight | Small uniform cells, soft | Brioche, Pull-man Loaf |
| Irregular | Varied cell sizes, rustic | Focaccia, Ciabatta |
The Science of Moisture and Heat
When heat is applied to the crumb structure, two primary physical transformations occur: evaporation and the Maillard reaction. As the bread reaches temperatures above 212°F (100°C), the residual moisture within the starch granules begins to turn into steam. This process is crucial for reviving stale bread, as it temporarily re-gelatinizes the starches, making the interior soft again. However, if heat is applied for too long without moisture control, the crumb becomes overly dry and brittle, losing its palatable elasticity.
Simultaneously, the Maillard reaction begins on the surface where proteins and sugars interact under high heat. This reaction is responsible for the complex flavors and golden-brown hues associated with toasted bread. To achieve the perfect balance, one must manage the rate of moisture loss against the speed of browning. Factors influencing this balance include:
- Initial water content of the loaf.
- The presence of fats or sugars in the dough.
- The surface-area-to-volume ratio of the slice.
- The ambient humidity of the kitchen environment.
Effective heat application ensures that the exterior reaches the desired crispness while the internal crumb retains enough moisture to remain tender and flavorful during consumption.
Adjusting Toaster Temperature Settings
Most modern toasters utilize infrared radiation to heat the bread surface rapidly. Adjusting the temperature or "darkness" settings is not merely about color; it is about managing the thermal gradient of the crumb. For bread with a tight, dense crumb, a lower setting for a longer duration is often preferable. This allows the heat to migrate to the center of the slice without carbonizing the exterior. If a high heat is used on a dense slice, the outside may burn while the inside remains cold and damp.
For breads with an open crumb and high moisture, such as artisanal sourdough, a higher setting can be beneficial. The large air pockets allow for faster heat distribution, and the high heat quickly crisps the thin walls of the alveoli. Consider these general guidelines for toaster settings:
- Low Setting: Best for frozen slices or enriched, sugary breads like brioche to prevent scorching.
- Medium Setting: Ideal for standard white or whole wheat sandwich loaves with a uniform crumb.
- High Setting: Suitable for thick-cut, high-hydration rustic breads that require intense heat to achieve a crunch.
Properly calibrated settings ensure that the structural integrity of the crumb is maintained while enhancing its textural contrast.
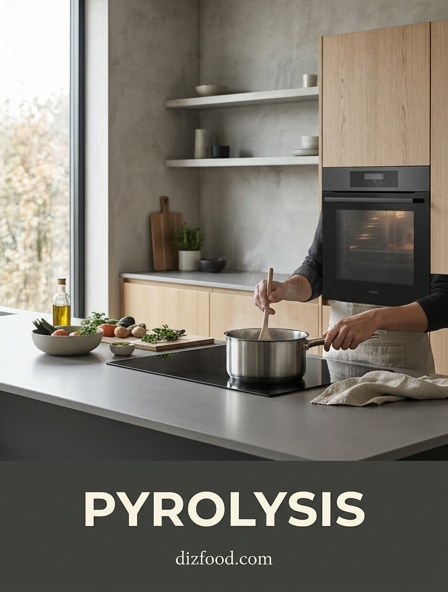
Manual Toasting in the Skillet
Toasting in a skillet offers a level of control and flavor development that automated toasters cannot replicate. This method utilizes conductive heat, where the bread is in direct contact with a hot surface, usually aided by a thin layer of fat. The skillet method is particularly effective for thick slices where the goal is a "fried" exterior texture and a warm, steamy interior. Because the heat is applied to one side at a time, the cook can monitor the progression of the Maillard reaction visually and tactilely.
To achieve an even toast across a rustic crumb, it is often necessary to use a weight or to press down slightly with a spatula. This ensures that the high points of an irregular crumb make contact with the pan. The skillet method also allows for the addition of aromatics like garlic or herbs, which infuse into the crumb as it heats. Using a heavy-bottomed pan, such as cast iron, provides the most consistent heat retention, preventing hot spots that could lead to uneven browning. This manual approach transforms the bread from a simple side into a central component of the culinary presentation.
Oven Roasting for Rustic Crusts
The oven is the superior choice when preparing large quantities of toast or when dealing with exceptionally thick, rustic loaves that would not fit in a standard toaster. Oven roasting utilizes convective heat, which surrounds the bread, drying the surface more uniformly. This is the ideal method for creating crostini or bruschetta, where a sturdy, fully-dried crumb is required to support heavy toppings. By placing slices on a wire rack over a baking sheet, air can circulate around both sides, eliminating the need for flipping.
To maintain a soft interior while achieving a rustic crust, a high temperature (around 400°F) for a shorter period is recommended. This creates a quick sear on the outside. If a crunchy, cracker-like texture is desired throughout, a lower temperature (300°F) for a longer duration will slowly dehydrate the crumb. This technique is especially useful for breads with large inclusions like nuts or seeds, as the oven gently toasts these components along with the flour-based crumb, deepening the overall flavor profile of the slice.
Slicing Techniques for Even Texture
The way bread is sliced significantly impacts how the crumb responds to heat. An uneven slice will result in "hot spots," where thinner sections overcook or burn before the thicker sections are properly toasted. To achieve a professional result, using a high-quality serrated knife is non-negotiable. The teeth of the knife should saw through the crust without compressing the delicate internal crumb. Pressing down too hard during slicing collapses the air cells, leading to a gummy, dense texture once heated.
For most applications, a thickness of 0.5 to 0.75 inches is ideal. This provides enough structural mass to hold moisture in the center while allowing the surfaces to crisp. When dealing with very airy breads like ciabatta, slightly thicker slices are often better to prevent the bread from becoming too fragile. The following list outlines the steps for a perfect slice:
- Position the bread on a stable cutting board.
- Use a long, serrated blade to maximize the stroke length.
- Apply minimal downward pressure, letting the weight of the knife do the work.
- Maintain a consistent vertical angle to ensure uniform thickness from top to bottom.
Applying Fats for Surface Crispness
The application of fats-such as butter, olive oil, or rendered animal fats-serves as a heat-conducting medium that accelerates the browning process while adding flavor. When fat is applied to the crumb before heating, it fills the small pores and creates a barrier that traps internal moisture. This results in a distinctive "crunch" that is different from the "snap" of dry-toasted bread. In a skillet or oven, the fat fries the surface of the crumb, leading to a more uniform and golden color.
The timing of the application is critical. Applying butter to cold bread before toasting results in a deeply infused flavor as the fat melts into the crumb. Conversely, applying butter to already hot toast allows it to sit on the surface, preserving the initial crispness of the toasted edges. For the best texture in a skillet, brushing the bread with melted fat or oil ensures even coverage. This is particularly important for breads with an open crumb, as the fat can reach deep into the large holes, ensuring that every part of the bite is seasoned and perfectly textured.
Steam Control for Soft Interiors
In professional kitchens, steam is often used to manipulate the crumb's texture during reheating. If bread has become dry or "stale" due to starch retrogradation, introducing a small amount of moisture can be transformative. Steam works by penetrating the dried-out starch network and re-hydrating the molecules, returning the crumb to its original soft state. This is why many high-end toasters now include a small water reservoir or a "steam" function.
For home cooks, this can be replicated by lightly spritzing a loaf with water before placing it in a hot oven, or by placing a shallow pan of water on the bottom rack. For individual slices, wrapping the bread loosely in a damp paper towel and microwaving it for a few seconds can soften the crumb, though this must be followed by a quick toast to restore the crust. Managing steam effectively prevents the common issue of bread becoming "leathery" or excessively hard. By controlling the humidity, you ensure that the internal crumb remains supple and pleasant to eat, contrasting perfectly with a crisp exterior.
The Impact of Toasting Duration
The duration for which bread is exposed to heat determines the final moisture content and structural rigidity of the crumb. A short duration at high heat primarily affects the surface, leaving the interior unchanged. This is often preferred for fresh, high-quality artisanal loaves. As the duration increases, the heat penetrates deeper into the crumb, eventually evaporating the majority of the internal moisture. This transition from "toasted" to "dried" is a fine line that defines the culinary use of the bread.
Understanding the stages of toasting can help in achieving specific results for different recipes. The table below describes the transformation of the crumb over time:
| Duration | Crumb State | Best For |
|---|---|---|
| Short (1-2 min) | Warm, soft, minimal color | Soft rolls, brioche |
| Medium (3-4 min) | Golden surface, slightly firm | Sandwiches, breakfast toast |
| Long (5+ min) | Fully dehydrated, brittle | Croutons, soup dipping |
Careful monitoring of the time ensures that the crumb does not reach the stage of carbonization, which introduces bitter flavors and an unpleasant gritty texture.
Preserving Texture After Heating
Once bread has been heated to the desired level, the way it is handled during the cooling phase is vital to preserving its texture. As soon as the heat source is removed, the bread begins to release steam. If the toast is placed immediately onto a flat, cold plate, this steam becomes trapped against the surface of the bread, leading to condensation. This process, often called "sweating," quickly turns a perfectly crisp crust and airy crumb into a soggy, limp mess.
To prevent this, heated bread should be placed on a wire cooling rack or leaned against another slice in a "tent" shape to allow for maximum airflow. This allows the steam to escape into the air rather than being reabsorbed by the crumb. If the bread is to be served in a basket, lining the basket with a breathable cloth napkin can help manage moisture. Promptly serving the bread is also essential, as the gelatinized starches will begin to firm up again as the temperature drops. Proper post-heating management ensures that the effort put into achieving the perfect crumb structure is not wasted before the first bite.


Comments