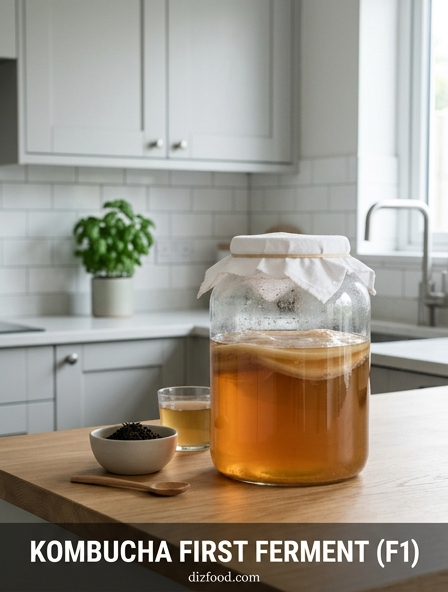
Understanding the Primary Fermentation Phase
The primary fermentation phase, commonly known as F1, is the foundational stage of kombucha brewing. During this period, a symbiotic culture of bacteria and yeast, or SCOBY, is introduced to a base of sweetened tea. The yeast consumes the sucrose, converting it into ethanol and carbon dioxide, while the bacteria oxidize the ethanol into acetic and gluconic acids. This biochemical transformation results in the characteristic tangy profile of the beverage. The process is aerobic, meaning it requires oxygen to flourish, which is why the vessel is covered with a breathable fabric rather than a solid lid.
- The SCOBY acts as a living filter, protecting the liquid from wild pathogens.
- F1 typically lasts between seven to fourteen days depending on ambient conditions.
- A new "baby" pellicle usually forms on the surface, indicating healthy microbial activity.
- The pH level should drop significantly, ideally reaching a range between 2.5 and 3.5.
Success in F1 relies heavily on the quality of the starter tea and the health of the culture. Maintaining a consistent environment ensures that the yeast and bacteria remain in balance, preventing one from dominating the other and ruining the final flavor profile.
Essential Equipment for Two Stage Brewing
To successfully execute a two-stage brewing process, specific hardware is required to maintain hygiene and facilitate the transition from aerobic to anaerobic states. The primary vessel should be made of lead-free glass or food-grade ceramic to withstand the high acidity of the ferment. Plastic is generally avoided due to potential chemical leaching and scratching, which can harbor unwanted bacteria. Additionally, precise measuring tools are necessary to ensure consistency across different batches of brew.
| Equipment Item | Purpose in Brewing |
|---|---|
| Glass Carboy or Jar | Primary vessel for F1 fermentation. |
| Breathable Cloth | Allows gas exchange while blocking pests. |
| Adhesive Thermometer | Monitors liquid temperature in real-time. |
| Flip-Top Bottles | Pressure-rated glass for carbonation. |
Beyond the vessels, a high-quality stainless steel or plastic funnel is essential for mess-free transferring. Using a dedicated siphoning kit can also minimize agitation and prevent the oxidation of the delicate tea base during the transition to the bottling phase.
Yeast Management for Optimal Flavor
Managing the yeast population is critical for achieving a clean, crisp kombucha flavor. When yeast becomes overactive, usually due to high temperatures, the brew may develop a yeasty, bread-like aroma or become excessively vinegary too quickly. Yeast naturally settles at the bottom of the vessel as brown, stringy clusters. Controlling these populations ensures that the bacteria have enough ethanol to convert into beneficial acids without creating an unbalanced alcoholic content.
- Filter the starter tea from the top of the previous batch where yeast concentration is lower.
- Stir the brew thoroughly before bottling to distribute the yeast evenly if a consistent carbonation is desired.
- Periodically trim the bottom of the SCOBY pellicle to remove old, dormant yeast cells.
- Keep the brewing temperature below 80°F to prevent yeast over-multiplication.
By observing the color and density of the yeast sediment, a brewer can adjust their technique. Excessive sediment often suggests the need for a cooler fermentation environment or a shorter F1 cycle to keep the flavors light and refreshing rather than heavy and fermented.
Monitoring Specific Gravity and Activity
While many homebrewers rely on taste, monitoring specific gravity provides a scientific approach to tracking sugar depletion. Using a hydrometer or a refractometer allows the brewer to see exactly how much sugar the SCOBY has consumed. This data is invaluable for replicating successful batches and determining the exact moment to move to secondary fermentation. Visual cues, while less precise, complement these readings by showing the physical health of the culture.
- Initial specific gravity for sweet tea usually falls between 1.040 and 1.060.
- A finished F1 typically shows a drop of 0.020 to 0.030 points.
- Bubbles trapped beneath the pellicle indicate active carbon dioxide production.
- The clarity of the liquid will shift from transparent to slightly cloudy as microbes multiply.
Consistent logging of these metrics helps in troubleshooting stalls in fermentation. If the gravity remains static over several days, it indicates that the SCOBY may be dormant or the temperature is too low. Conversely, a rapid drop suggests the brew is progressing faster than expected, requiring an earlier harvest to avoid over-acidification.
Transitioning to Secondary Fermentation
The transition from F1 to secondary fermentation (F2) marks the shift from an aerobic process to an anaerobic one. This is the stage where flavorings are added and carbonation is built. Timing is crucial; if the liquid is moved too early, the sugar content may be too high, leading to explosive pressure. If moved too late, the lack of residual sugar will result in a flat, overly sour drink that lacks the desired effervescence.
- Sanitize all bottles and funnels to prevent contamination.
- Remove the SCOBY and set aside two cups of starter tea for the next batch.
- Add fruit purées, juices, or botanicals to the bottles.
- Fill the bottles with the F1 liquid, leaving about one to two inches of headspace.
- Seal the bottles tightly with swing-top lids to trap carbon dioxide.
During this transition, the brewer must balance the infusion of new sugars from fruit with the remaining yeast activity. The sealed environment forces the CO2 produced by the yeast to dissolve into the liquid, creating the natural fizz that characterizes high-quality kombucha.
Clarification Techniques and Sediment Control
Aesthetics and mouthfeel are greatly improved through proper clarification and sediment control. While kombucha is naturally cloudy due to suspended yeast and bacterial cellulose, excessive sediment can lead to off-flavors and an unappealing texture. Managing this begins at the end of F1 and continues through the bottling process. Many brewers prefer a clear, champagne-like appearance which requires deliberate steps to filter out the particulate matter before the final pour.
- Use a fine-mesh nylon strainer or cheesecloth when transferring liquid to bottles.
- Cold crashing the brew after carbonation helps solids settle firmly at the bottom.
- Avoid stirring the primary fermentation vessel before siphoning to leave sediment undisturbed.
- Pour the final chilled product into a glass in one steady motion, leaving the last bit of sediment behind.
By employing these techniques, the final beverage retains its nutritional value while presenting a professional, polished look. Sediment control also prevents the "volcano effect" where CO2 nucleates on particles, causing the liquid to spray out uncontrollably upon opening the bottle.
Priming Methods for Natural Carbonation
Priming is the act of adding a small amount of fermentable sugar to the bottles to stimulate yeast activity during F2. The type of sugar used significantly impacts the speed of carbonation and the complexity of the bubbles. While white sugar is the most direct fuel source, many brewers utilize the natural sugars found in fruits and honey to add depth to the flavor profile. Calculating the correct amount of priming sugar is essential for safety and quality.
| Priming Agent | Recommended Amount | Carbonation Speed |
|---|---|---|
| Cane Sugar | 1 tsp per 16oz | Moderate |
| Fruit Juice | 2-3 oz per 16oz | Fast |
| Honey | 1.5 tsp per 16oz | Slow/Steady |
| Maple Syrup | 1 tsp per 16oz | Moderate |
It is important to remember that the residual sugar from F1 contributes to this total. If the F1 was harvested while still quite sweet, the amount of priming agent should be reduced to prevent over-pressurization and potential bottle failure.
Managing Temperature During Conditioning
Conditioning refers to the period during F2 when the bottles sit at room temperature to carbonate. Temperature management during this phase is perhaps the most influential factor in achieving the "perfect fizz." Yeast activity doubles with every ten-degree increase in temperature within its viable range. However, excessive heat can lead to "cooked" flavors and poor-quality bubbles that dissipate quickly. A steady, controlled environment is preferable to one with wide fluctuations.
- Place bottles in a dedicated "warm box" or cupboard to maintain 75°F to 80°F.
- Use a seedling heat mat with a thermostat for precise control in winter.
- Store bottles in a plastic bin during conditioning as a safety precaution against bursts.
- Move bottles to the refrigerator immediately once the desired carbonation level is reached.
Cold temperatures stop the yeast from further sugar consumption and help the CO2 stabilize within the liquid. Without a proper cooling phase, the carbonation will remain in the headspace, leading to a loud "pop" but a flat drink once poured into a glass.
Achieving the Perfect Head and Fizz
The hallmark of a well-crafted kombucha is a fine, persistent effervescence and a slight foamy head. This is achieved through the science of gas solubility. Carbon dioxide is more soluble in cold liquids than in warm ones. Therefore, the duration of the refrigeration period is just as important as the fermentation time. High-quality carbonation consists of tiny bubbles that tingle on the tongue rather than large, aggressive bubbles that vanish instantly.
- Chill bottles for at least 24 to 48 hours before opening to fully dissolve CO2.
- Ensure bottles have minimal headspace (around 1 inch) to force gas into the liquid.
- Use fruit purées with high pectin, like berries, which can help retain a foamy head.
- Verify that bottle seals are airtight; even a tiny leak will prevent pressure buildup.
Achieving this balance requires patience. Testing one bottle from a batch before moving the rest to cold storage can save an entire harvest. If the "tester" is flat, the remaining bottles can be left out for another day or two to continue conditioning.
Avoiding Off Flavors in the Final Pour
Off-flavors can arise from various factors, including contamination, poor ingredient quality, or improper fermentation times. A common issue is a "sulfur" or rotten egg smell, often caused by stressed yeast or nutrients lacking in the tea. Another frequent problem is "over-acetification," where the brew tastes more like salad dressing than a beverage. Identifying these issues during the F1 phase allows the brewer to course-correct before bottling the product for F2.
- Always use filtered, chlorine-free water to avoid chemically-induced off-notes.
- Avoid over-steeping tea leaves, which releases bitter tannins that persist through F2.
- Keep the brewing vessel away from direct sunlight to prevent UV rays from skunking the tea.
- Ensure the SCOBY is submerged or moist to prevent the growth of mold or kahm yeast.
If a batch smells medicinal or excessively funky, it is often safer to discard it and start fresh with a clean culture. Maintaining strict sanitation of all "kitchen" tools and surfaces is the most effective way to ensure that every pour is crisp, clean, and delicious.


Comments